Dr. Michael Darveniza PhD, MDSc (Qld), FRACDS
PROSTHODONTIST
“Specialising in crowns, bridges & implants”
www.yourdentalspecialistlismore.com.au
Scroll down and use the arrows to view the different case studies from the beginning to the successful end of the patients treatment.
COMPOSITE RESIN OVERLAYS
-
![Text about temporary composite resin overlay for dental restoration.]()
-
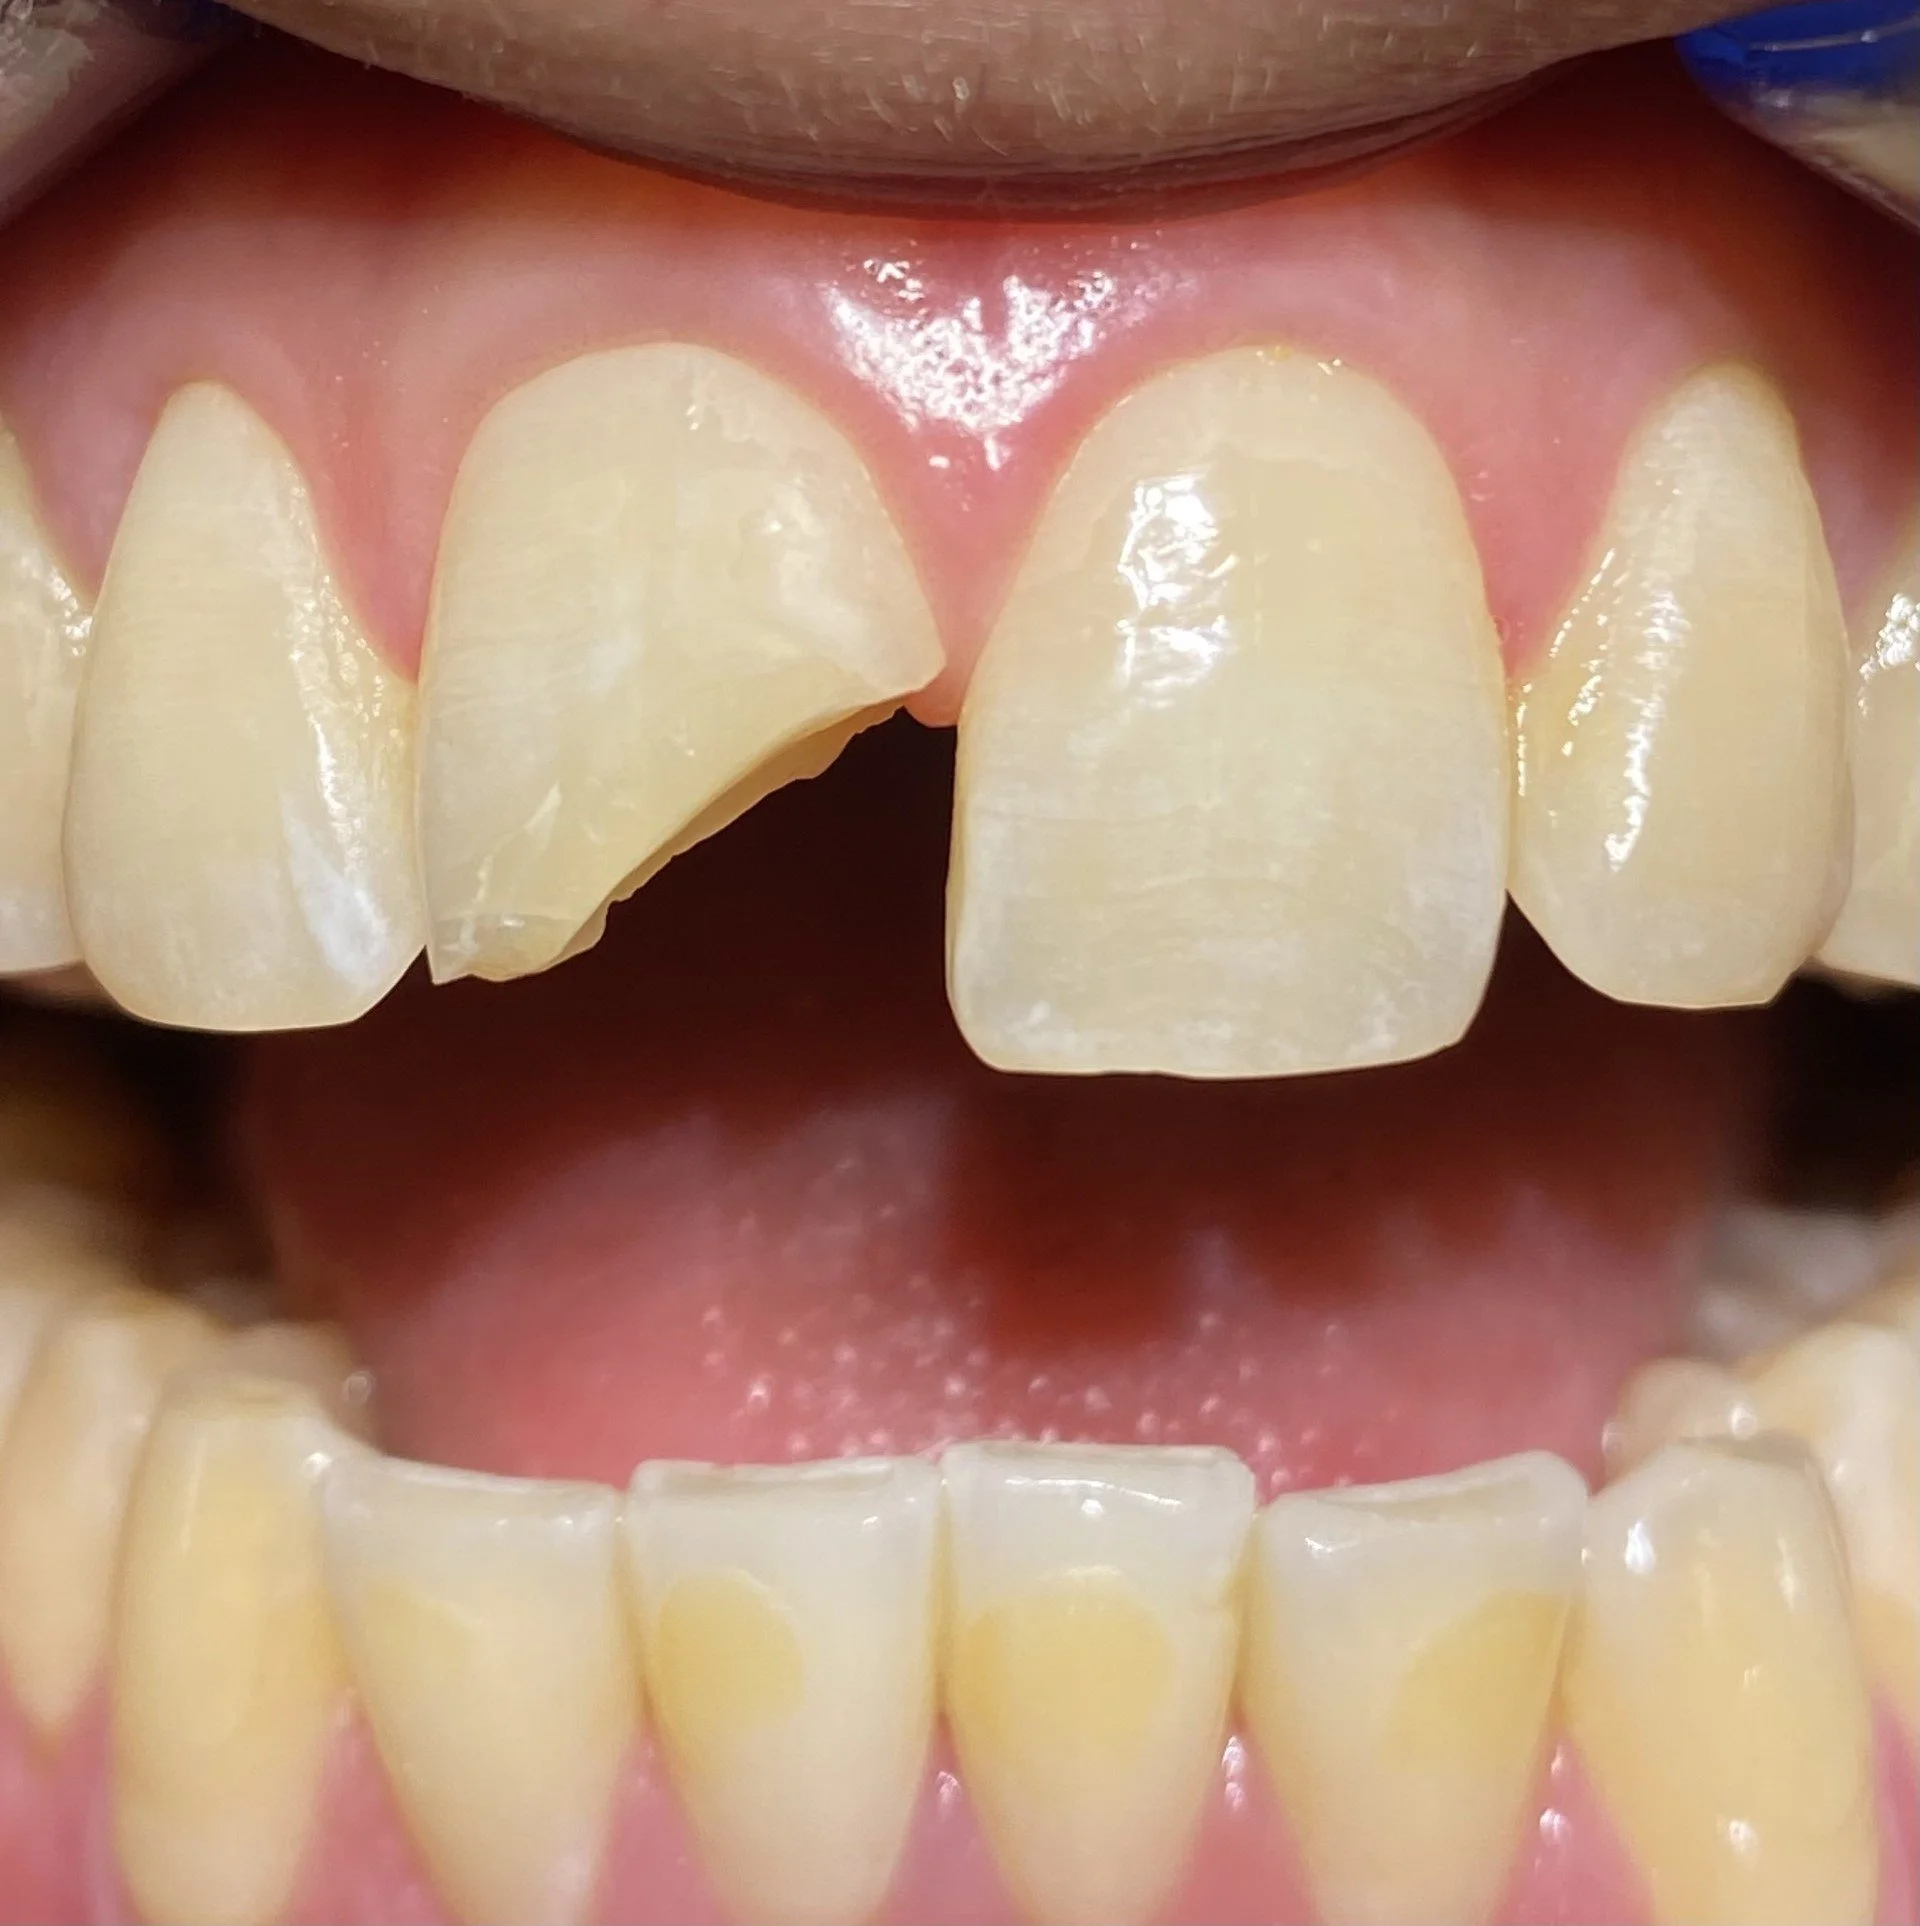
![Close-up of a person's mouth showing a chipped front tooth and facial hair.]()
This 25 year old patient while in Indonesia suffered a surfboard accident and this photo illustrates the fractured tooth. The patient was a close friend and I suggested he go to Singapore and find a Prosthodontist to repair the tooth. He initially decided to fly to the capital of Sumatra, Medan, and visit a Dentist who placed an ordinary bonded filling. This lasted three hours and fell out during his first meal, due to poor cavity tooth wall preparation.
-
![Close-up of a person's front teeth, showing a chipped upper central incisor.]()
The tooth was conservatively drilled by a Singapore Prosthodontist with a 2 mm wide bevel on the front and back of the tooth and then placed a larger bonded filling.
-
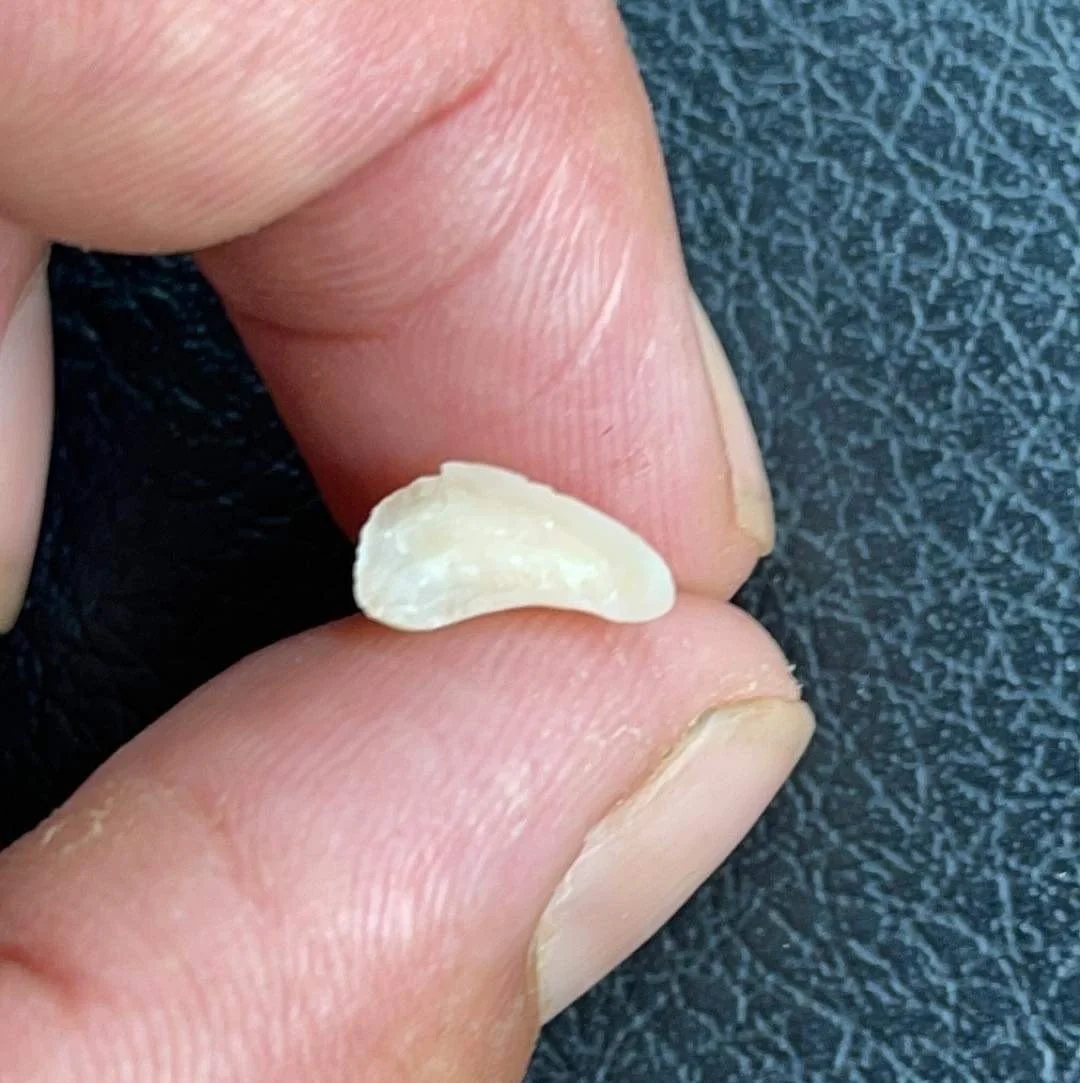
![Close-up of a small, translucent object, possibly a tiny tooth or claw, held between fingers; textured black background.]()
This larger bonded filling that fell out after three years of use while eating dry bread. This also fell out due to inadequate tooth preparation where the walls of the tooth could not resist a rocking motion. In dentistry this is called inadequate resistance form of the cavity and tooth walls or poor engineering. There was no incisal step and no veneer bevels.
-
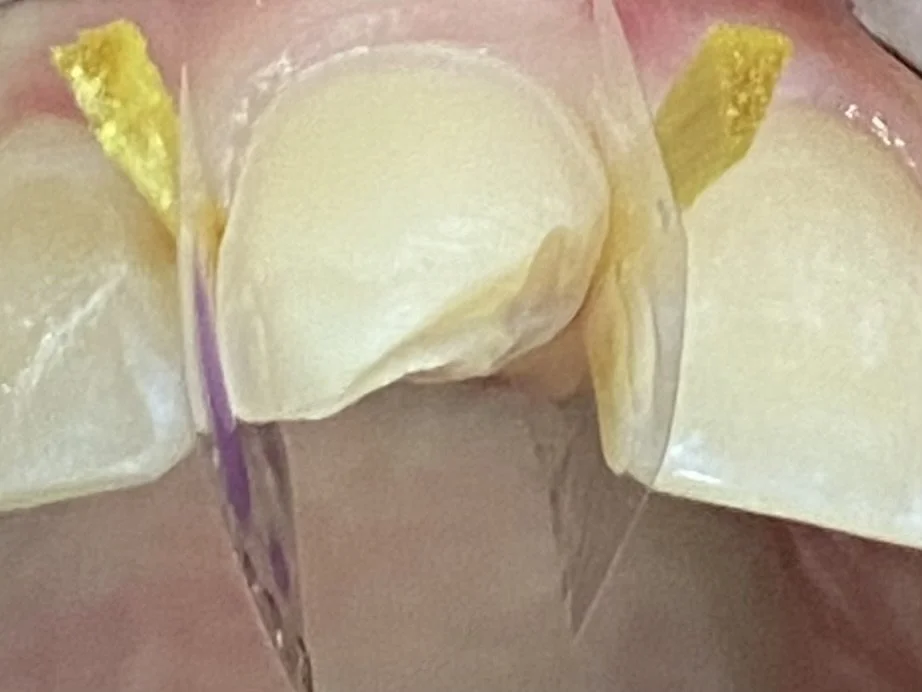
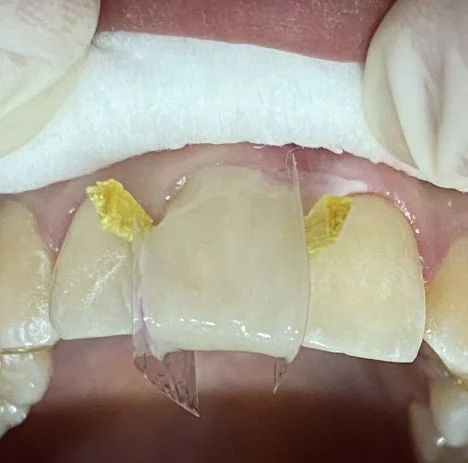
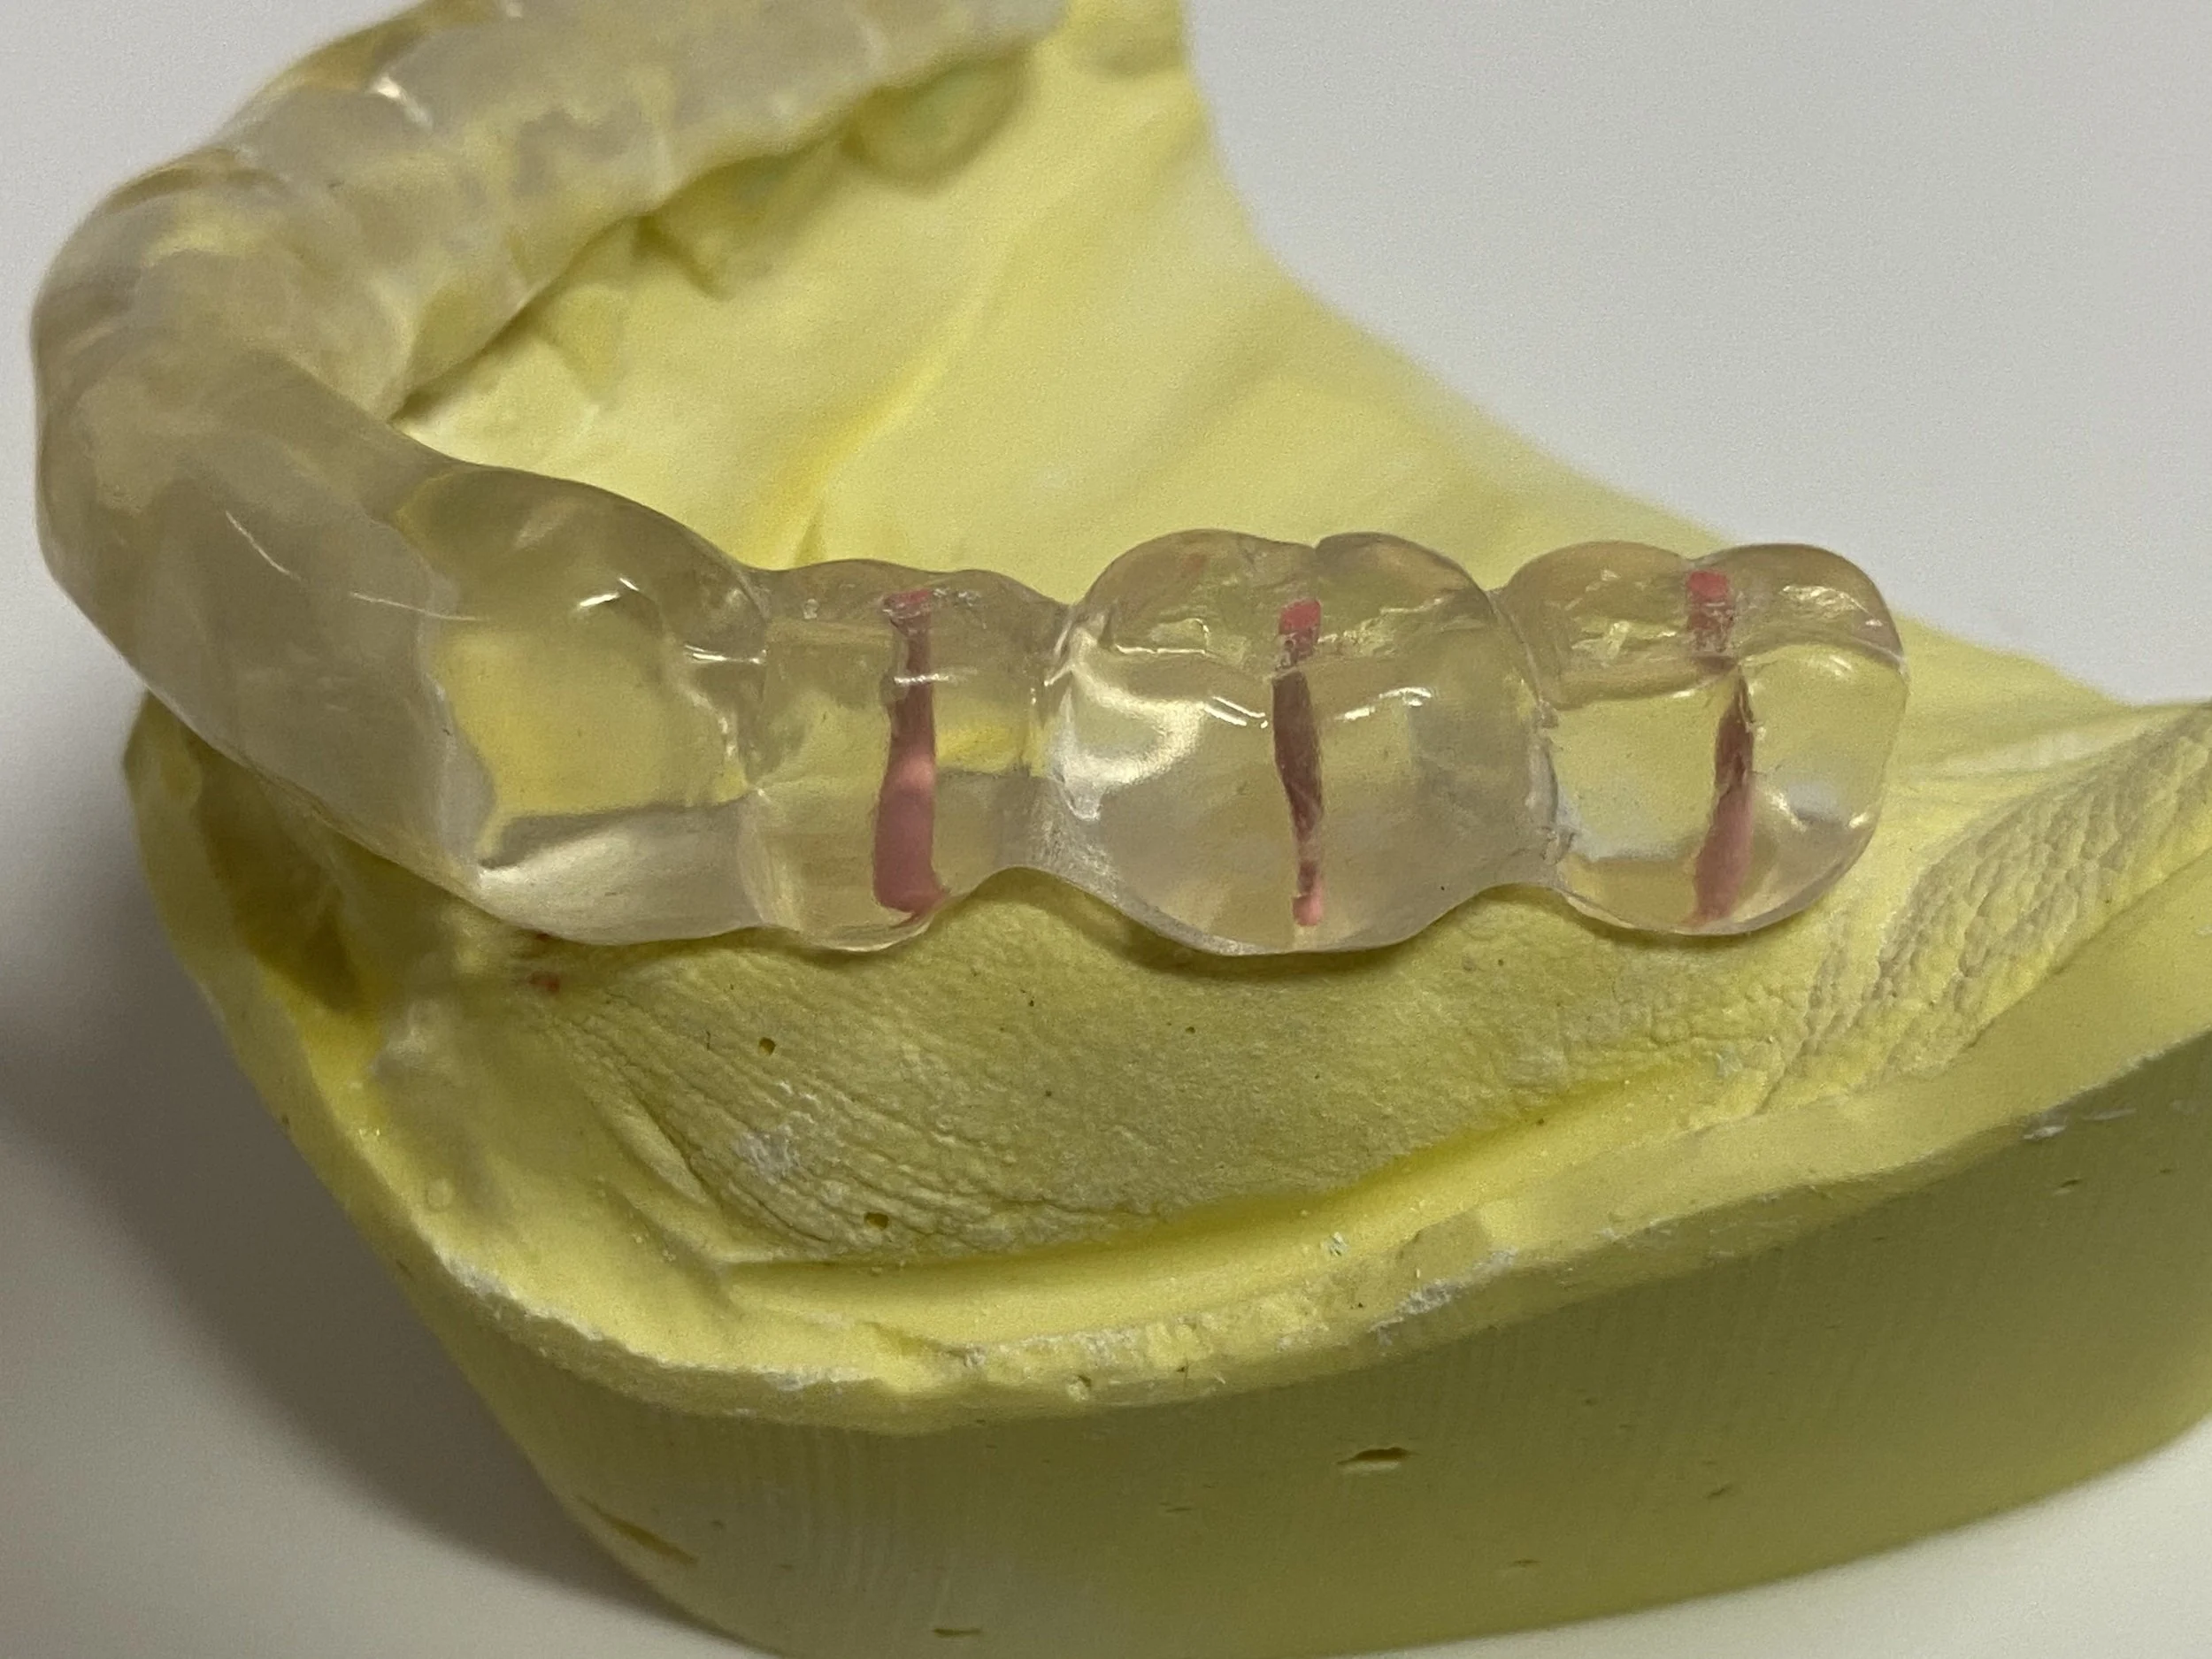
![Close-up of dental restorative procedure, showing teeth with clear and yellow adhesive strips applied.]()
A comprehensive cavity preparation for an overlay was prepared by Dr. Michael Darveniza in Lismore. This entailed a full frontal veneer bevel (but 0.5 mm above the gum line) with an incisal step and a retentive slot at the base of the cavity with a moderate area veneer bevel on the back of the tooth. The yellow pieces of wood are called wedges and secure the clear plastic strips to prevent the filling material getting stuck below the gum.
-
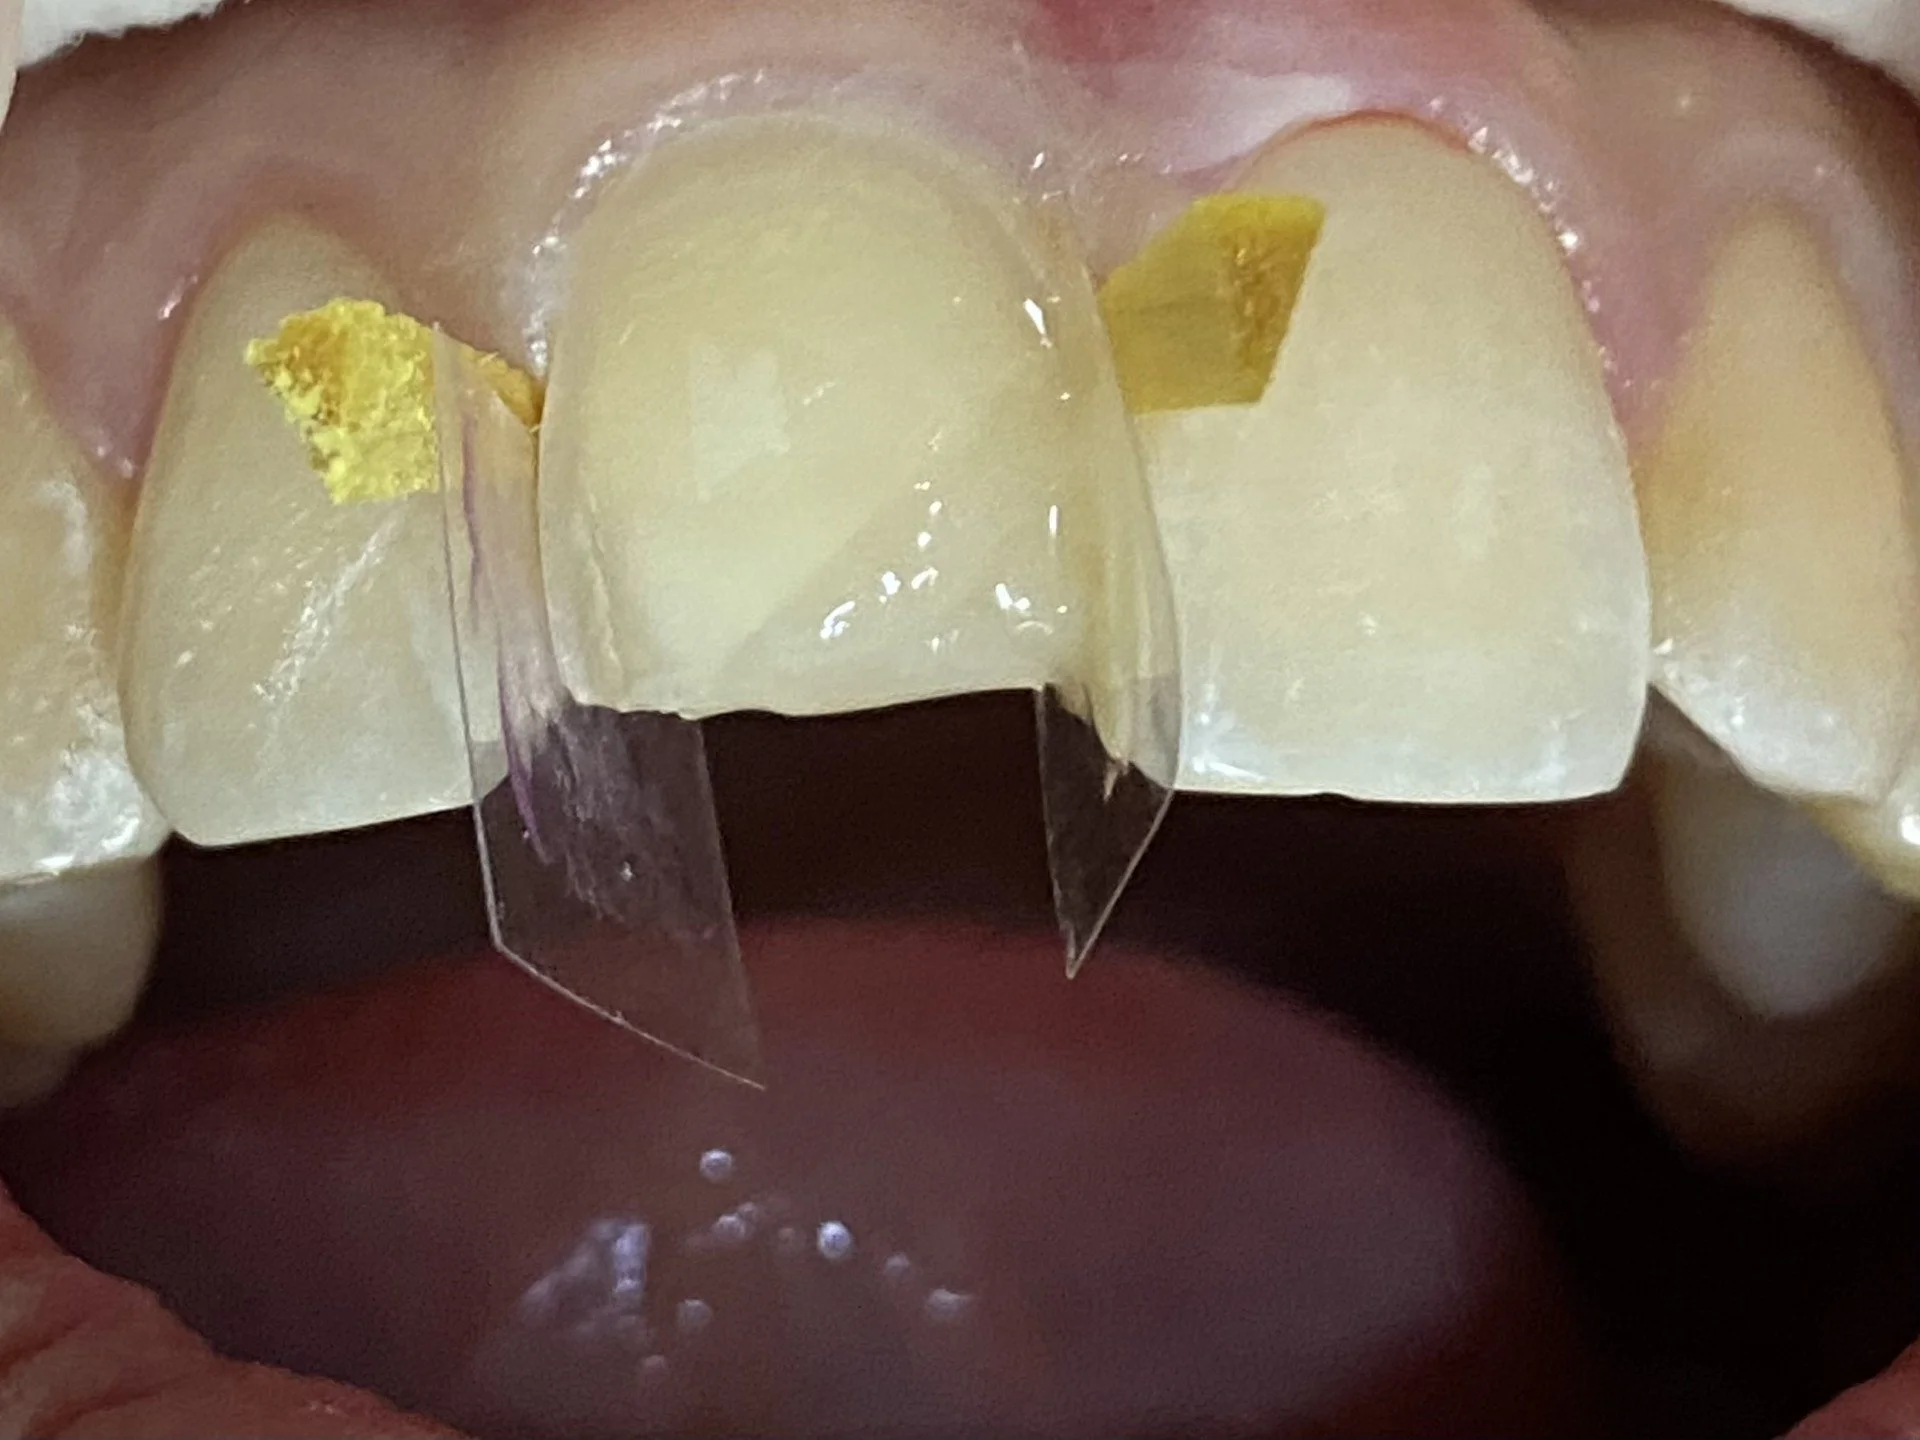
![Close-up of human teeth with wedges and a matrix band for dental restoration work.]()
This shows the bonding process of the tooth along with the placement of different resin colours.
-
![]()
This illustrates the final layer of a different coloured resin, before sculpturing and shaping to match the form of the adjacent front tooth.
-
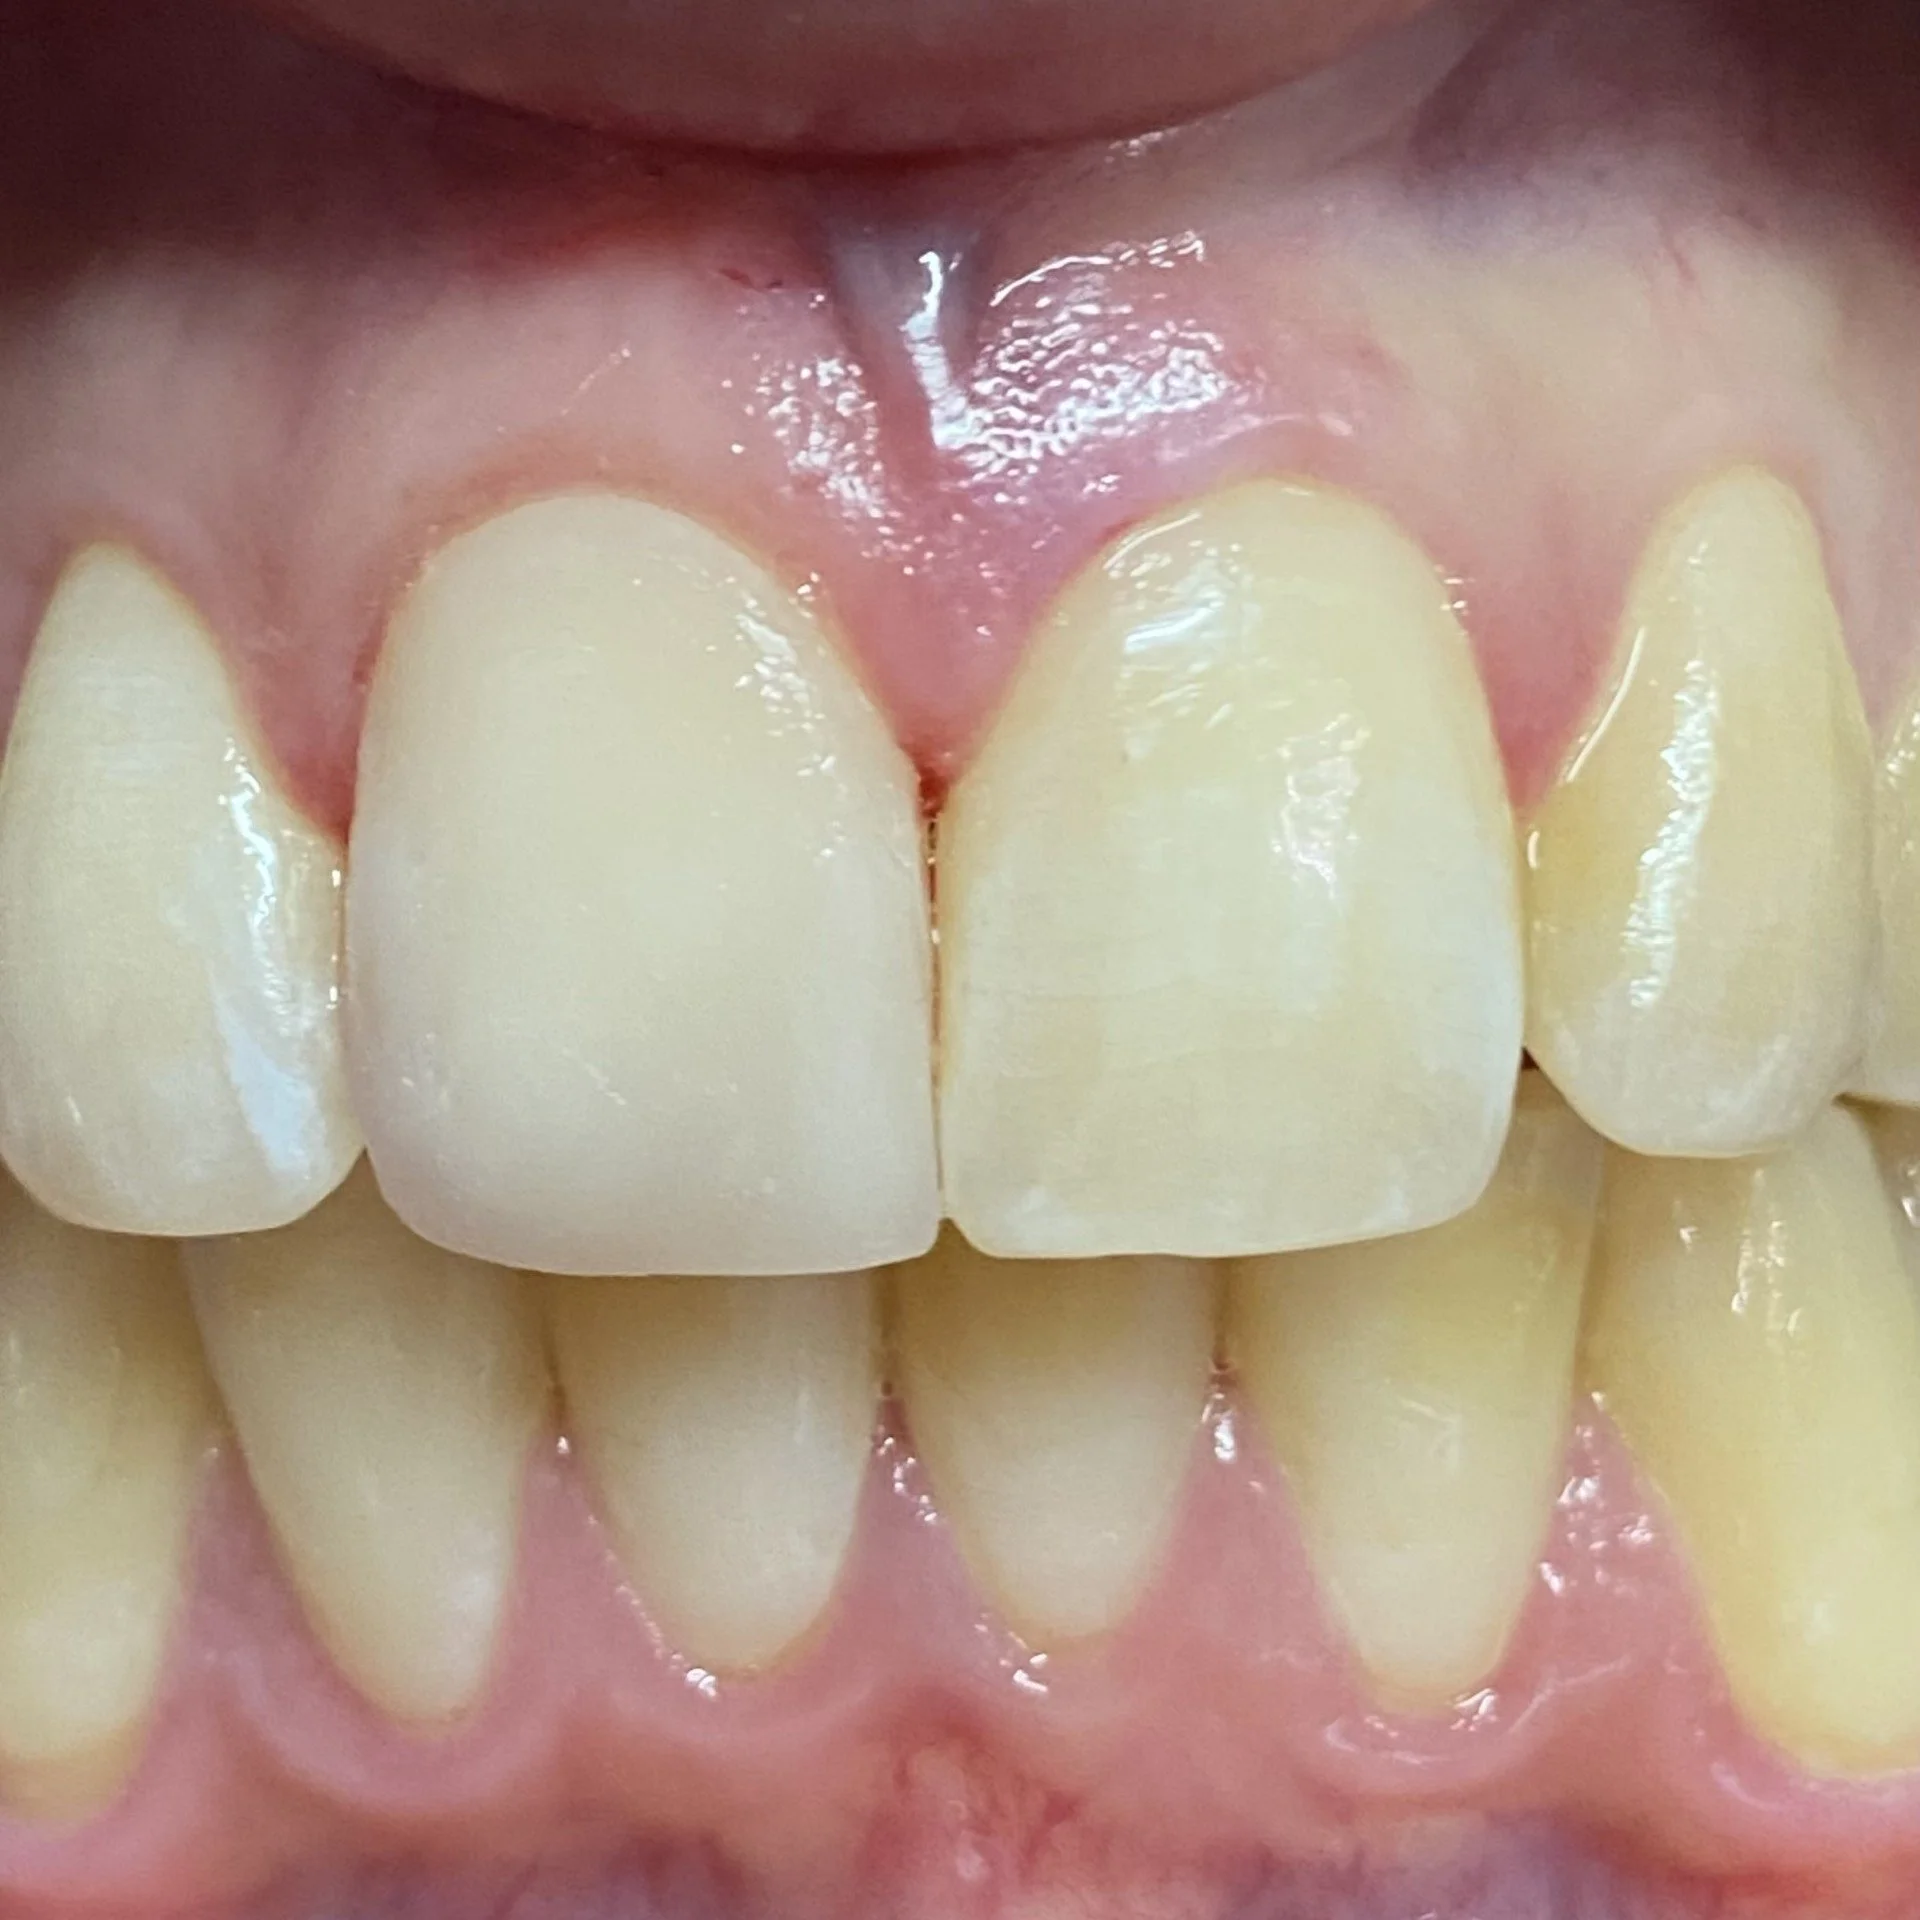
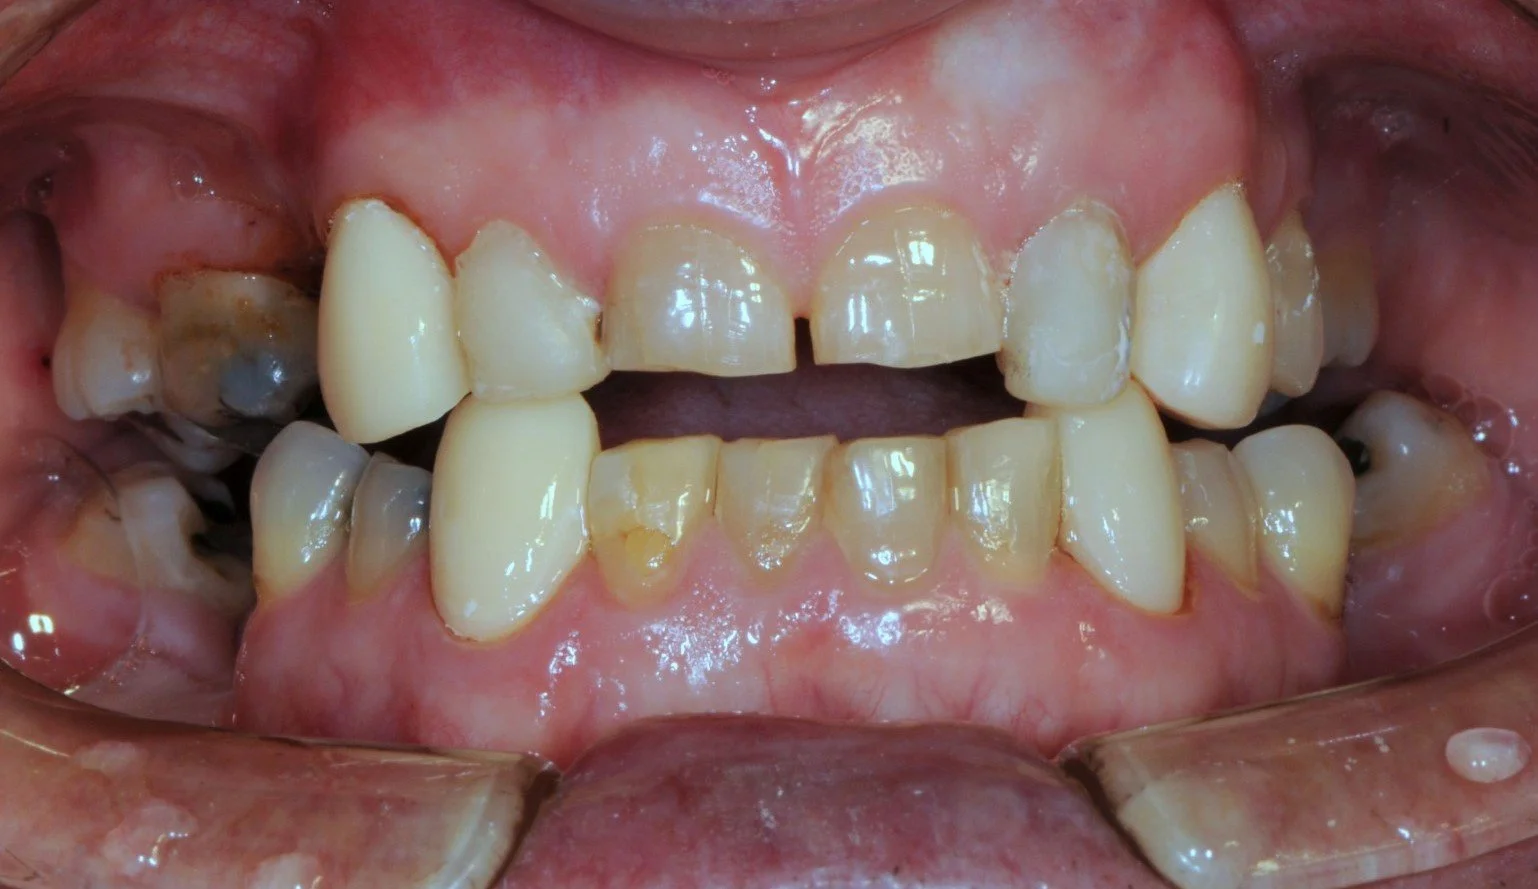
![Close-up of human teeth and gums showing upper and lower front teeth.]()
The final shaped resin overlay illustrating the good colour match along with some inbuilt white opaque resin to match the white fluorotic spotting of the adjacent teeth.
-
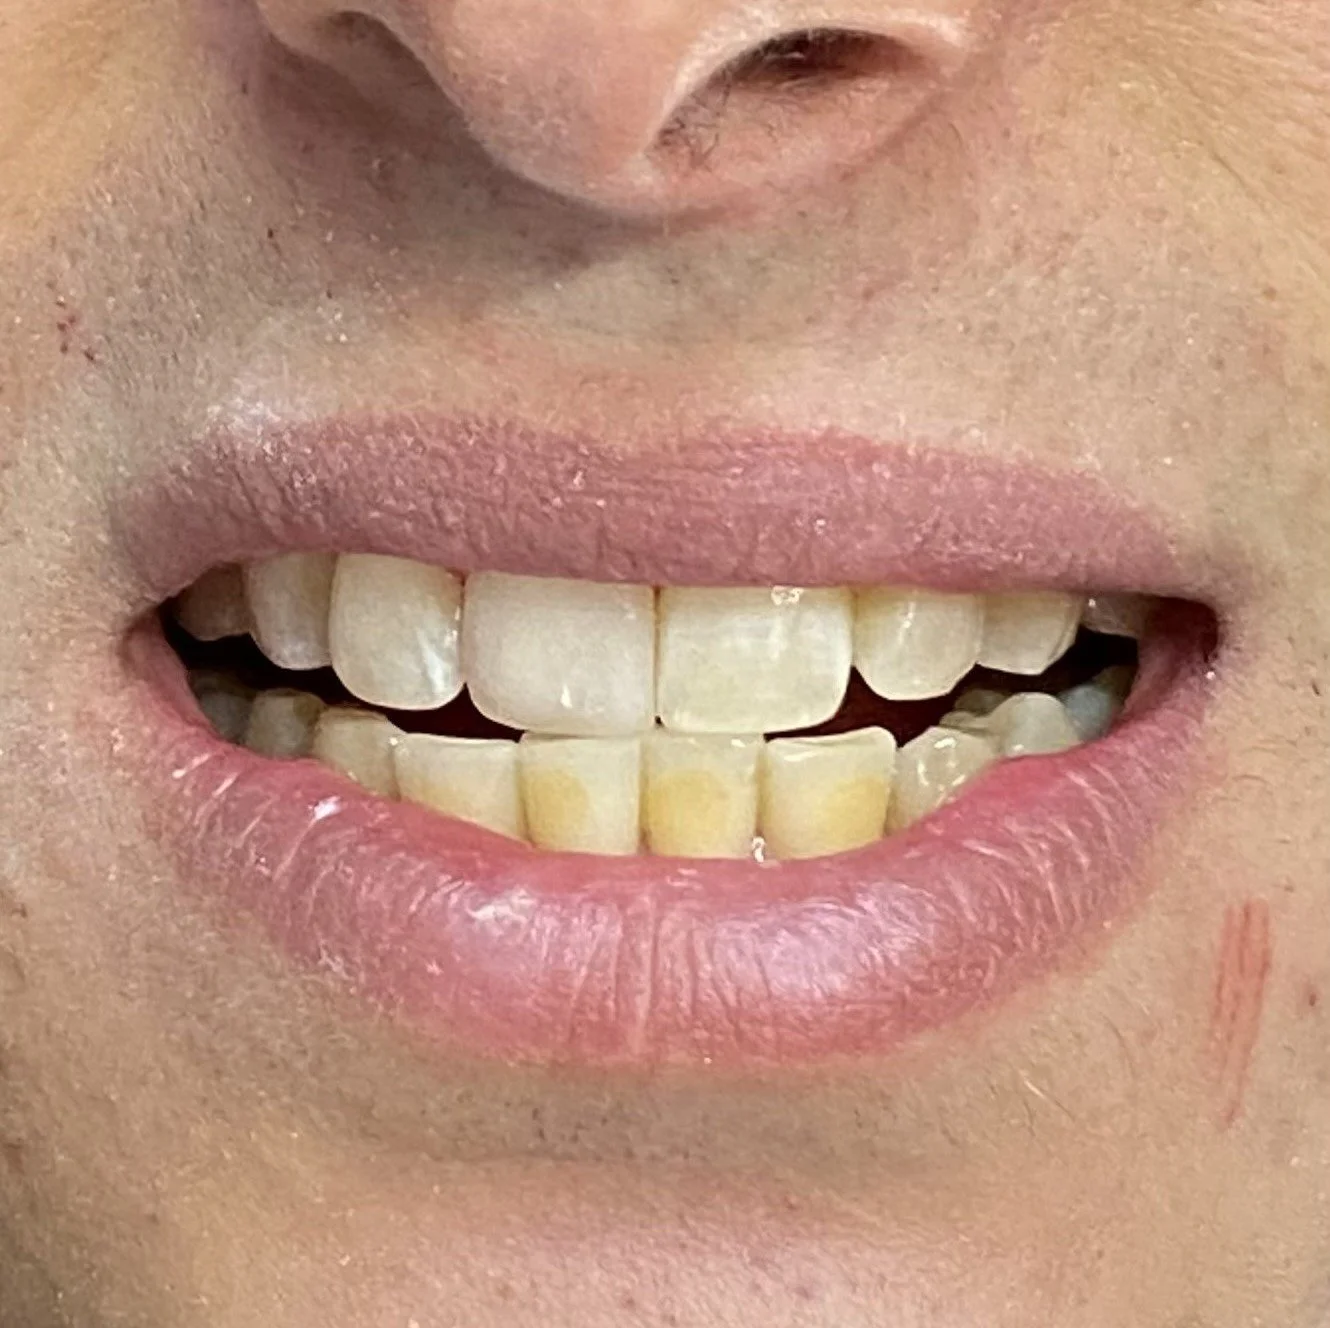
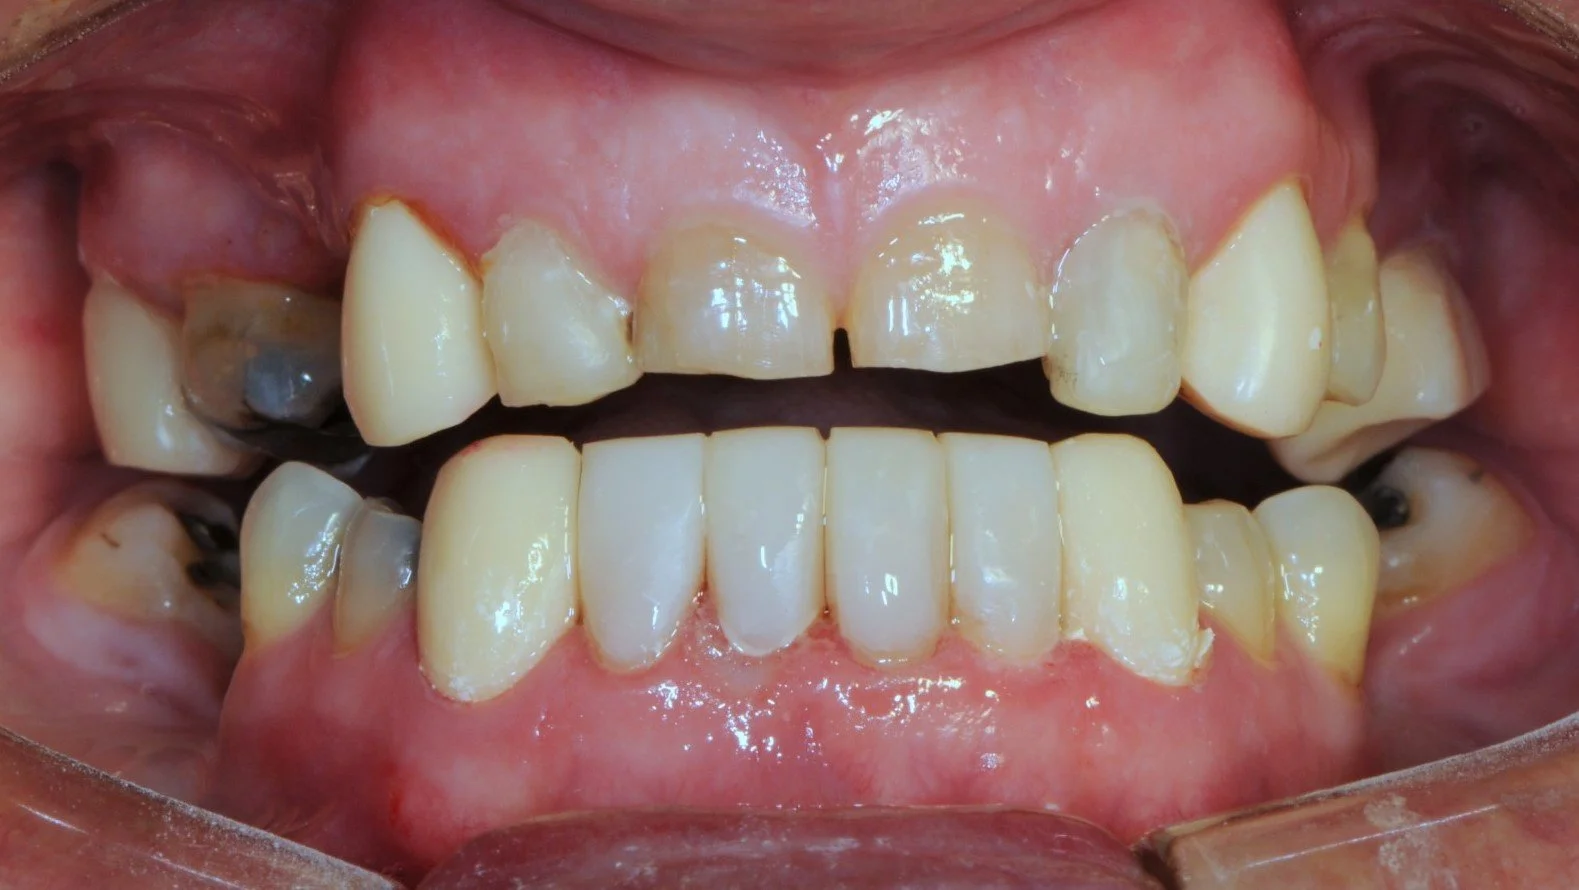
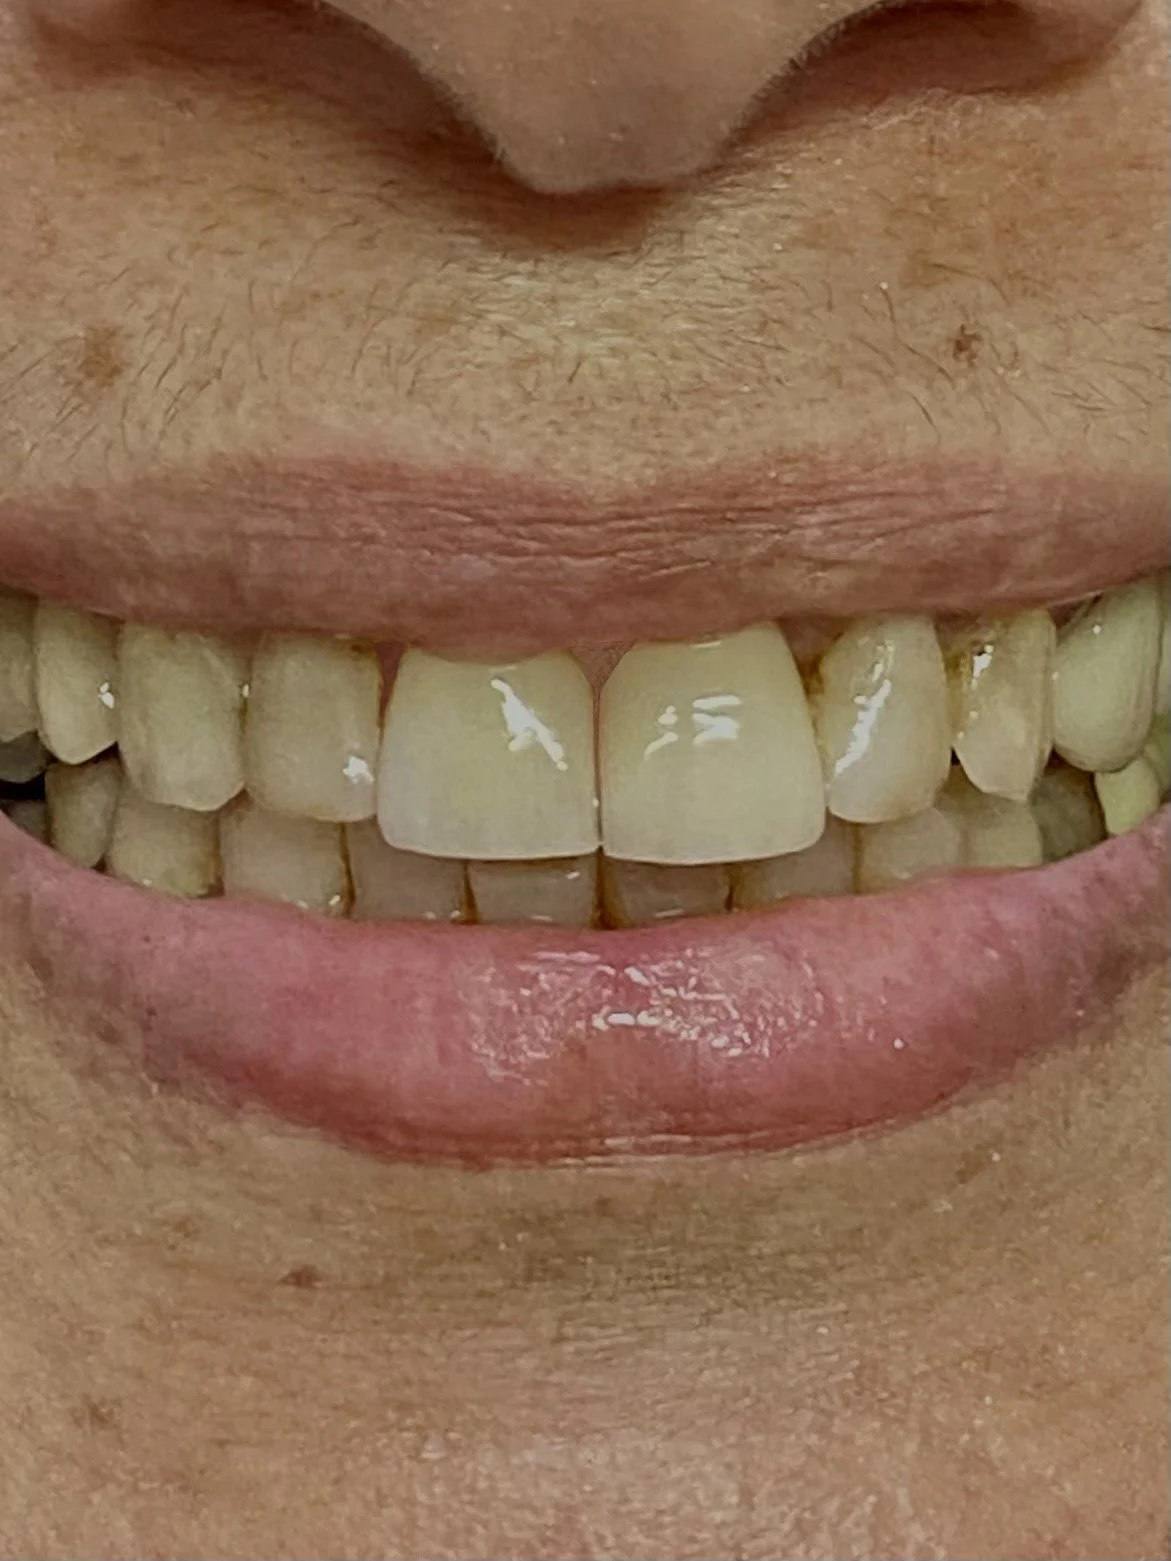
![Close-up of a smiling person's teeth with slightly stained upper and lower teeth, visible lips and part of the nose.]()
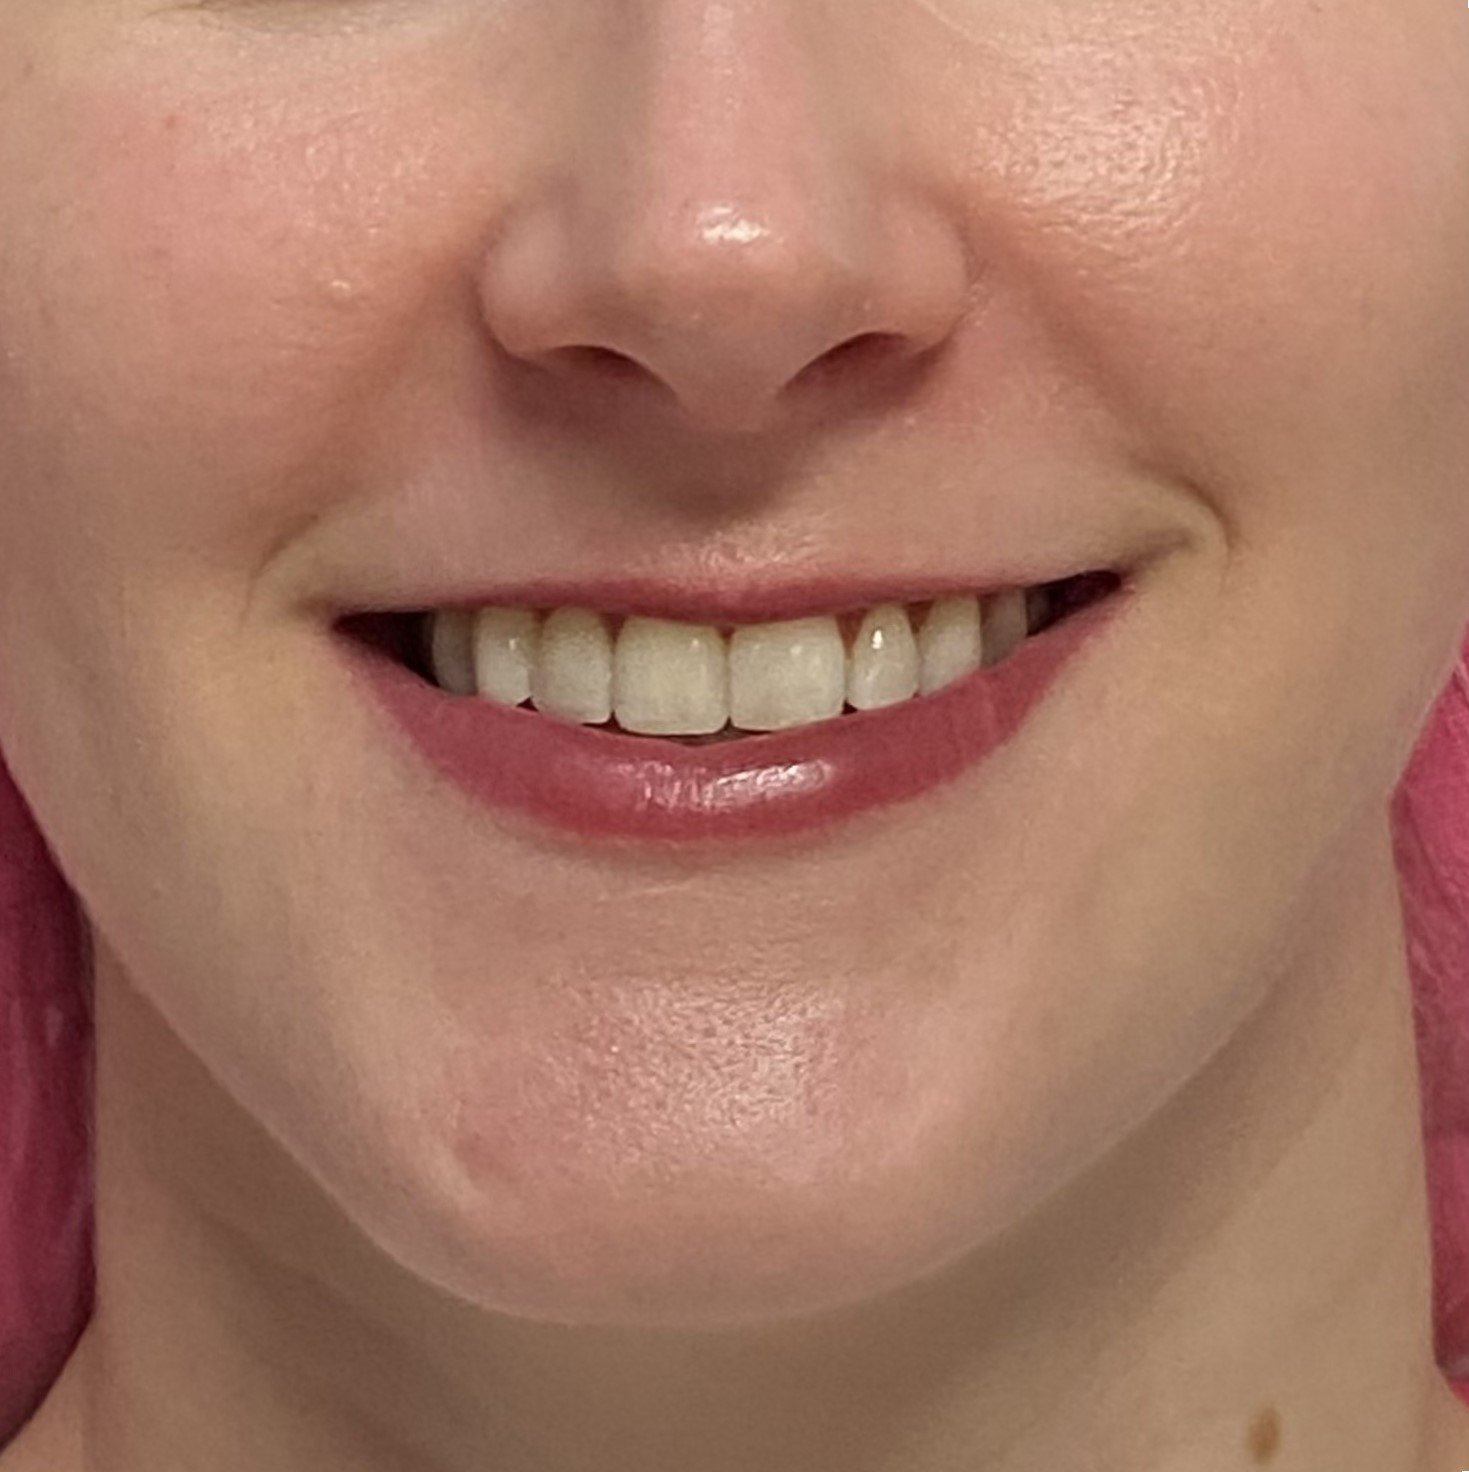
The patient has successfully used this overlay for five years and is very cautious on not biting extreme materials and has adhered to preventative instructions e.g. not biting fishing lines etc.


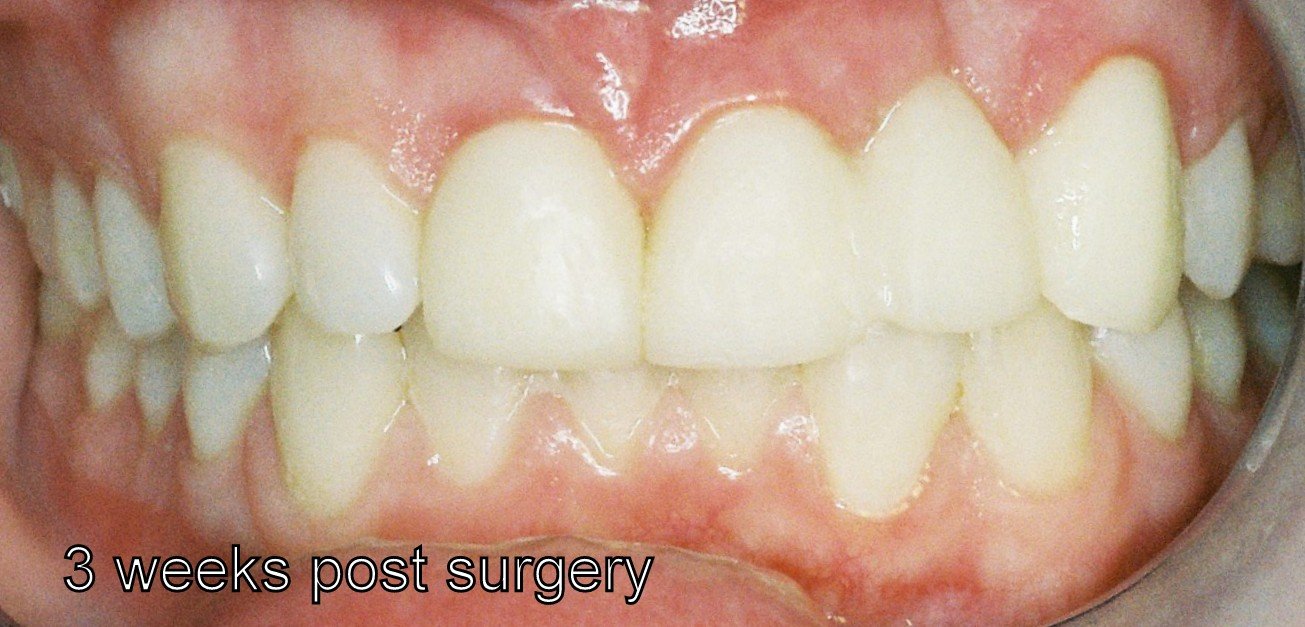
AESTHETIC CASE FOR REPLACEMENT OF A TOOTH MISSING FROM A CLEFT PALATE
-
![]()
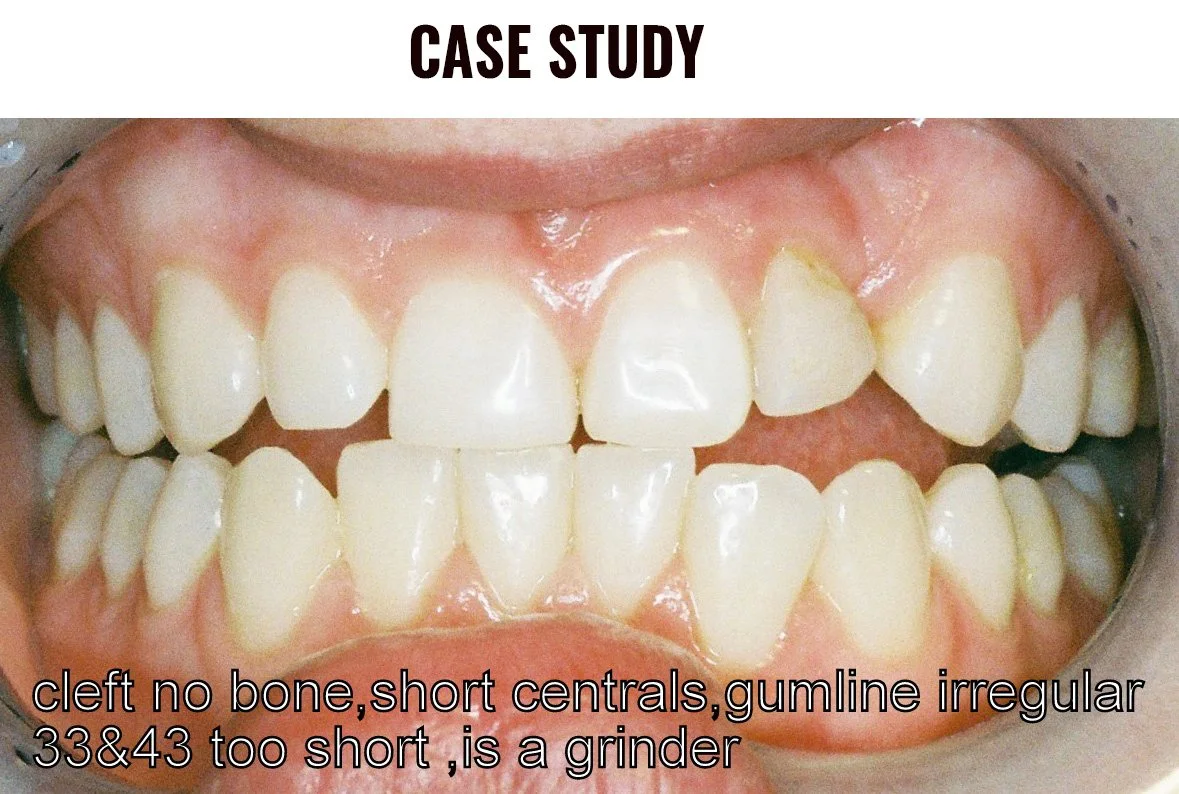
THIS BEFORE PHOTO HIGLIGHTS THE REMANENCE OF A CLEFT PALATE IN THE TOP LEFT NUMBER 2 REGION AND NOTE A SCAR/CLEFT IN THE GUMLINE. THE PERMANENT TOOTH 22 DID NOT FORM BUT THE BABY/DECIDUOUS TOOTH IS EVIDENT AND WAS GOING TO BE EXTRACTED TO IMPROVE THE AESTHETICS
-
![Close-up of human teeth showing bite alignment and dental health]()
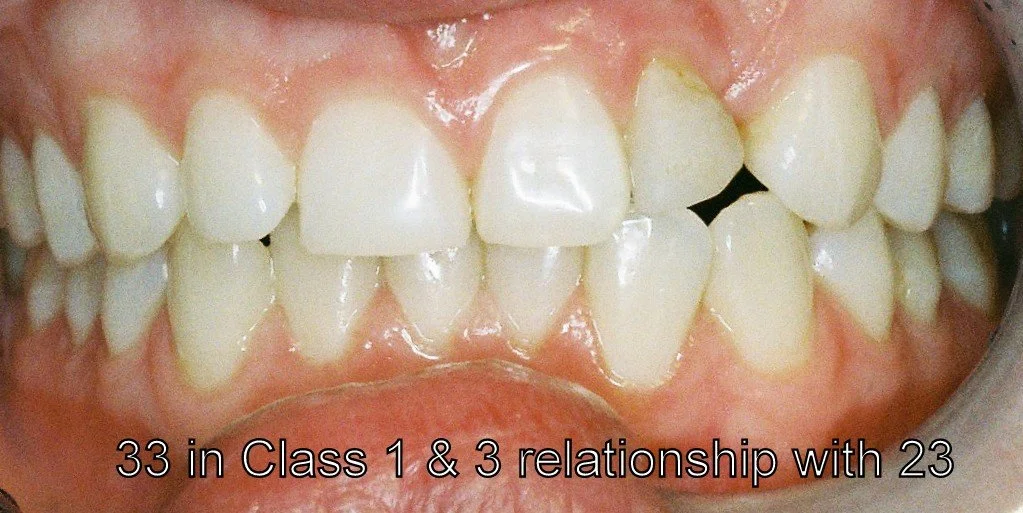
THIS VIEW ILLUTRATES A NARROWER LEFT FRONT TOOTH COMPARED TO THE RIGHT FRONT TOOTH AND IRREGULAR GUMLINES IN THE TOP 4 INCISOR FRONT TEETH
-
![]()
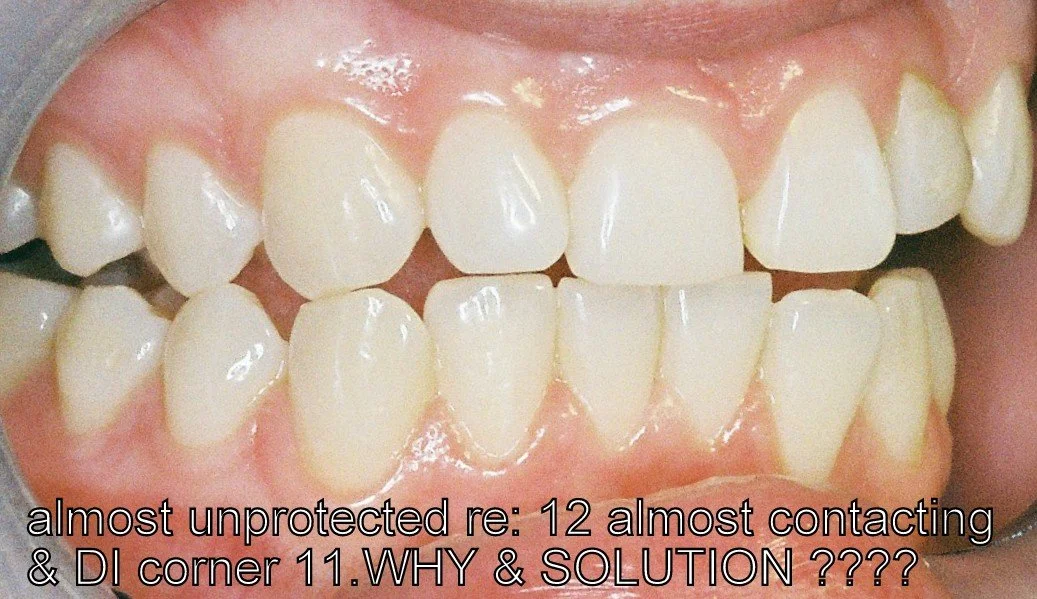
THE RIGHT VIEW ILLUSTRATES AN ALMOST UNPROTECTED RIGHT BITE
-
![]()
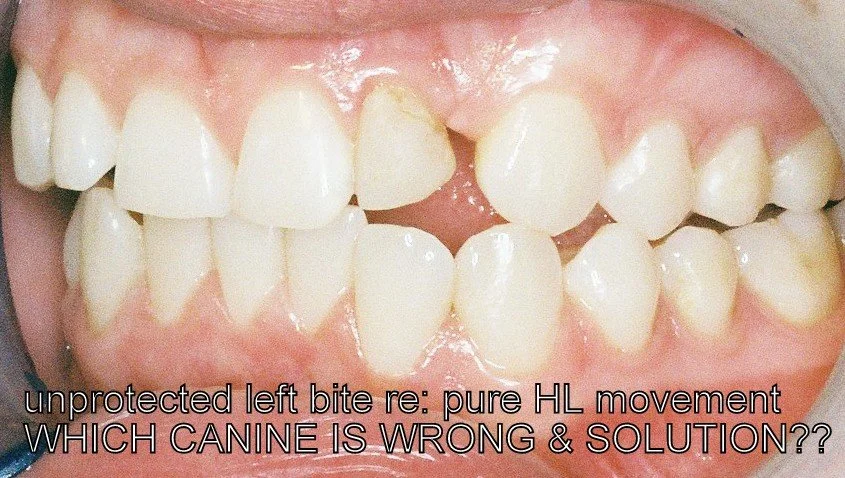
THE LEFT VIEW HIGHLIGHTS A COW-LIKE LEFT JAW MOVEMENT WHICH IS AN UNPROTECTED LEFT BITE AND THE WIDE UNESTHETIC SPACE IN THE TOP LEFT NUMBER 2 REGION
-
![Dental plaster model with a ceramic tooth]()
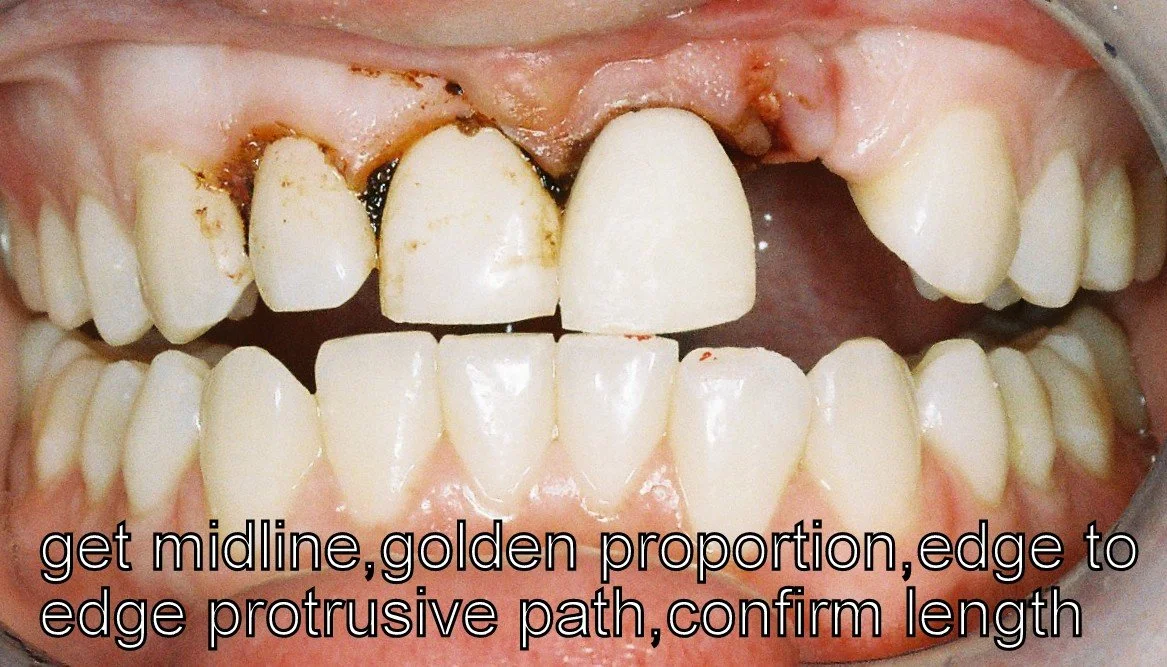
THE VIEW AFTER EXTRACTION OF THE TOP LEFT NUMBER 2 BABY TOOTH AND GUM SURGERY TO EVEN OUT THE IRREGULAR GUMLINES AND BROWN ASTRINGENT TO STOP BLEEDING. ALSO, NOTE THE NEW LONGER AND WIDER TEMPORARY PLASTIC CROWN FABRICATED FOR THE LEFT FRONT TOOTH.
-
![]()
NOTE THE NEW TEMPORARY CROWN FOR THE TOP RIGHT FRONT TOOTH AND THE 3 UNIT TEMPORARY PLASTIC BRIDGE REPLACING THE MISSING TOOTH AND ATTACHED TO TOOTH NUMBERS LEFT 1 AND 3.
-
![]()
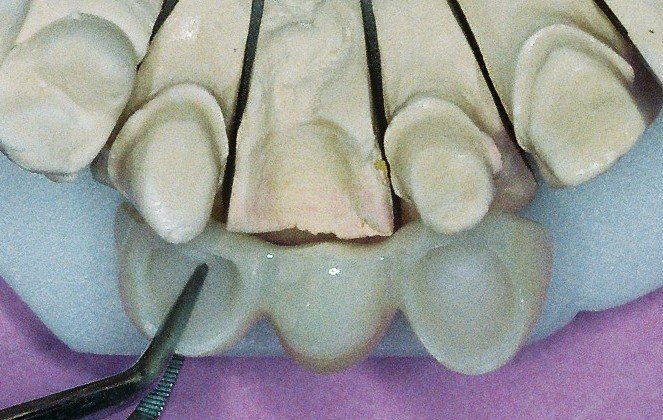
THIS IS A VIEW OF A PLASTER MODEL OF THE PREPARED TEETH AND SHOWING THE UNDER SURFACE OF THE 3 UNIT ZIRCONIA/PORCELAIN BRIDGE. PLEASE NOTE THE BRIDGE TOOTH HAS AN EGG LIKE OR SPHERIODAL SHAPE WHICH RECESSES INTO THE GUM LINE FOR AESTHETICS AND FUNCTION.”
-
![]()
NOTE THE COMPLETED CERAMIC 3 UNIT BRIDGE AND CROWN ON A PLASTER MODEL WHICH THE CERAMIST DUPLICATED USING DOUBLE SCANNING TECHNOLOGY, TO RE-CREATE THE SIZE AND SHAPES OF THE ORIGINAL TEMPORARY CROWN AND BRIDGE.
-
![]()
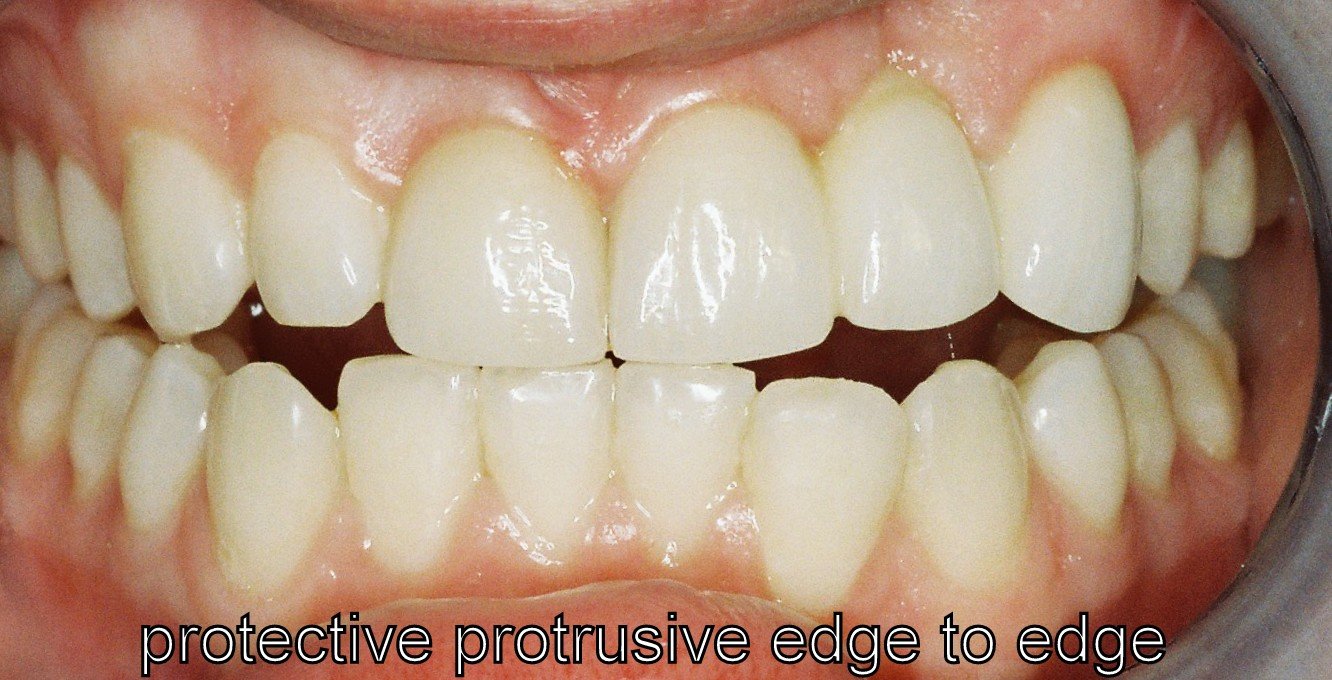
THE COMPLETED CROWN AND BRIDGE AFTER FINAL CEMENTATION AND A PROTECTIVE FORWARD BITE.
-
![]()
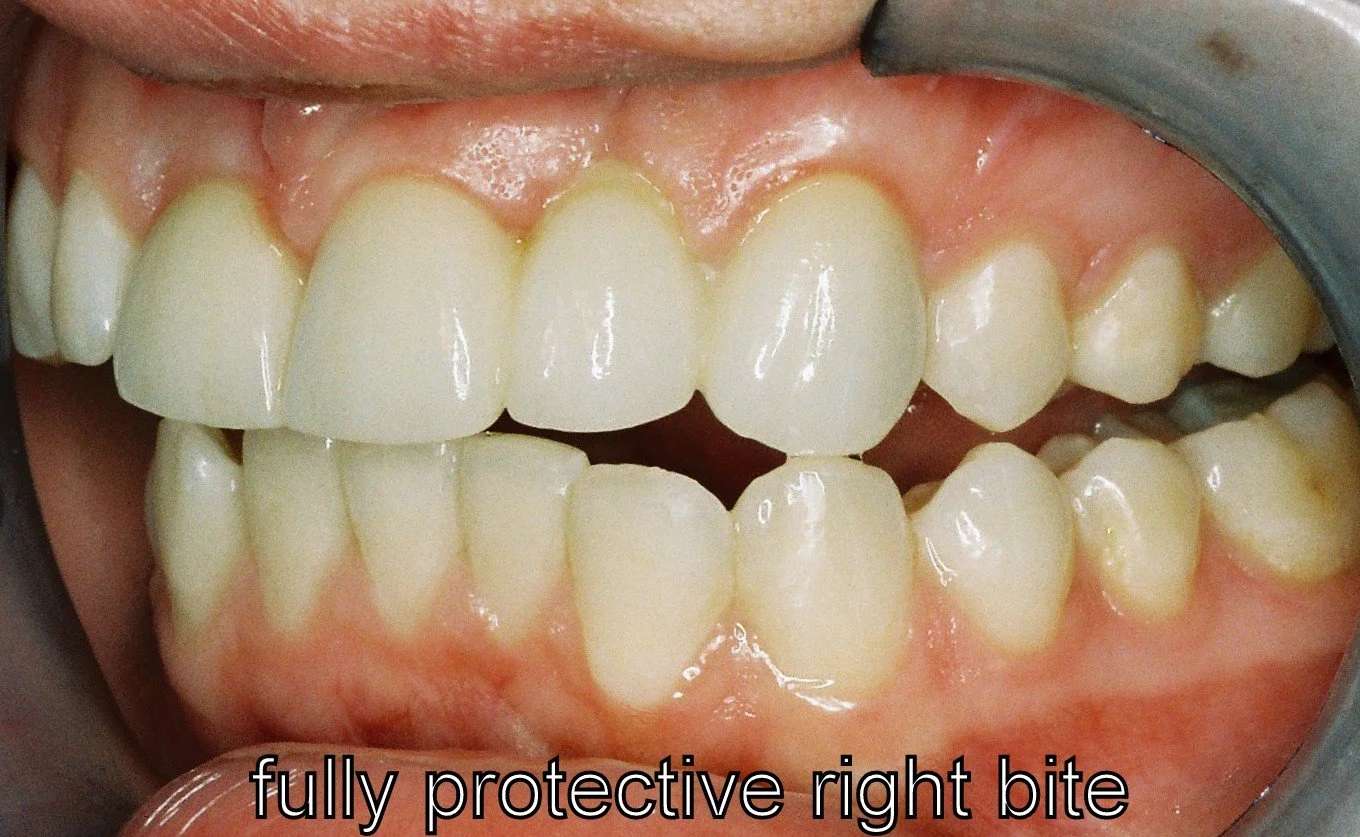
THE LEFT VIEW ILLUSTRATES A HUMAN LEFT PROTECTIVE BITE WITH A VERTICO-LATERAL JAW MOVEMENT.
-
![]()
THE FINAL PHOTO IN HINGE BITE WITH GREATLY IMPROVED AESTHETICS.

COMPOSITE RESIN OVERLAYS AND A CROWN
-
![Text detailing dental treatment for TMJ disorder and facial asymmetry, including the use of a protective occlusal splint, adjustments, resin overlays, and crowns.]()
-
![Close-up of a person's lips and nose]()
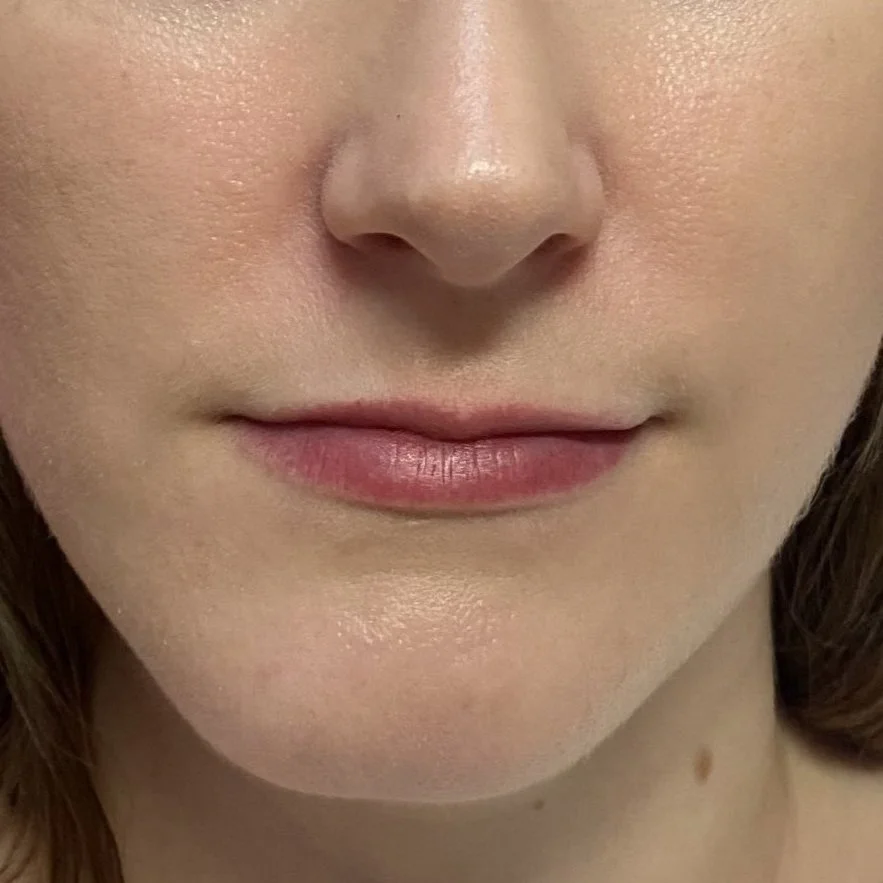
Here we have a facial view of a TMJ disorder patient before treatment with associated facial asymmetry.
-
![Close-up view of human teeth, focusing on the alignment and condition of the upper and lower teeth.]()
And an unprotected right bite associated with poorly positioned canine teeth and a recessed 12, 13 and 14 teeth.
-
![Close-up of human molars and gum]()
Here we see how the lower 43 canine is not only short in stature but rotated in towards the tongue.
-
![Close-up of a person's mouth with a dental cheek retractor in place, showing upper and lower teeth.]()
The right extreme jaw movement caused by over stretching of the left TMJ jaw joint as there was no restriction present with non-engaging right canine teeth. This movement repeated over multiple times both during the day and night significantly contributed to facial asymmetry.
-
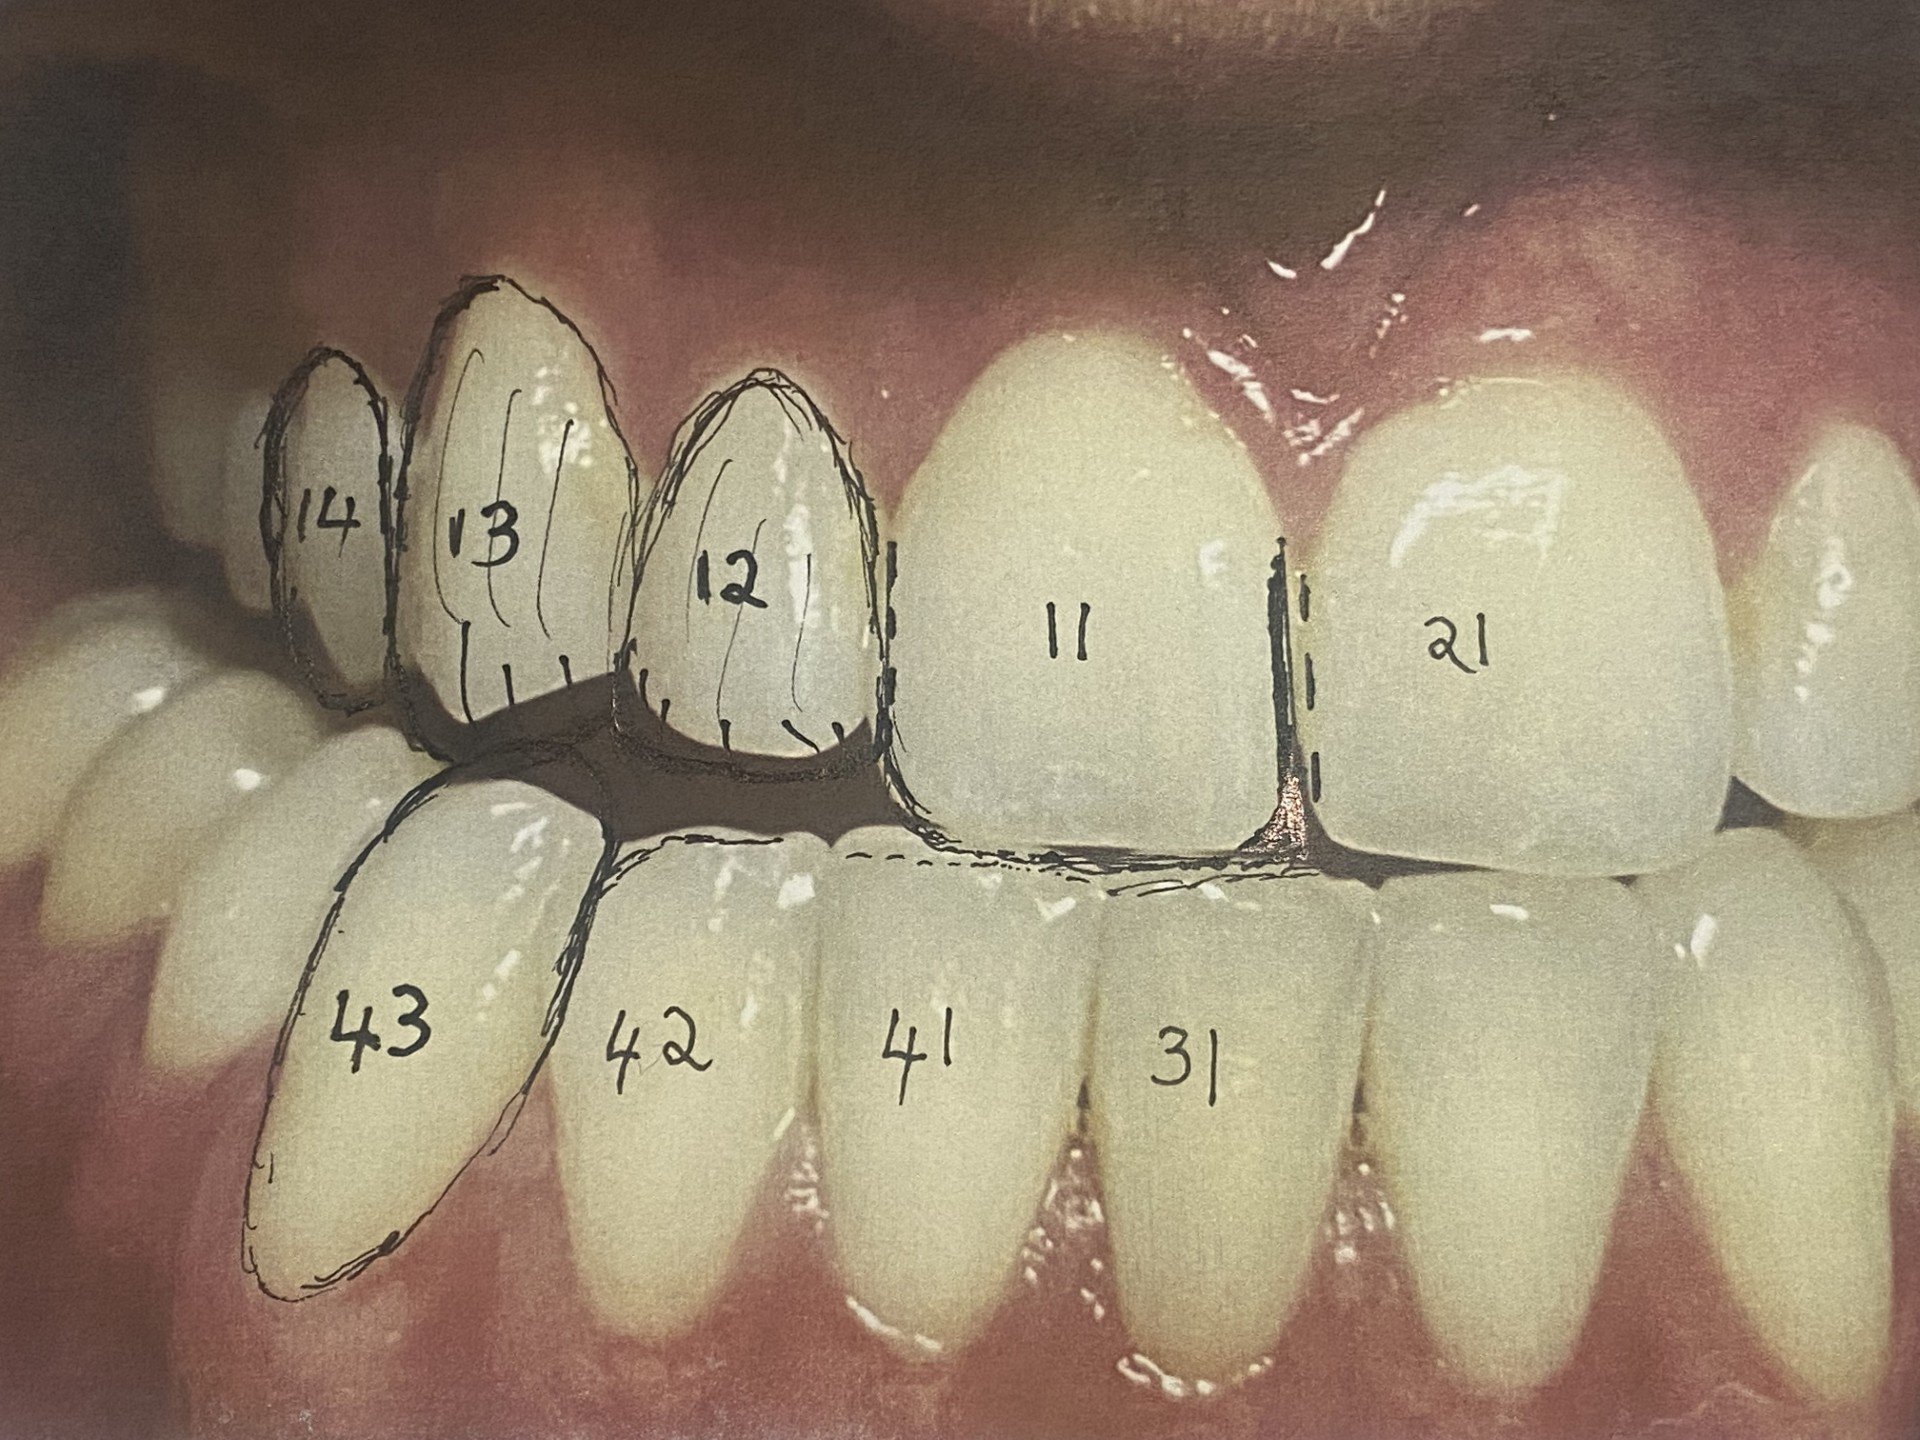
![Close-up of human teeth with numbers marked on each tooth.]()
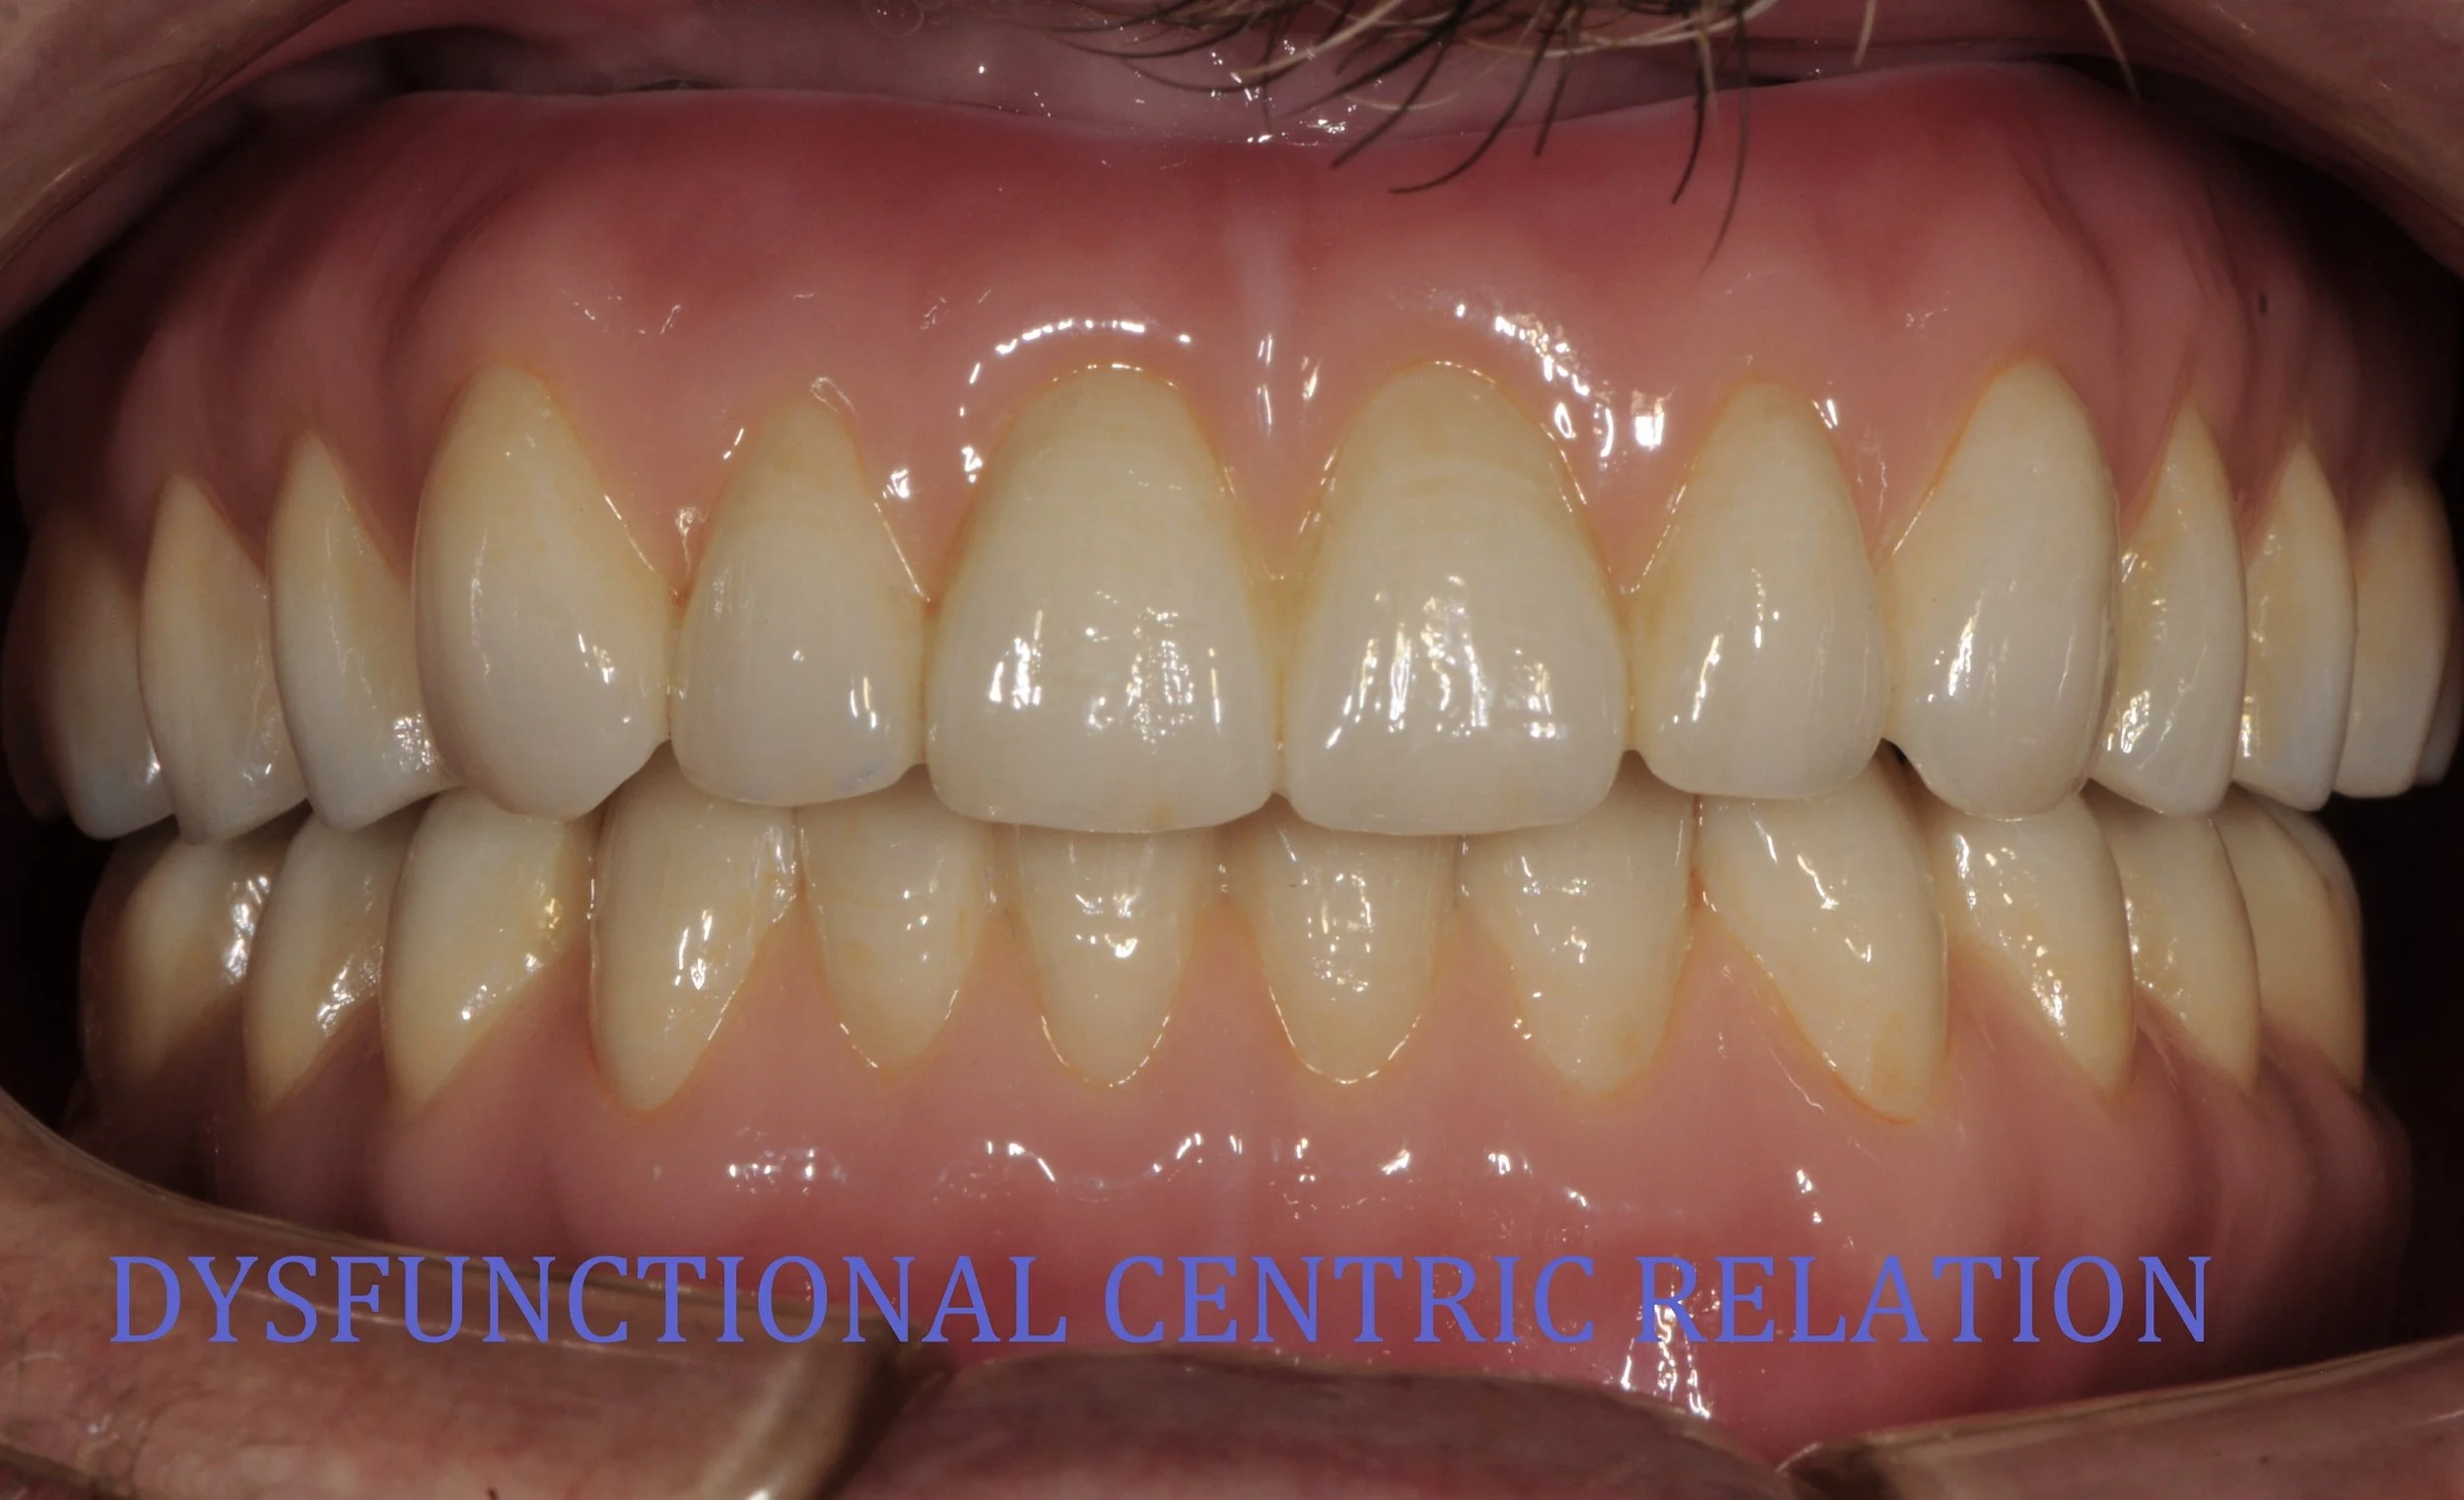
Line diagrams are necessary to address the dental asymmetry, upper dental midline and the bio-designing of right protective bite. This involved drilling the midline between the 11 and 21 teeth towards the left hand side and placing a filling on the mesial surface of the 11 tooth. Narrowing the distal surface of the 11 tooth to equalise the widths of the front 11 and 21 teeth. Overlaying of the 12 tooth onto the distal surface of the 11 and bringing it forward into the arch and longer was required. Similarly, overlaying the 13 and 14 was performed. The lower right 42 lateral incisor was narrowed on the distal surface to fit the lower right 43 canine temporary crown. The biting edges of the 31, 41 and 42 were adjusted to create a protective bilateral balanced forward bite with the upper front 11 and 21 teeth.
-
![Close-up view of human teeth, showing an overbite.]()
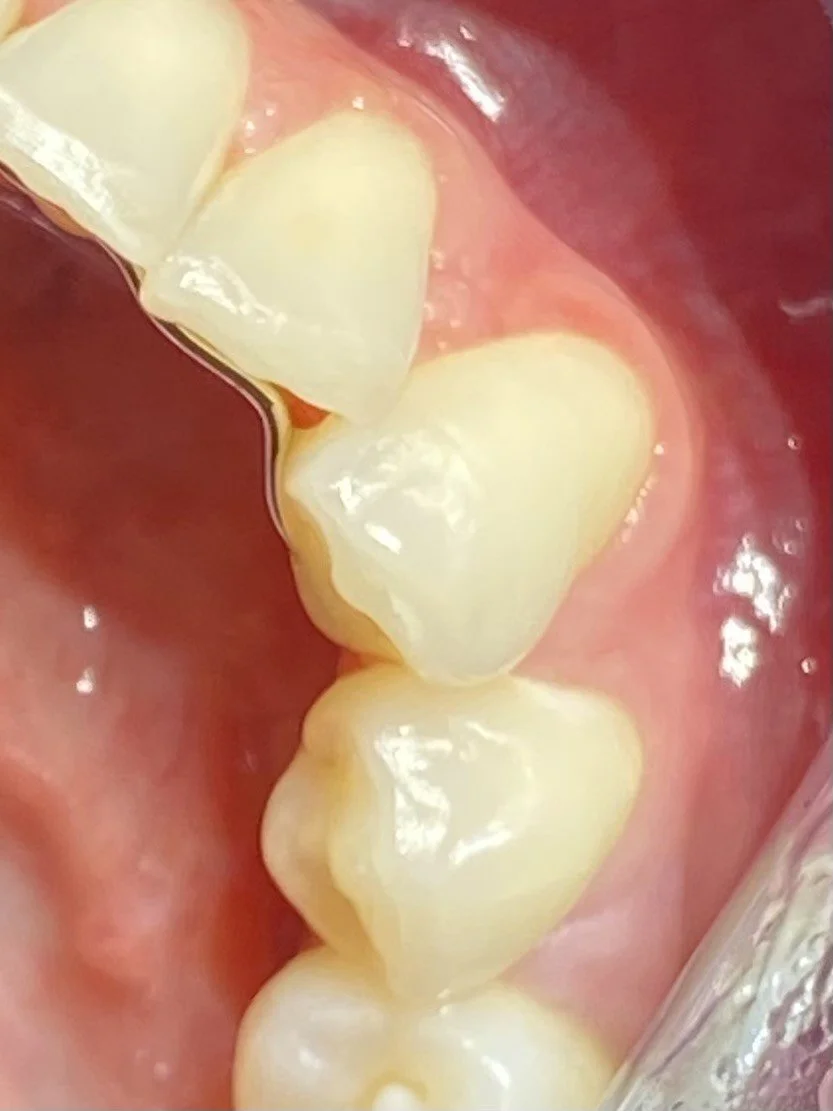
Now the bio-designed lower right 43 temporary crown creating a right protective bite.
-
![Close-up of human teeth and gums]()
We can clearly see that the lower jaw has moved into an extreme right jaw movement but has been stabilised and restricted by the engagement of the bio-designed lower final canine crown and upper resin overlay.
-
![Close-up of dental check-up showing upper and lower teeth]()
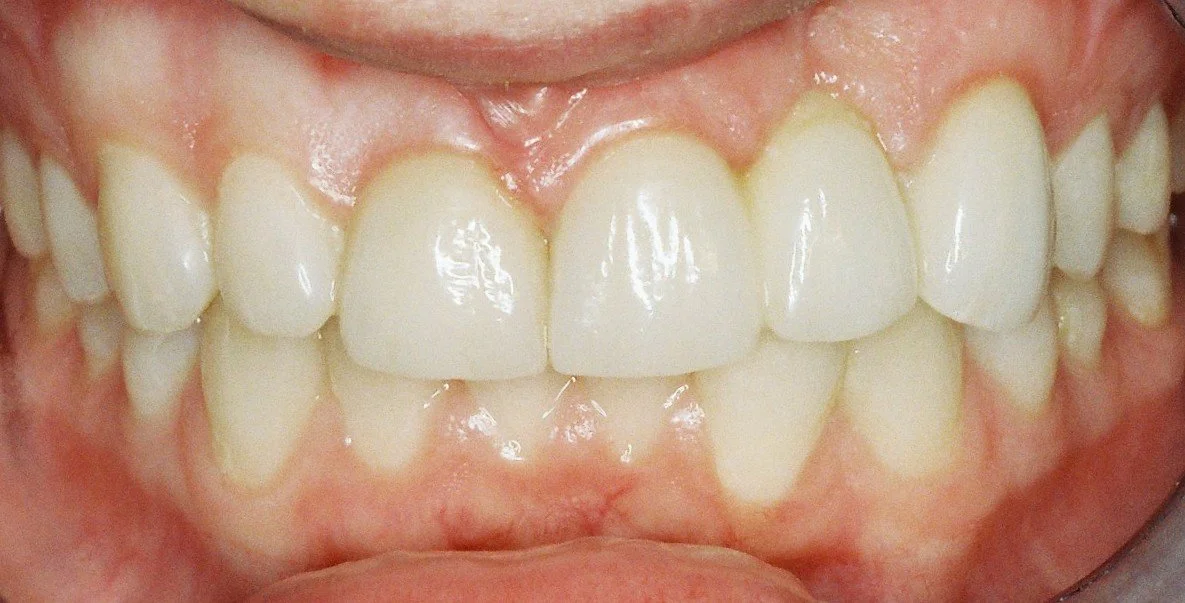
The completed aesthetic and functional occlusal bite case in hinge bite.
-
![Close-up of a smiling woman's mouth with visible teeth and pink lips.]()
The completed facial appearance with significantly improved facial and dental symmetry, without the need for facial surgery.


CROWNS and BRIDGES - OCCLUSAL RECONSTRUCTION WITH 4 BRIDGES
-
![Text description of dental procedures including metal partial dentures, occlusal bite reconstruction, Zirconia bridges, crowning, and composite resin overlays for lower incisors.]()
-
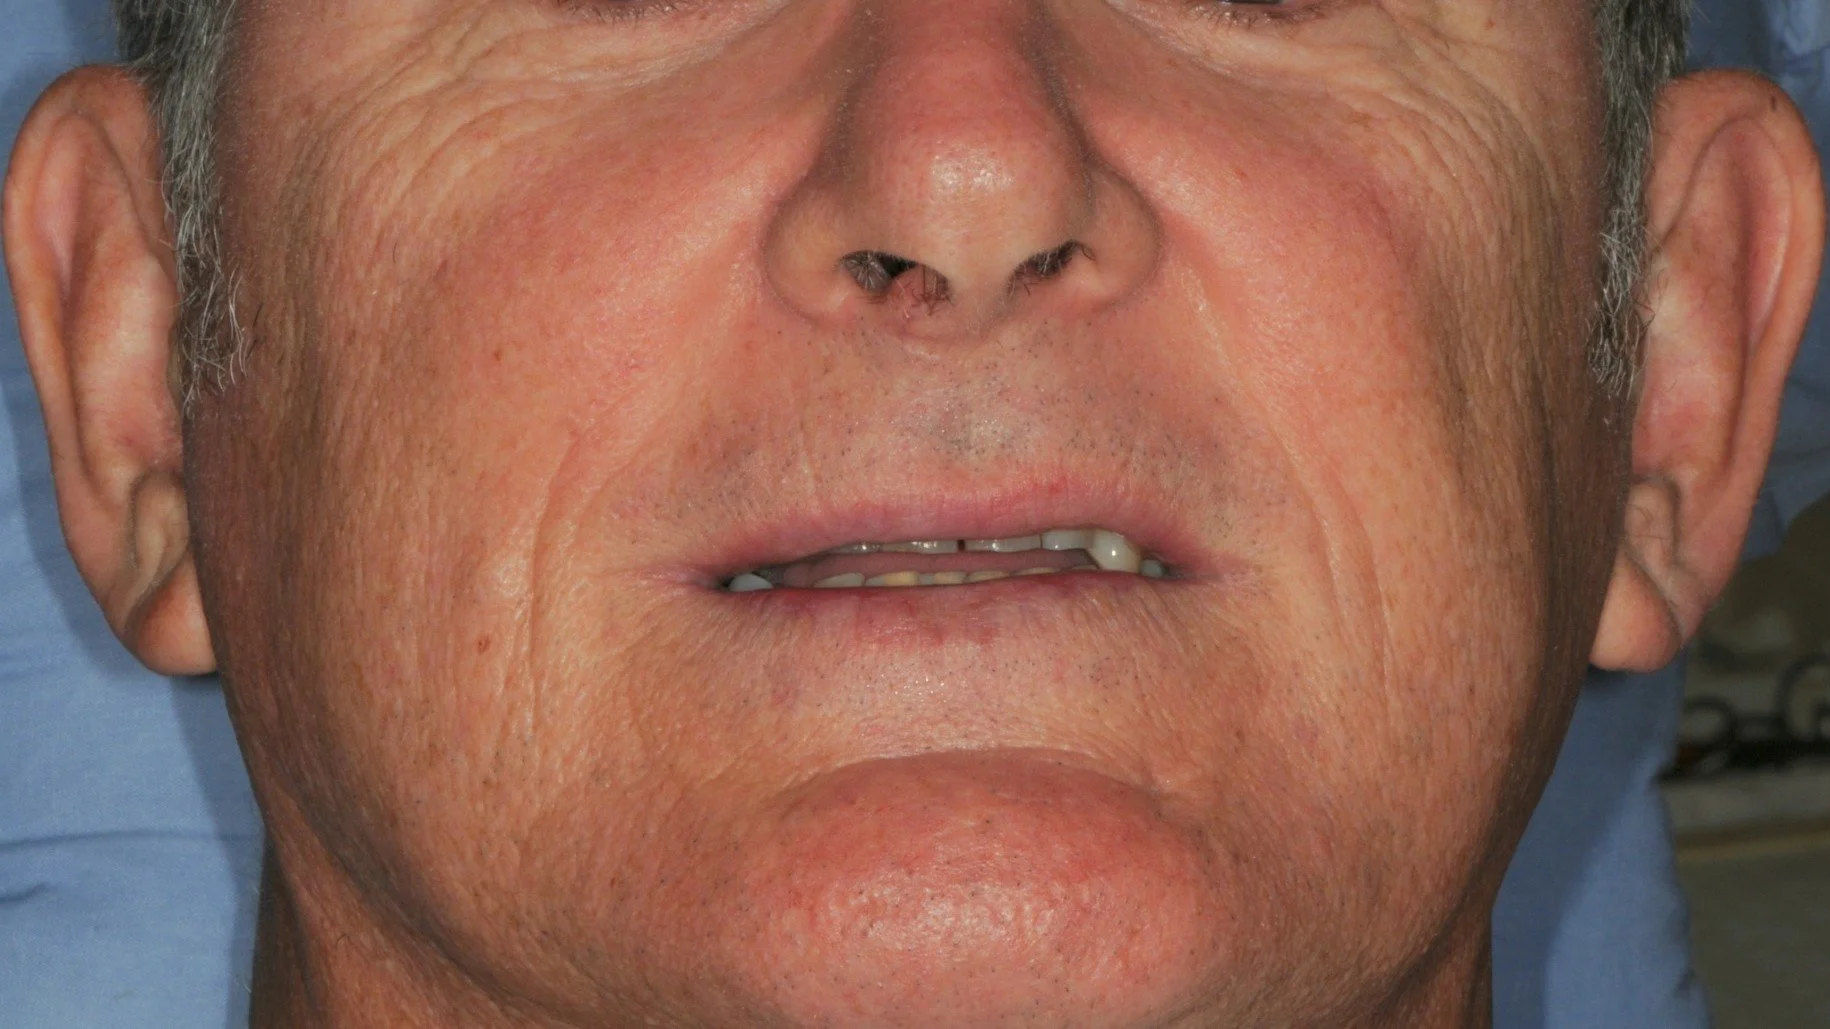
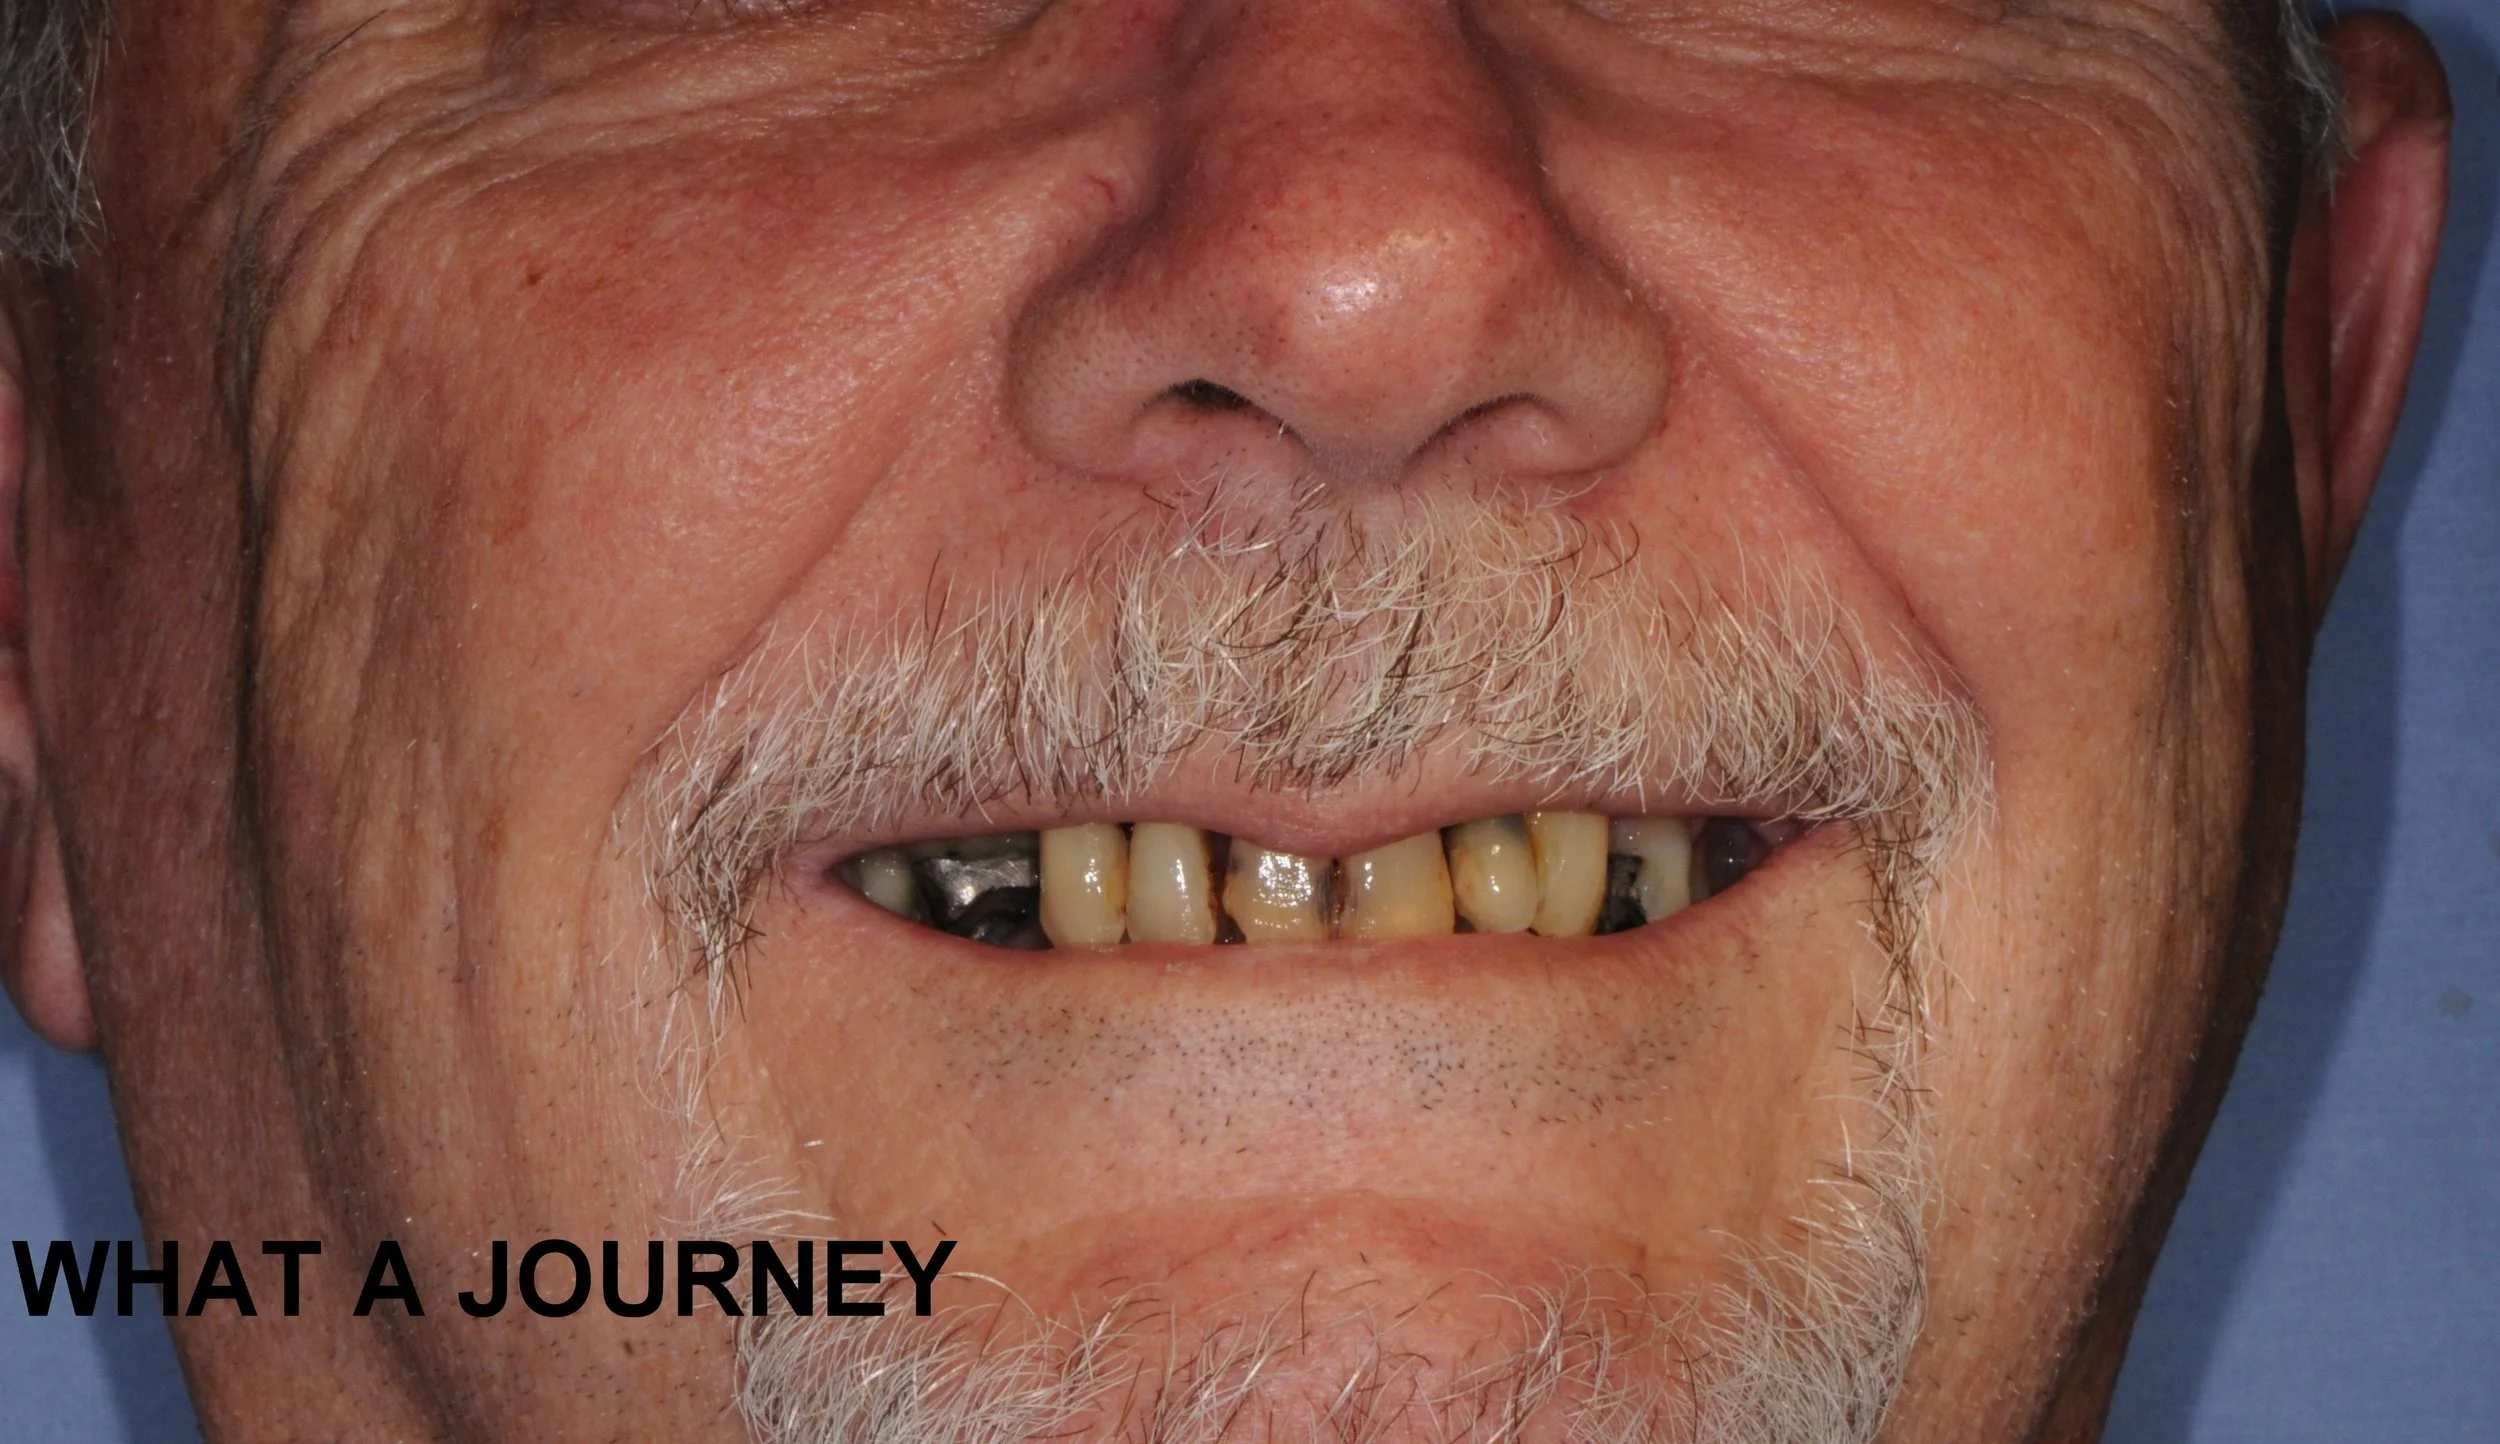
![Close-up of an older man's lower face, focusing on lips and chin.]()
Before treatment.
-
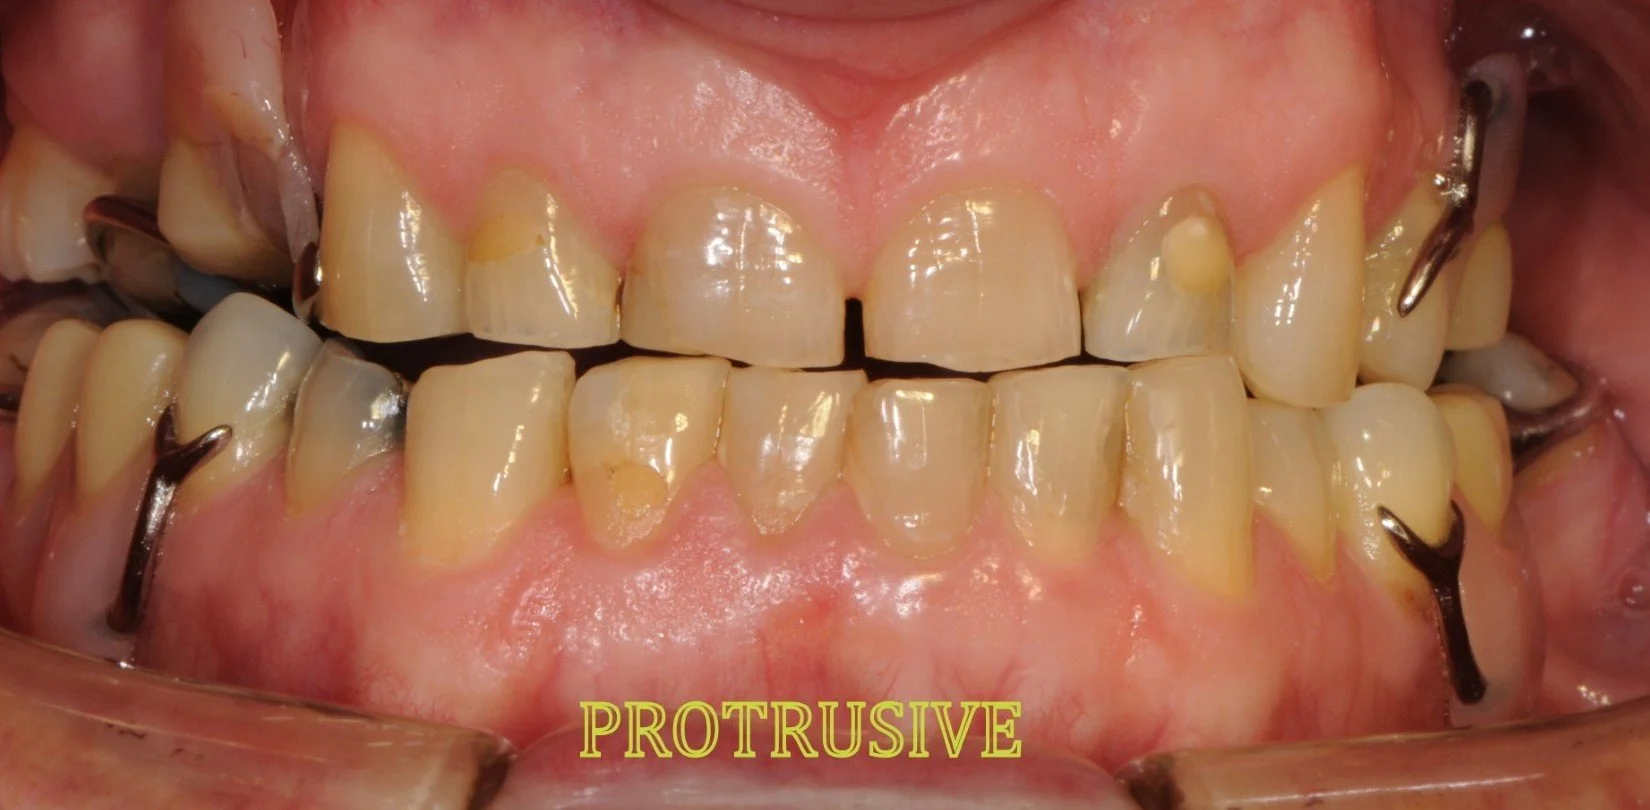
![Close-up of misaligned teeth with dental crowns and metal clasps, labeled 'protrusive.']()
Stainless steel clips and plastic denture teeth in all four quadrants.
-
![Close-up of yellowed, decayed teeth with a broken crown and cavities.]()
An anterior jig made of bees wax and multiple wafers of soft metal to determine the new facial height (nose to chin distance) required to accommodate the new crowns and bridges in hinge bite.
-
![Close-up of human teeth with dental issues, including decay and gum discoloration.]()
Temporary crowns on the canine teeth and temporary fillings on the upper lateral incisors to duplicate the facial height determined using the jig.
-
![Close-up of dental issues, including decayed and discolored teeth, and dental cavities.]()
The completed build-up of the lower incisors with resin overlays at the desired whiter colour.
-
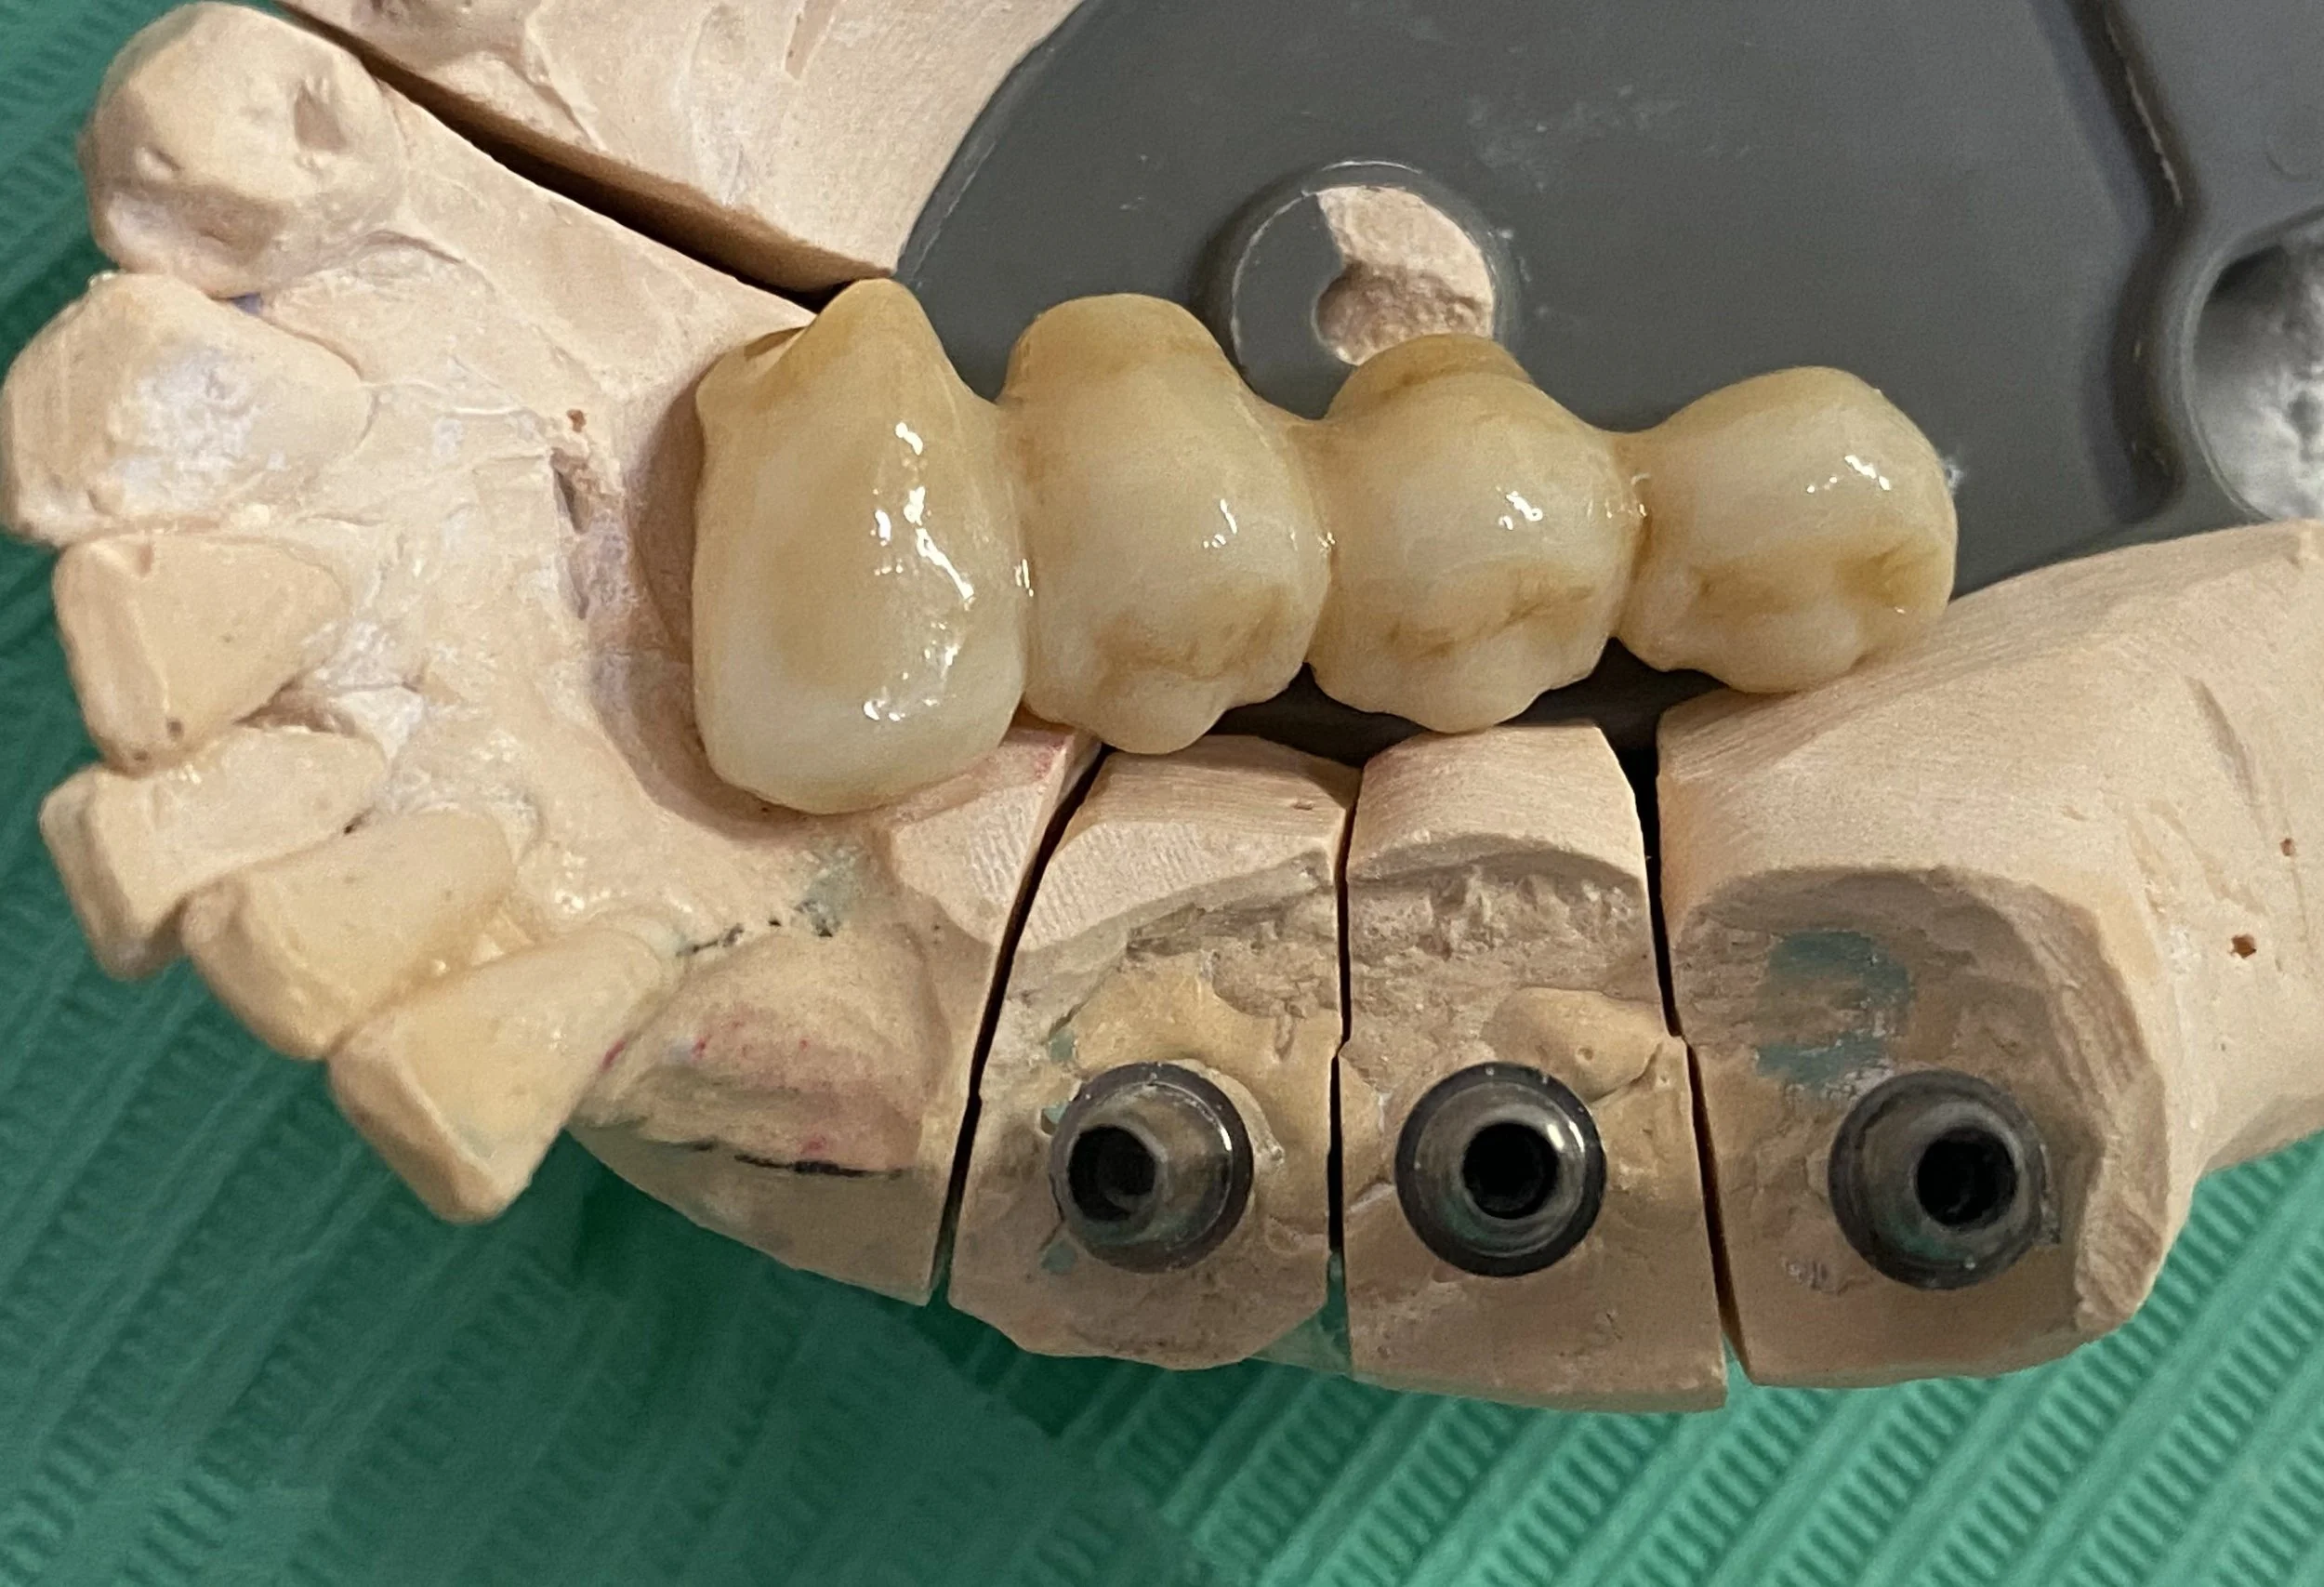
![Dental models and crowns on a plaster mold for dental restoration.]()
A plaster model with the prepared teeth for the right side 4 unit Zirconia bridge.
-
![Dental plaster model showing teeth and dental crowns.]()
A plaster model with the prepared teeth for the left side 3 unit Zirconia bridge.
-
![Close-up of upper and lower teeth, showing dental alignment and condition inside a mouth.]()
The completed 4 unit bridge from the right canine replacing 2 premolar teeth and supported by a molar tooth.
-
![Close-up of human teeth showing upper and lower molars and gums.]()
The completed 3 unit bridge from the left first premolar tooth replacing the second premolar tooth and supported by a molar tooth.
-
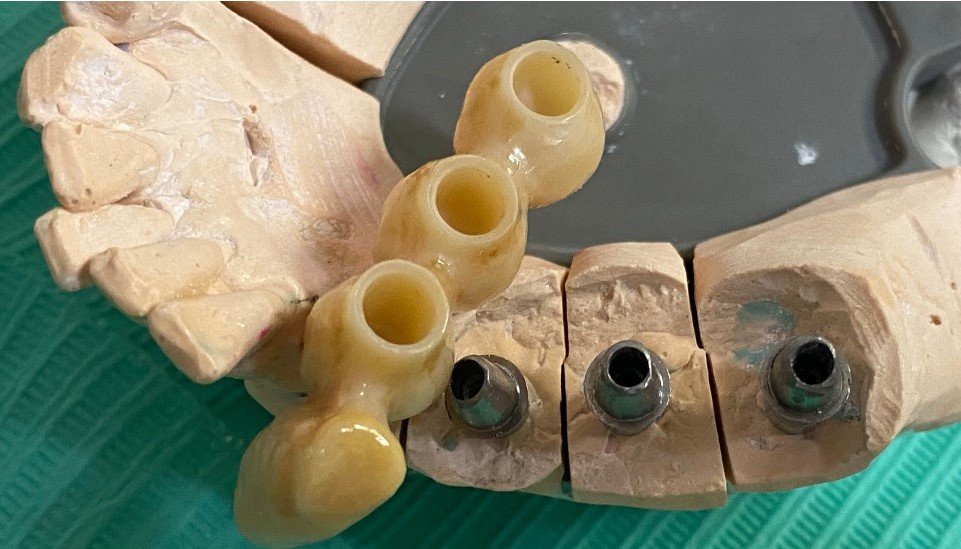
![Close-up of a dental model showcasing a tooth preparation with a removable crown nearby on a blue background.]()
A plaster model of the prepared molar teeth for a future 4 unit bridge. The internal portion of the molar tooth illustrates a post preparation and to the side a cast metal post-core coated with an opaque porcelain.
-
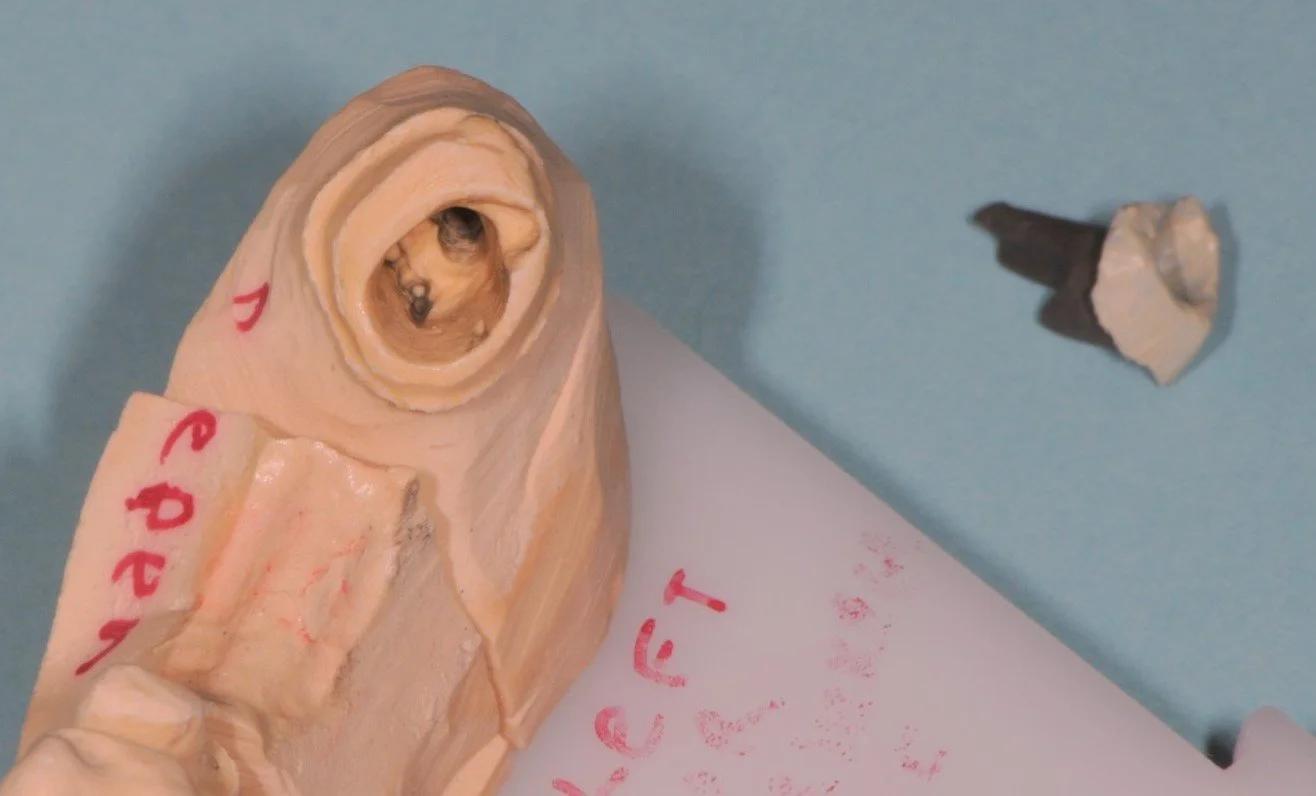
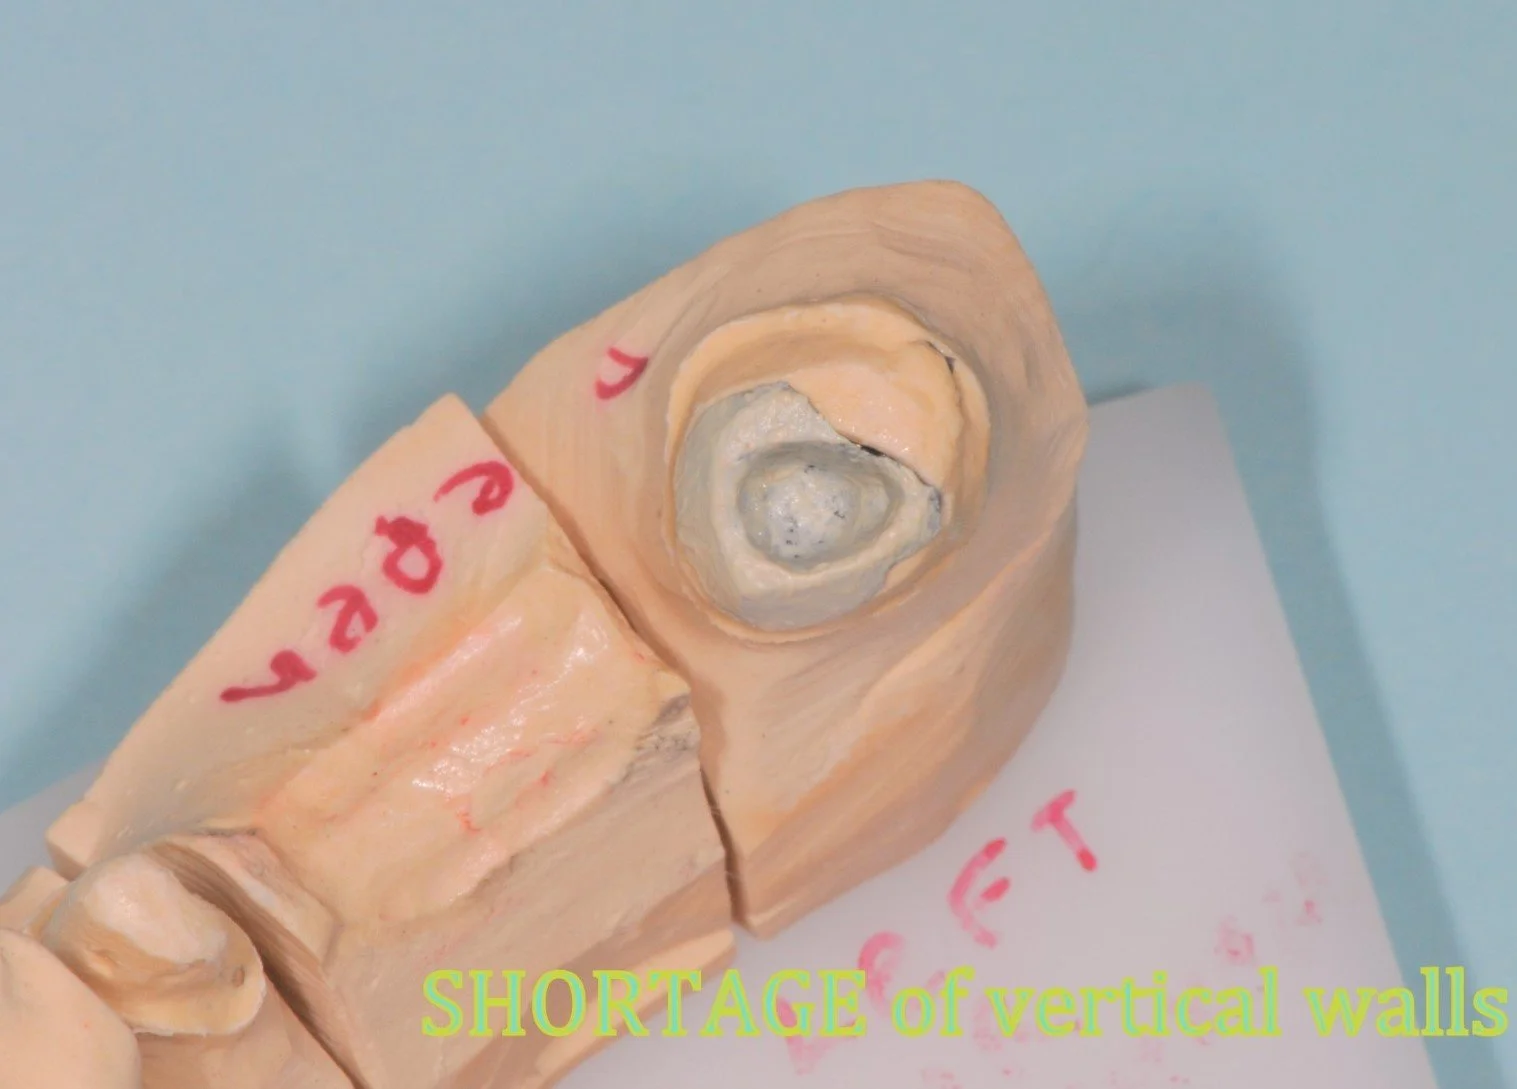
![Dental impression model with labeled sections, highlighting a shortage of vertical walls note.]()
A plaster model of the prepared teeth for a 3 unit bridge. This also illustrates the fitted post-core in the root of the molar tooth. This was required to build up vertical walls missing because the molar tooth was severely tilted. Please note the recess or well present inside the core was used to boost the retention of the bridge.
-
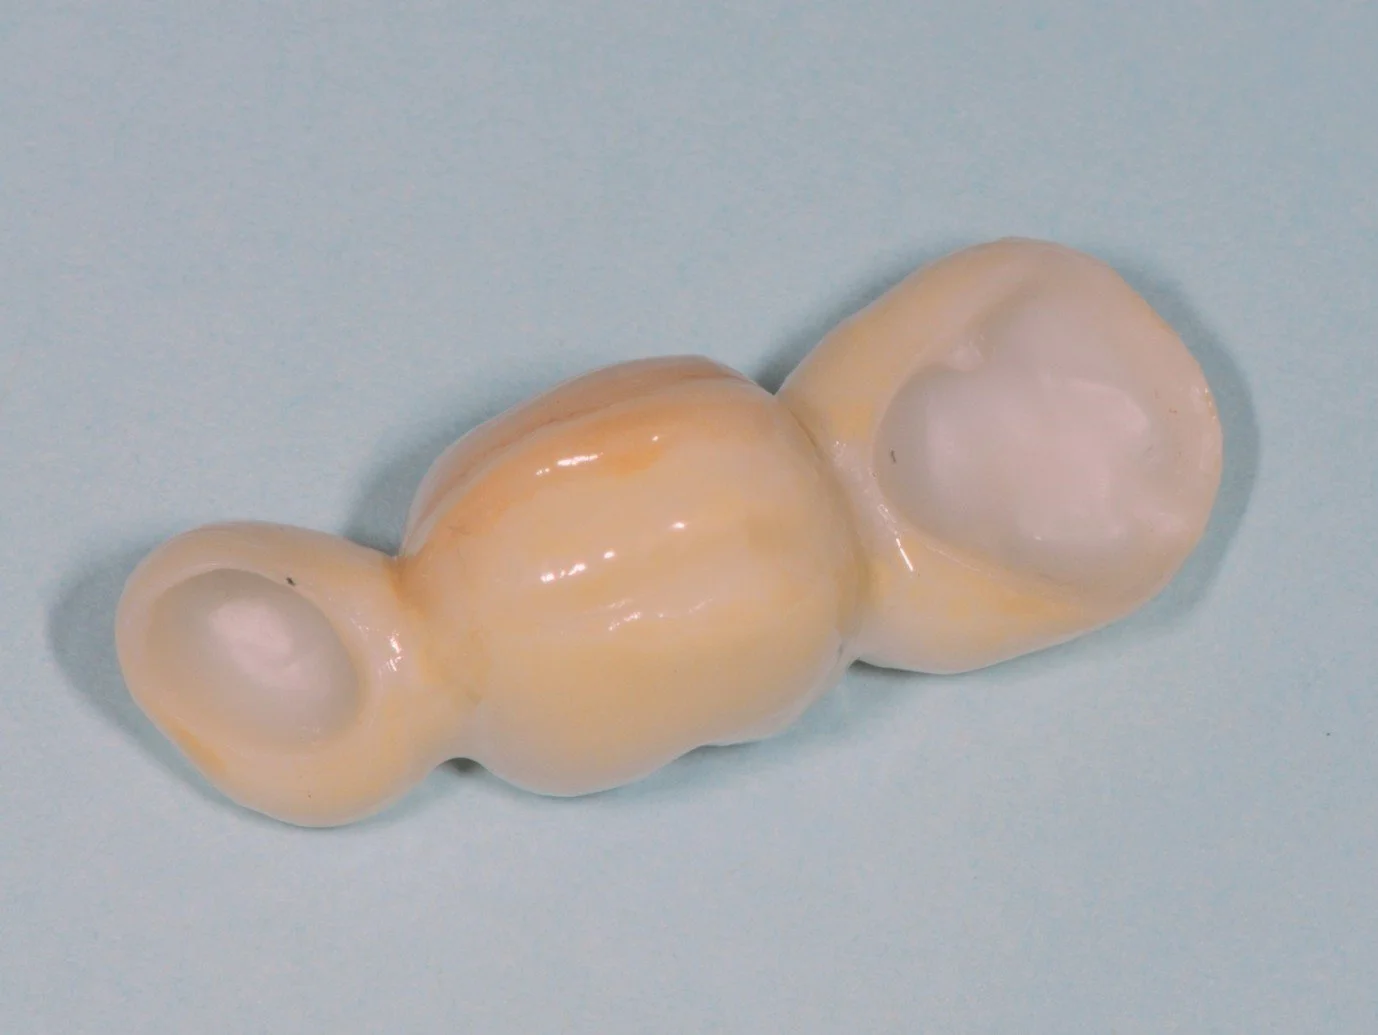
![Macro photo of a small, elongated, yellowish ceramic object with two circular ends and a glossy finish, set against a light blue background.]()
A 3 unit Zirconia bridge and a retentive Zirconia lump is evident in the molar crown and was designed to fit into the cast post-core for boosting bridge retention.
-
![Dental model with several teeth, including one with endodontic access, used for educational purposes.]()
A plaster model of the prepared teeth with grooving for a Zirconia 3 unit bridge.
-
![Dental bridge on light blue background]()
A. 3 unit zirconia bridge illustrating the base of the bridge or pontic tooth and inside the molar crown a zirconia rail is evident which duplicated the groove that was placed in the tooth for increased bridge retention.
-
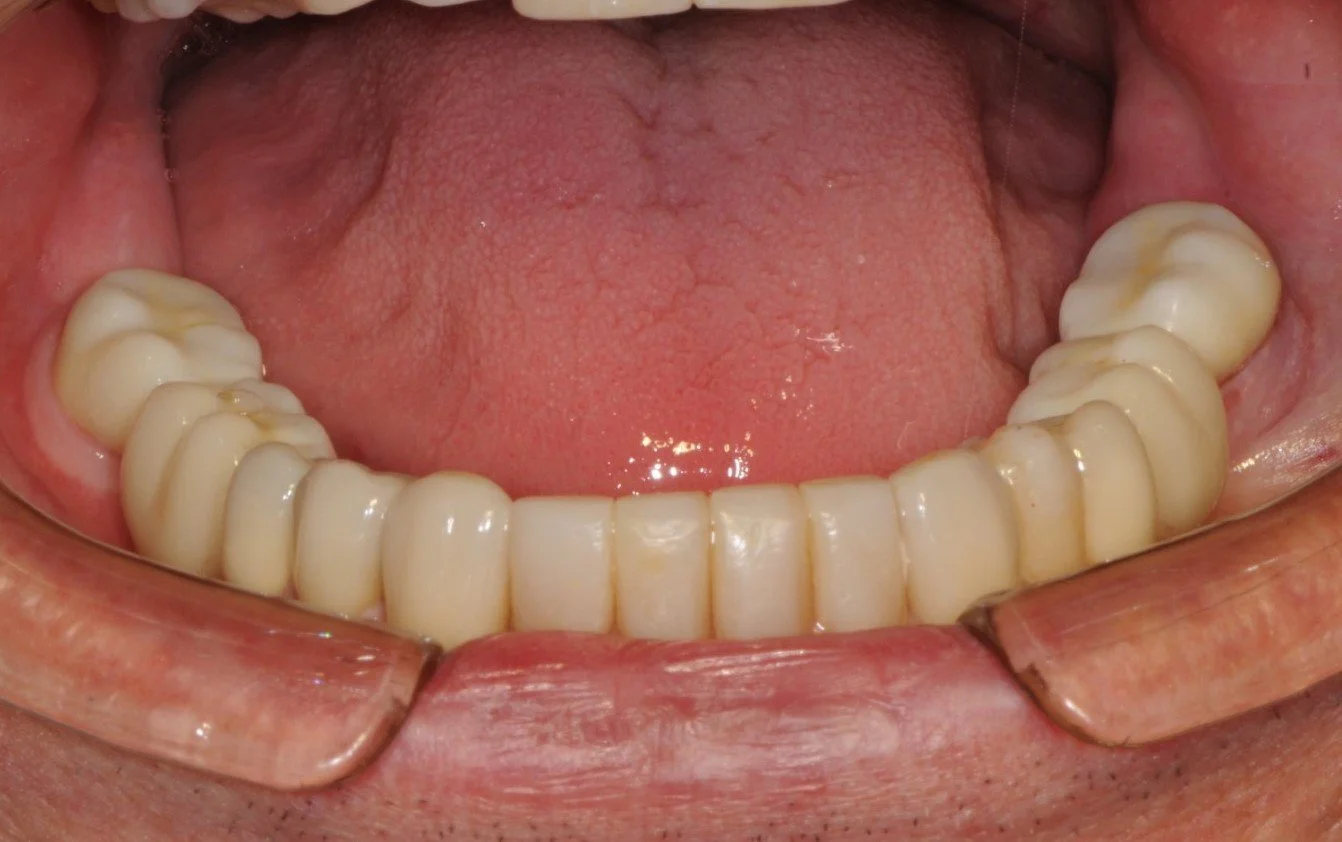
![Close-up of a person's lower dental prosthesis with visible gums and tongue.]()
The final view of the tops of the lower bridges and other teeth.
-
![Close-up of a smiling older man showing upper teeth]()
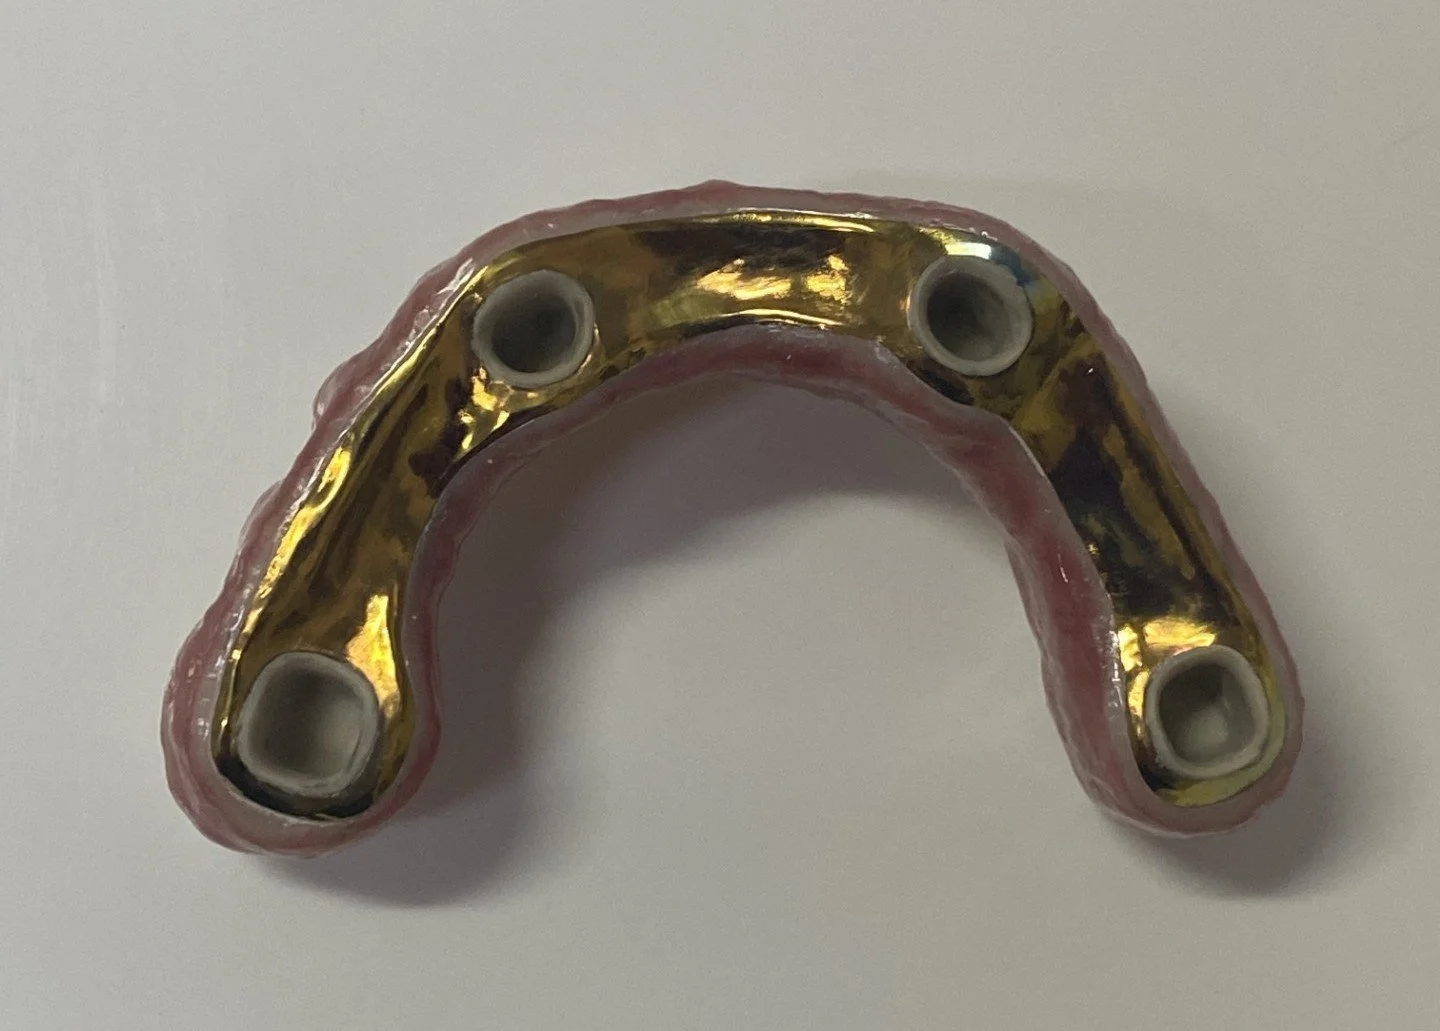
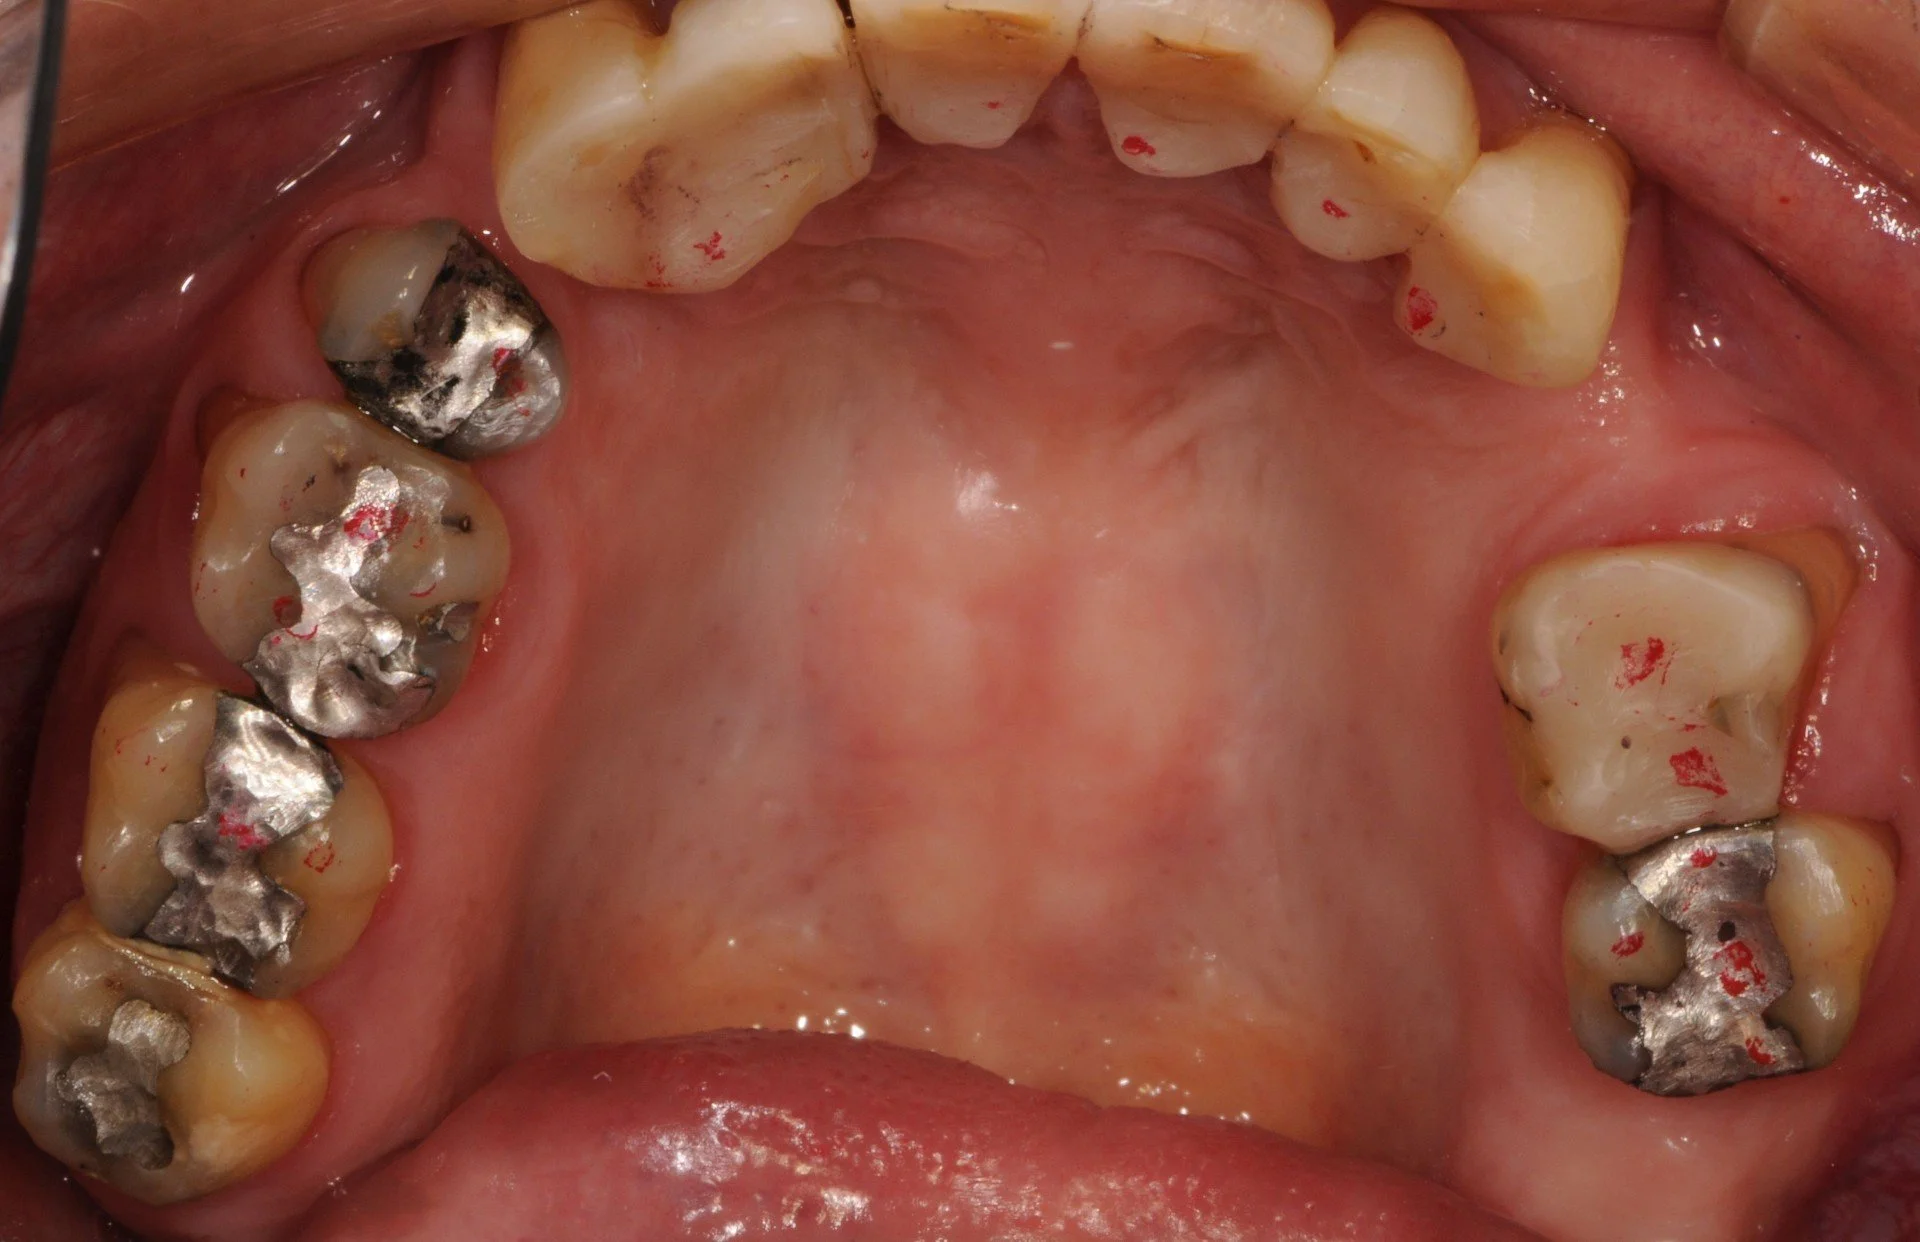
The final facial photograph of the completed reconstructed teeth without partial dentures. This Lismore patient was initially treated in Brisbane 15 years ago and I see him twice a year for a Continuous Care Appointment (CCA) and cleaning around his crowns, bridges and overlays using an airbrush that sprays a chalk/air/water air jet at the tooth and below the gumline to prevent decay and gum disease. All the crowns, bridges and overlays are intact 15 years later. He does not miss his partial dentures!


IMPLANT CROWNS, BRIDGES, DENTURES
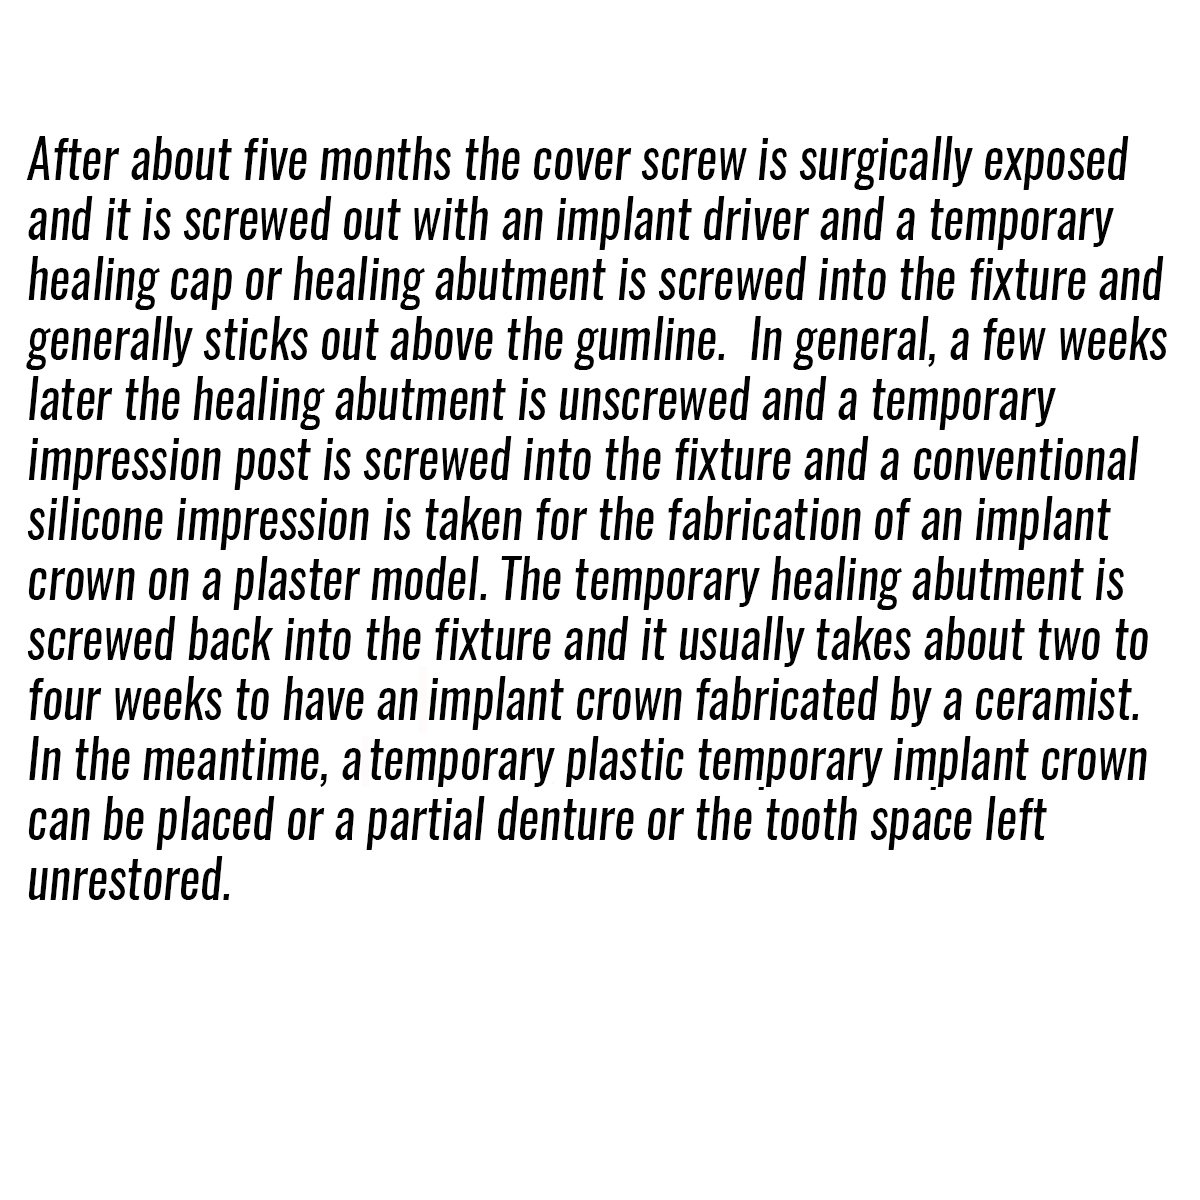
Implant Componentry
-
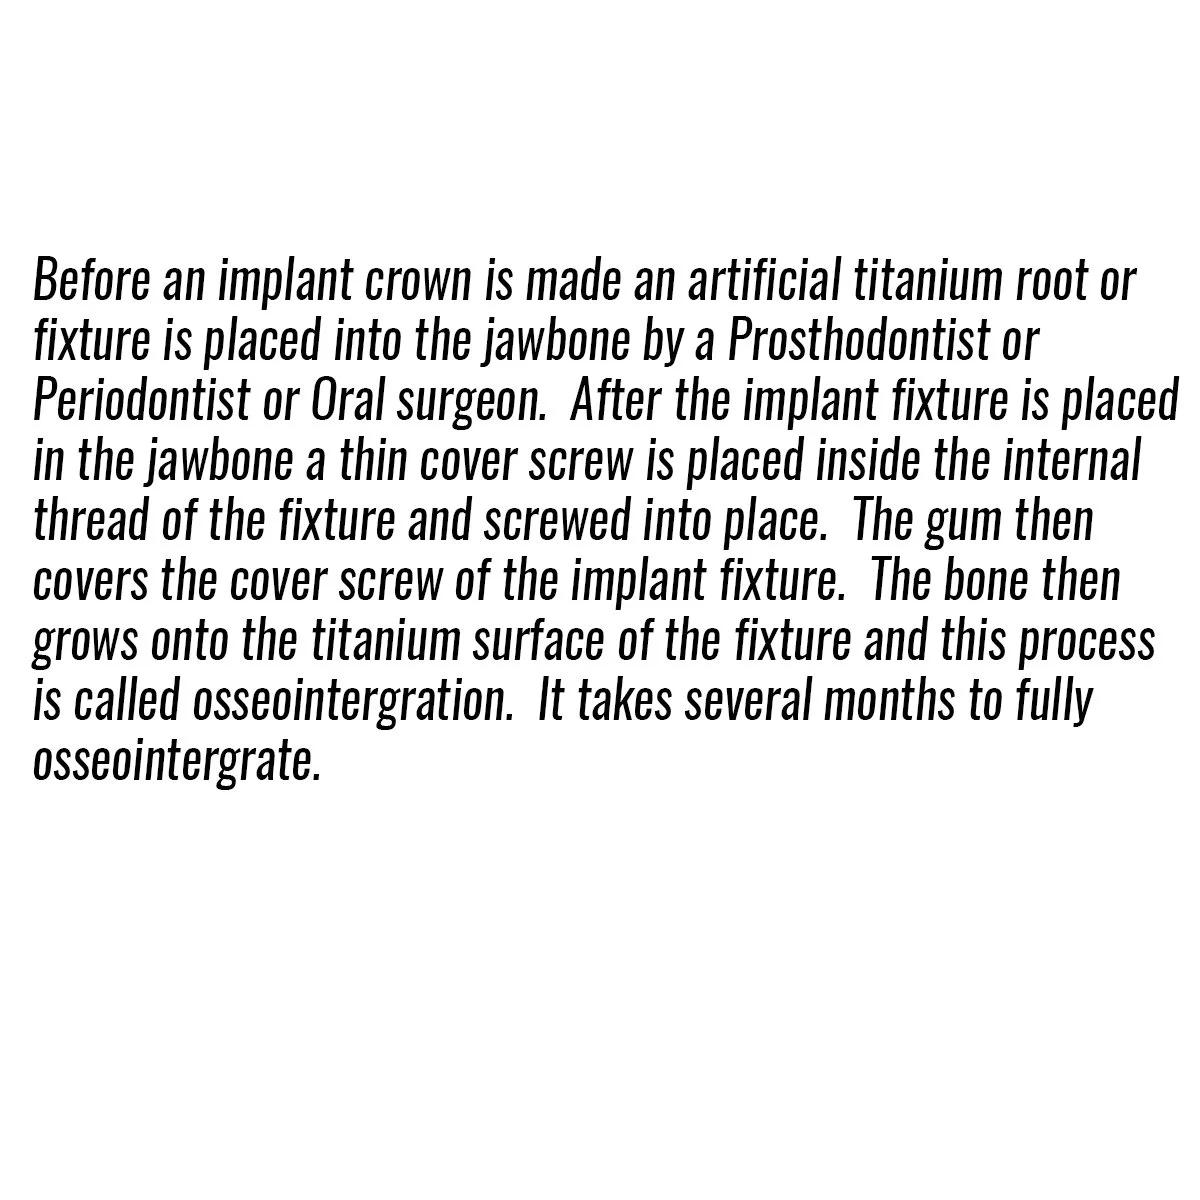
![Text explaining the dental implant process, involving titanium root, cover screw, gum coverage, and osseointegration, completed by a prosthodontist, periodontist, or oral surgeon.]()
-
![]()
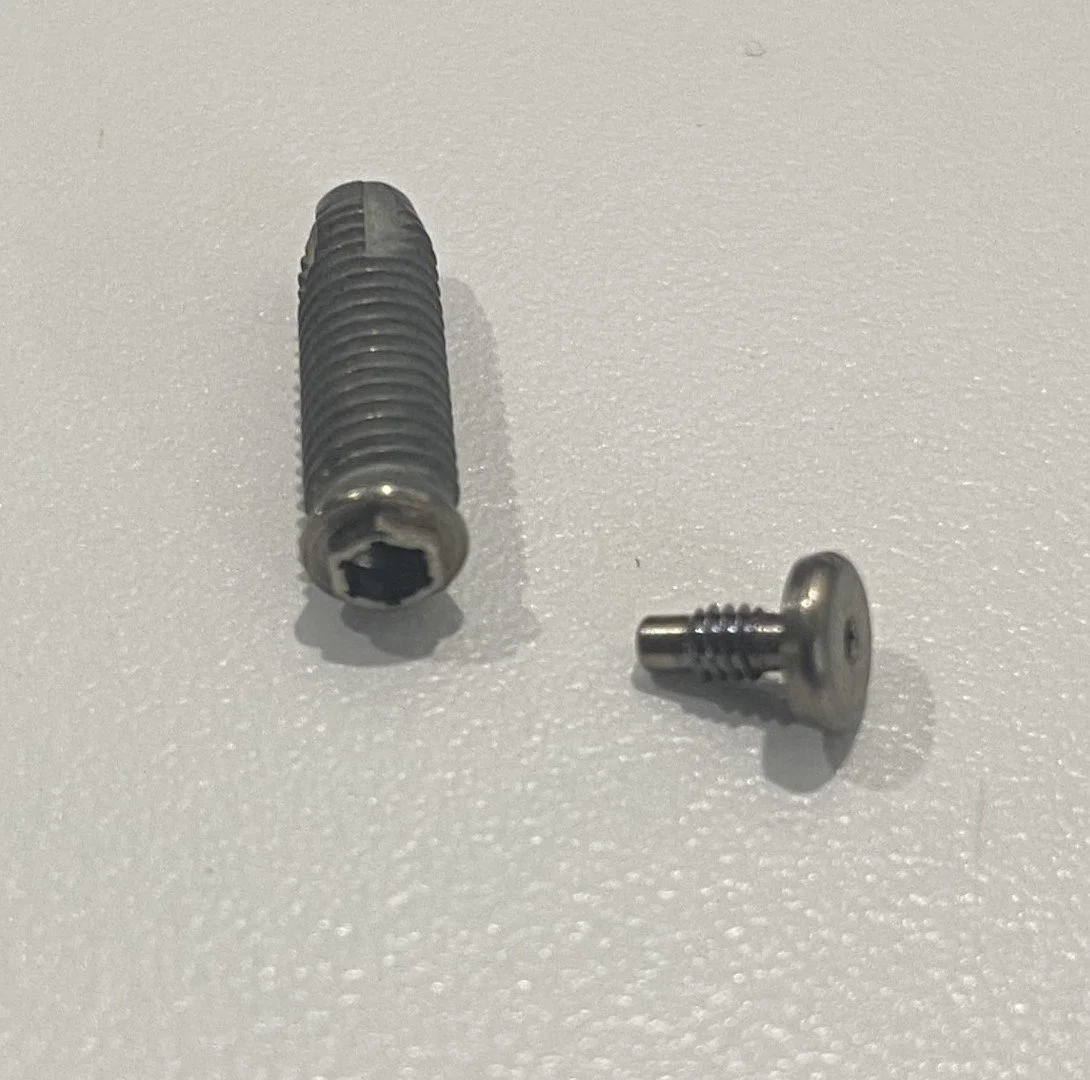
A titanium fixture and cover screw .
-
![]()
-
![]()
-
![]()
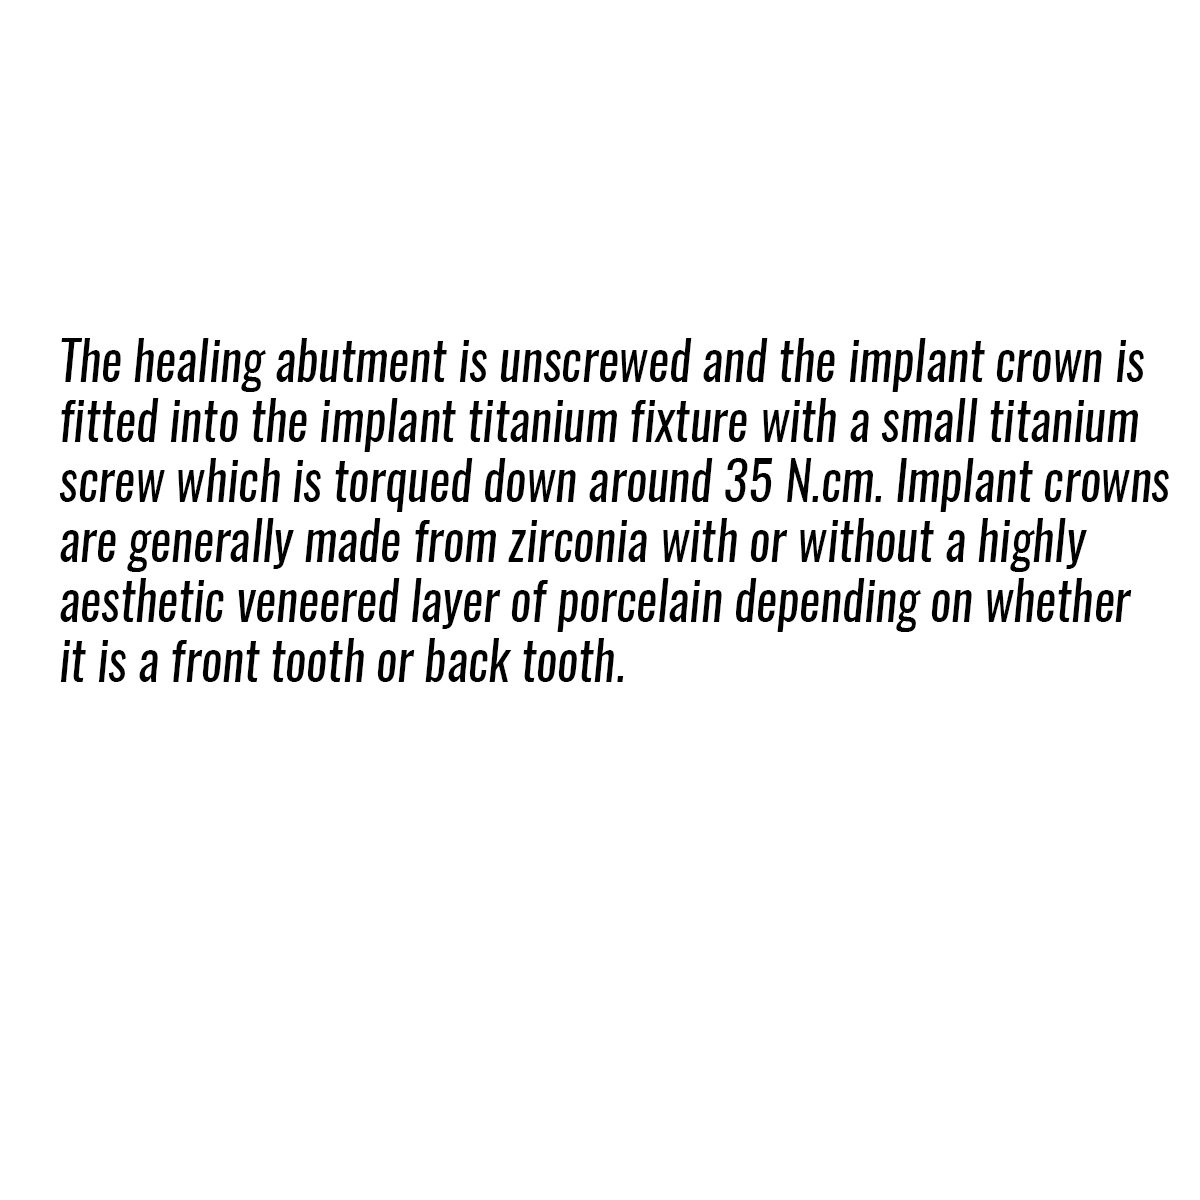
An an implant fixture and healing cap, also called a healing abutment.
-
![]()
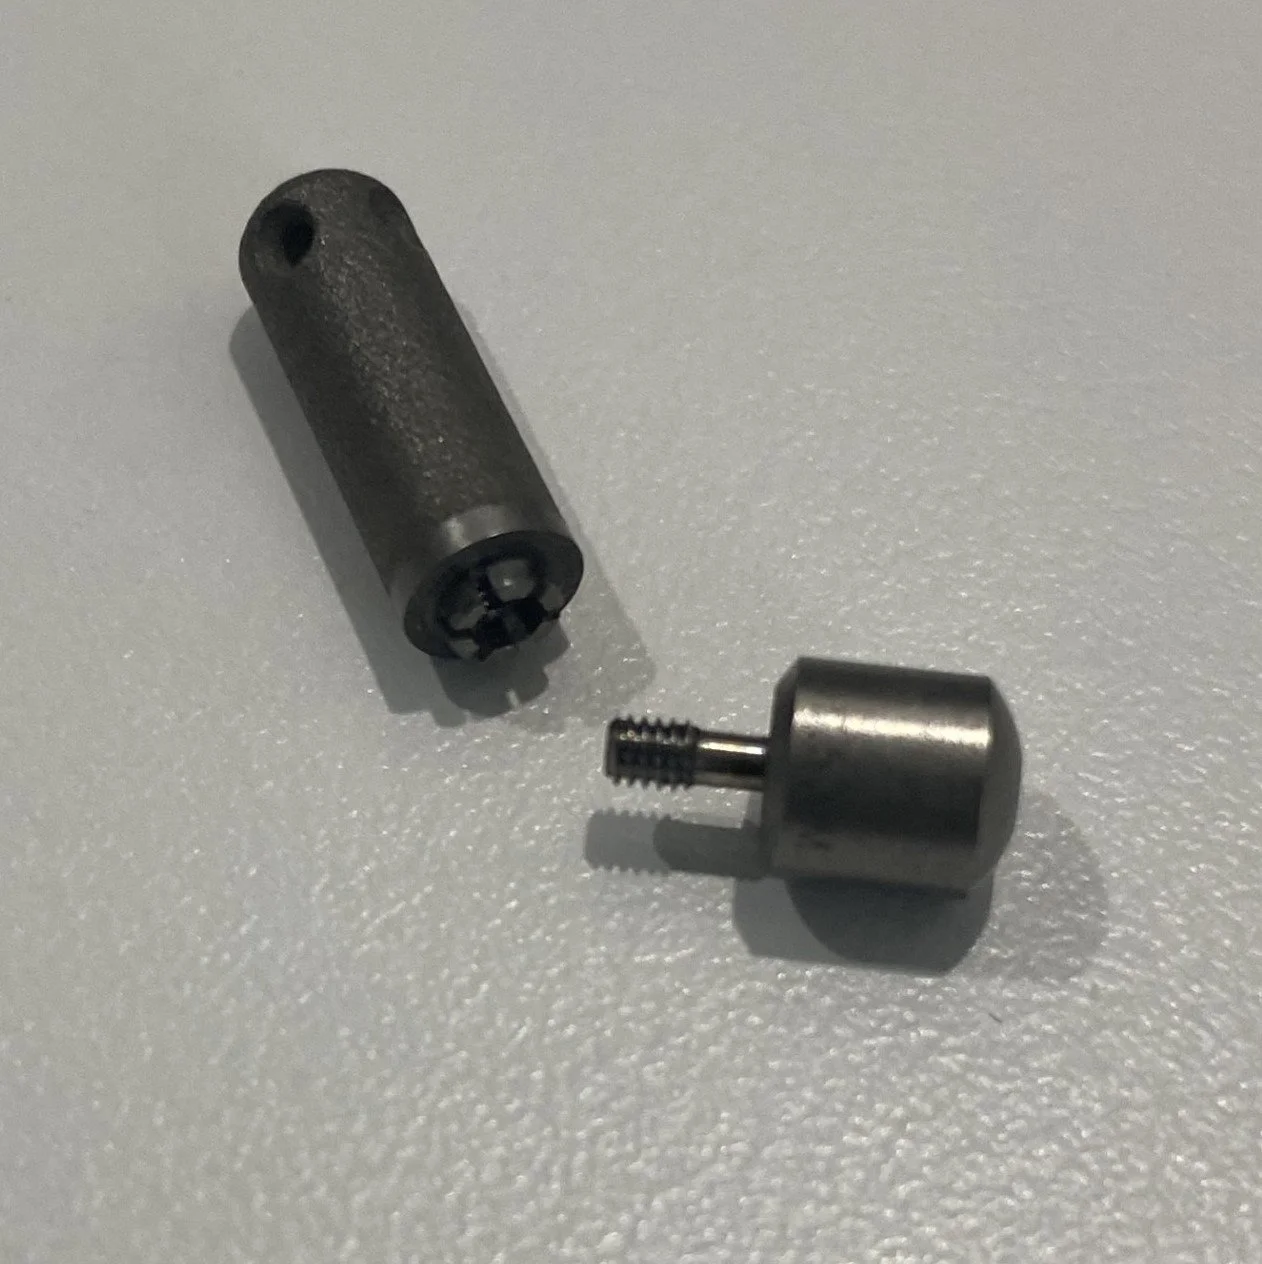
A fixture and a cemented abutment.
-
![]()
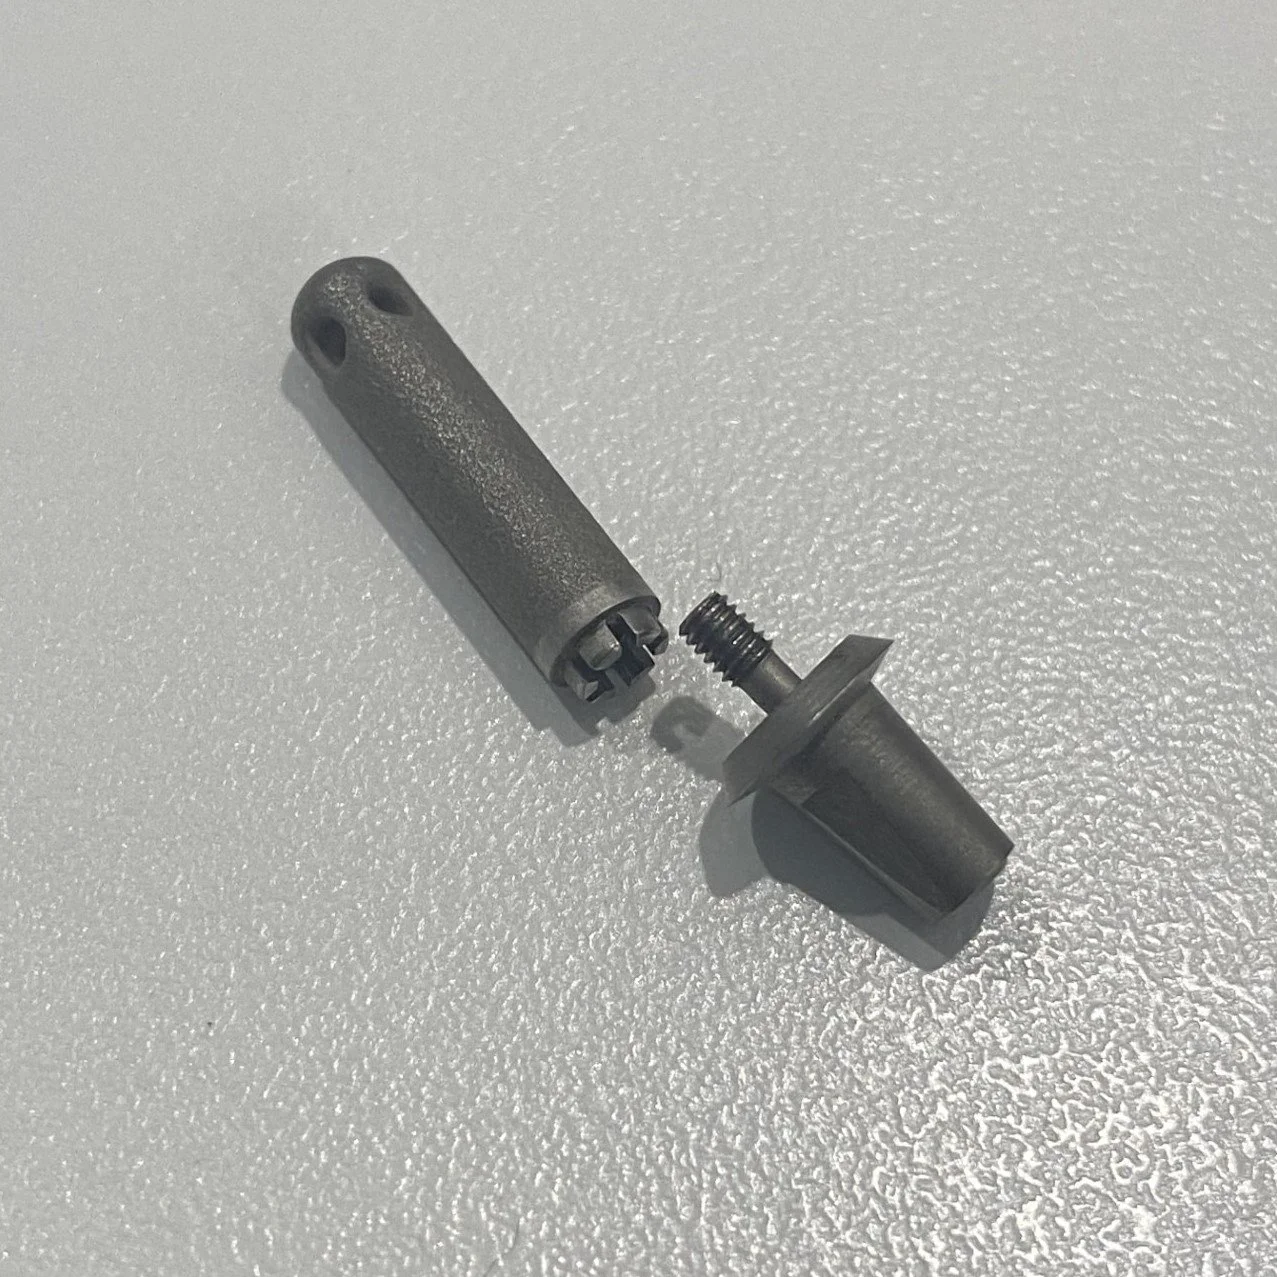
A Straumann fixture and healing abutment.
-
![]()
A completed zirconia implant crown (screw retained)
-
![]()
A rear view of the inside of a molar zirconia implant crown illustrating the metal titanium base abutment and a retentive implant screw.
-
![]()
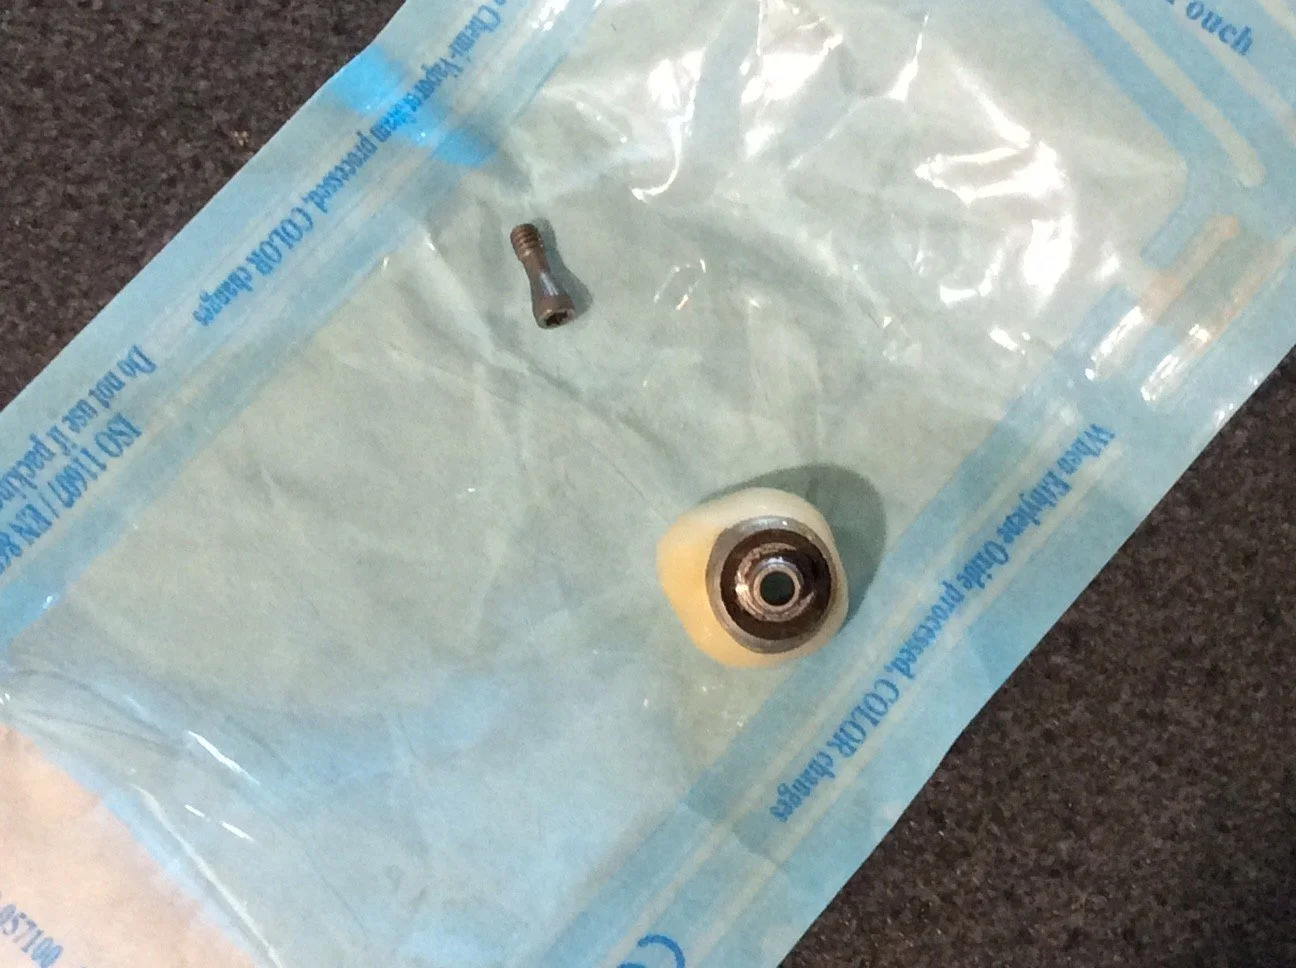
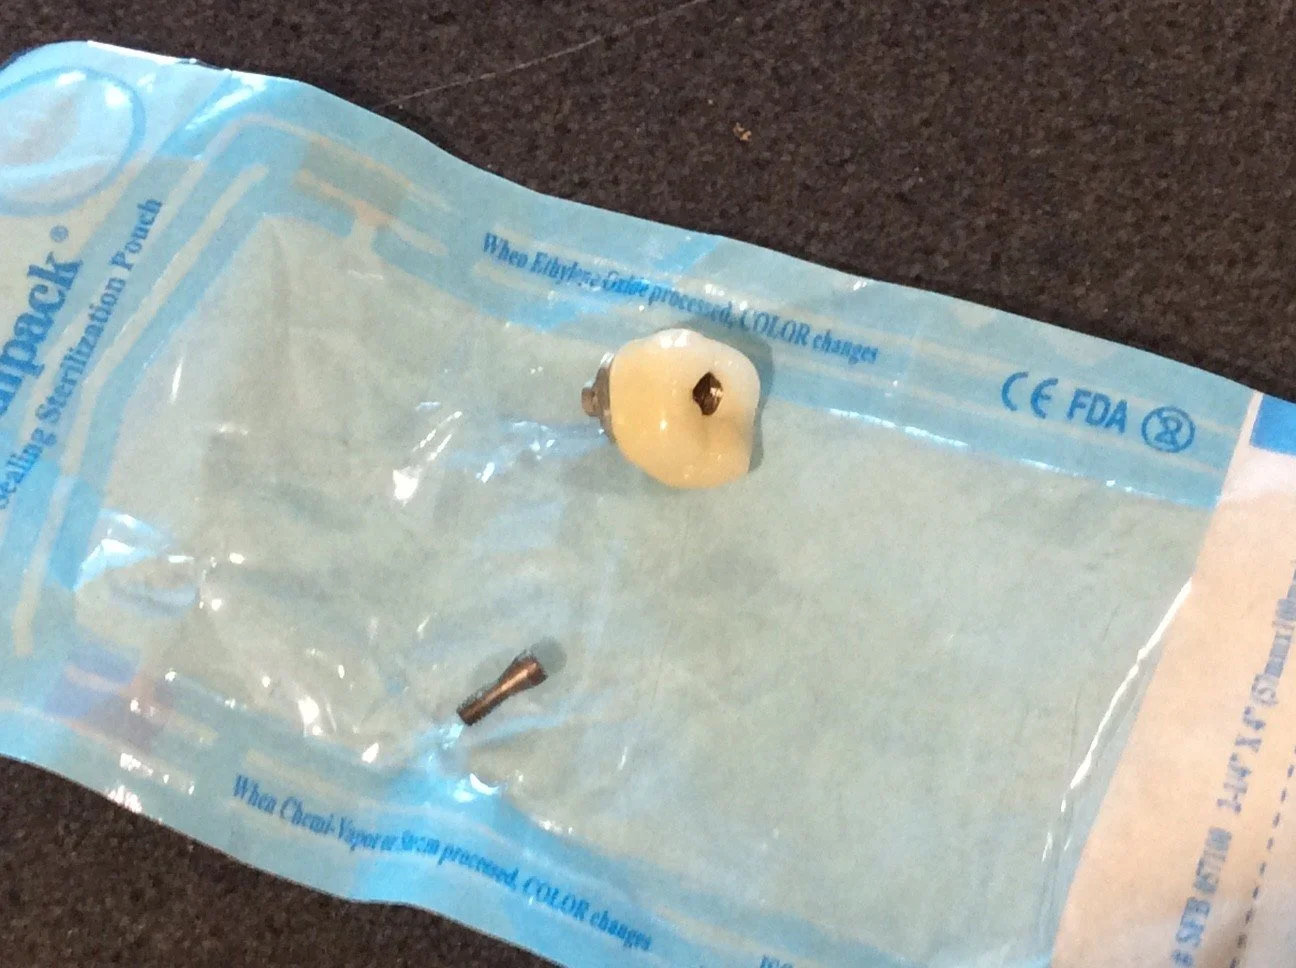
The screw access hole in the implant crown and retaining screw.There is a third component called an abutment which is the connecting structure between the fixture and implant crown, which is generally a titanium base abutment which is glued to the insides of an implant crown.Occasionally, a cemented abutment is used which involves connecting the cemented type of abutment to the fixture with a small screw and cementing the implant crown to the abutment
IMPLANT SURGERY
Implant surgery is carried out at Brunswick House, 42 Uralba Street, Lismore by Dr. Michael Darveniza.
-
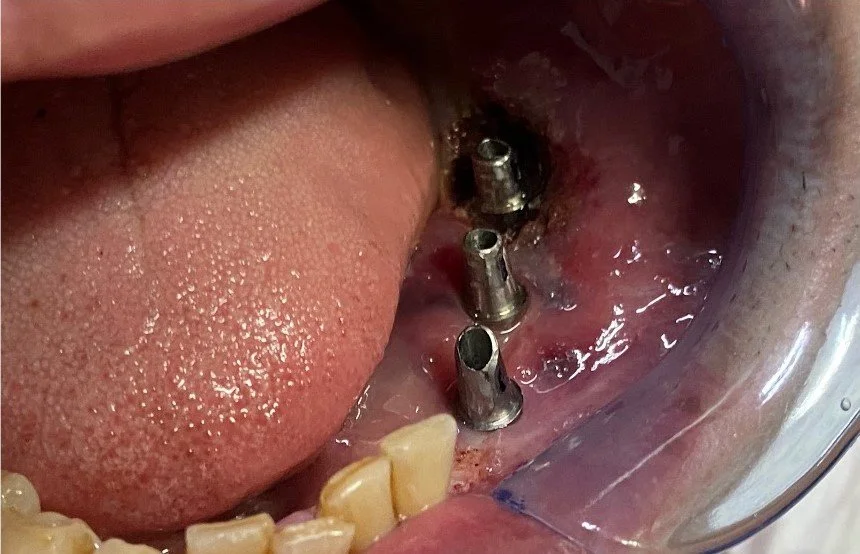
![]()
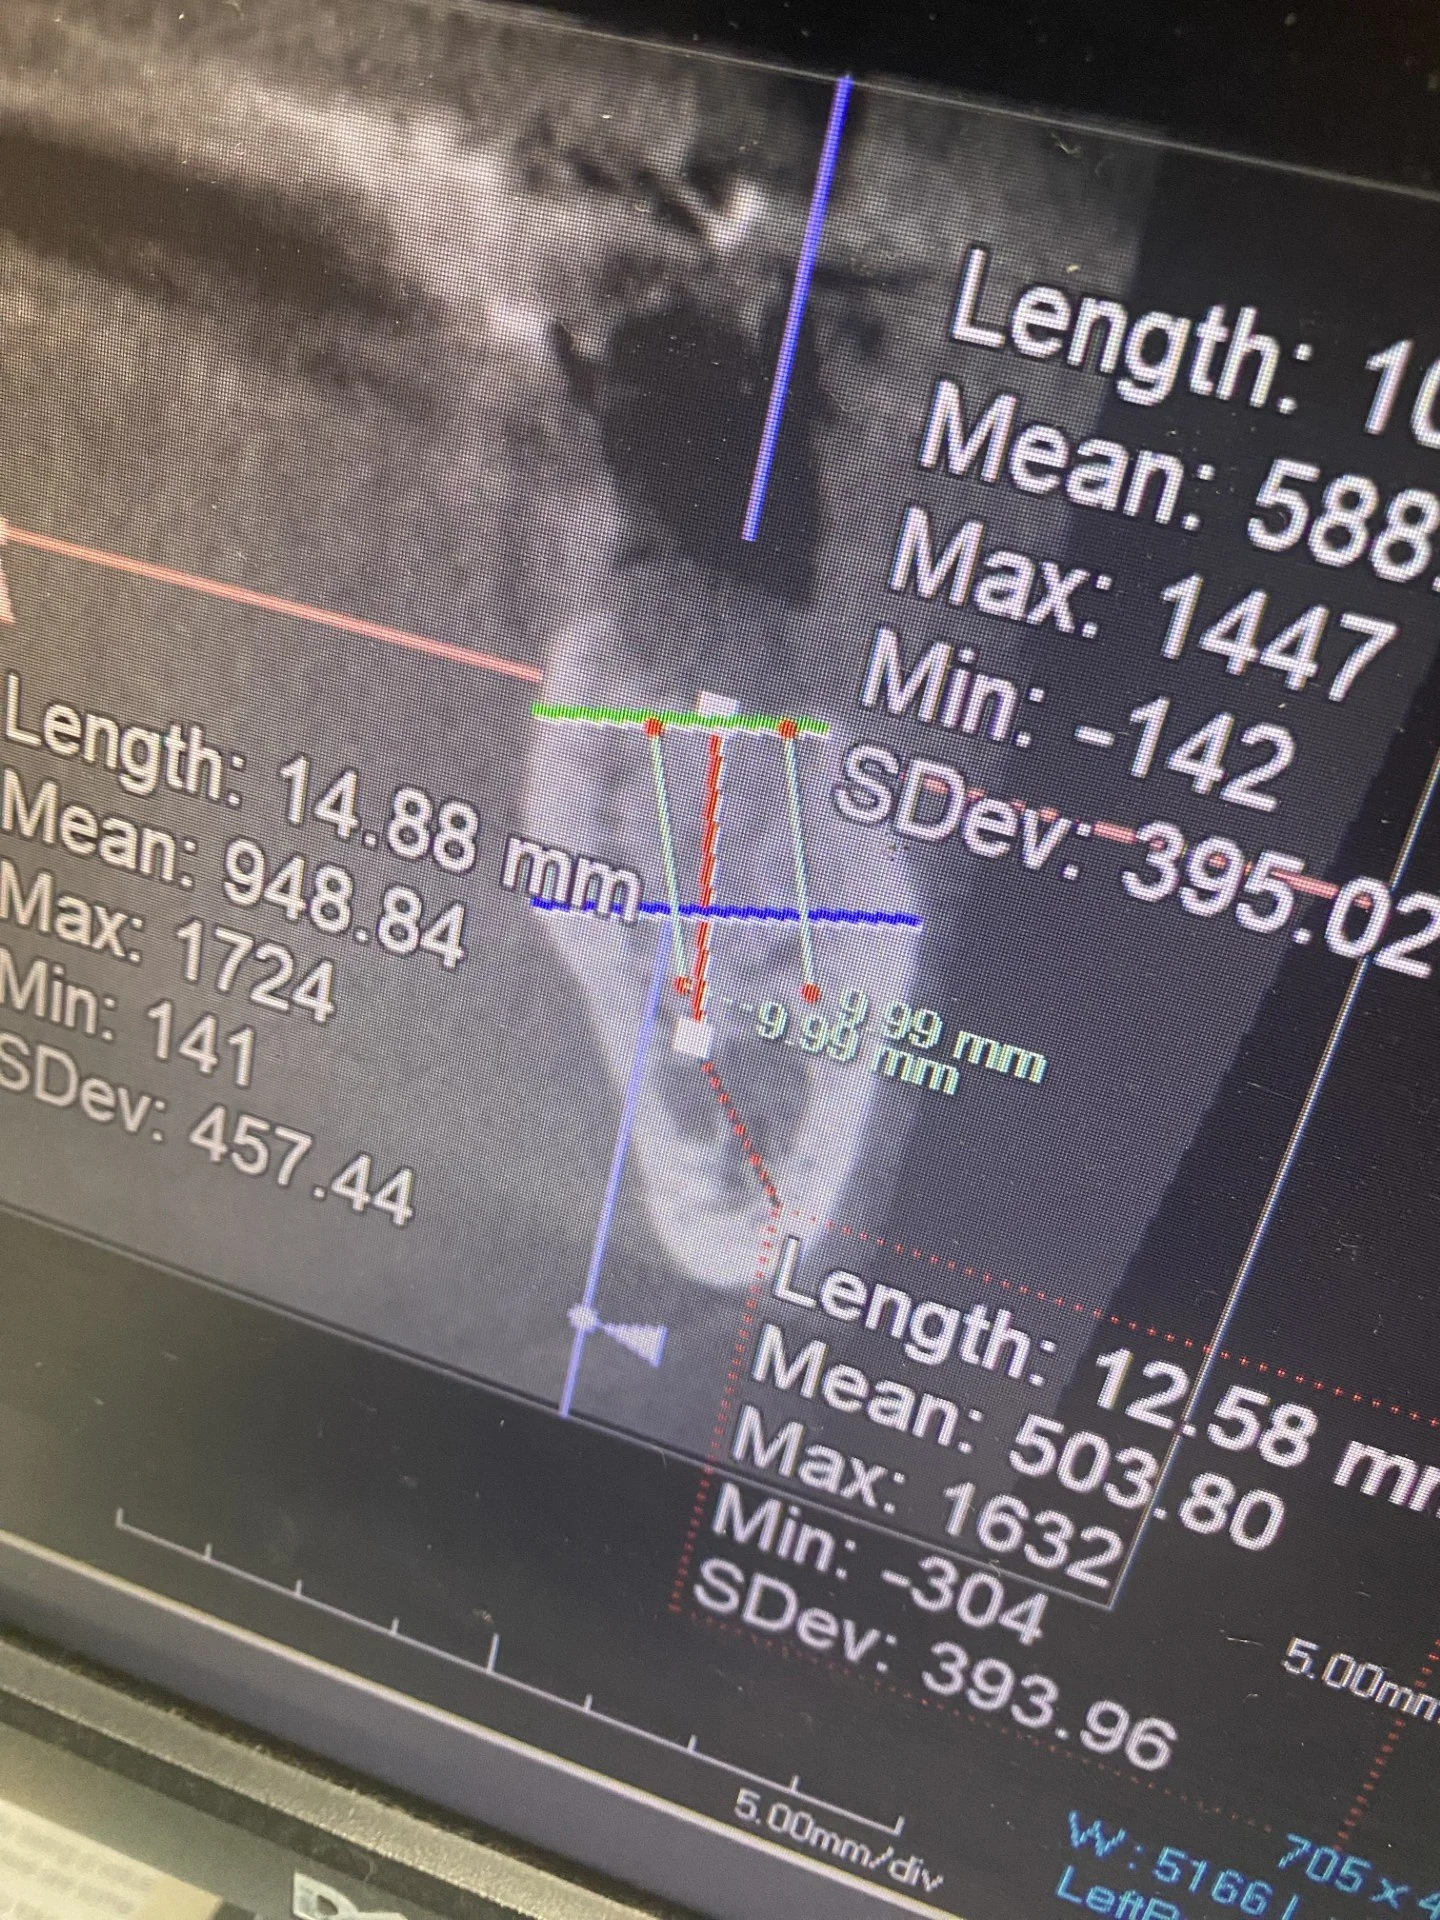
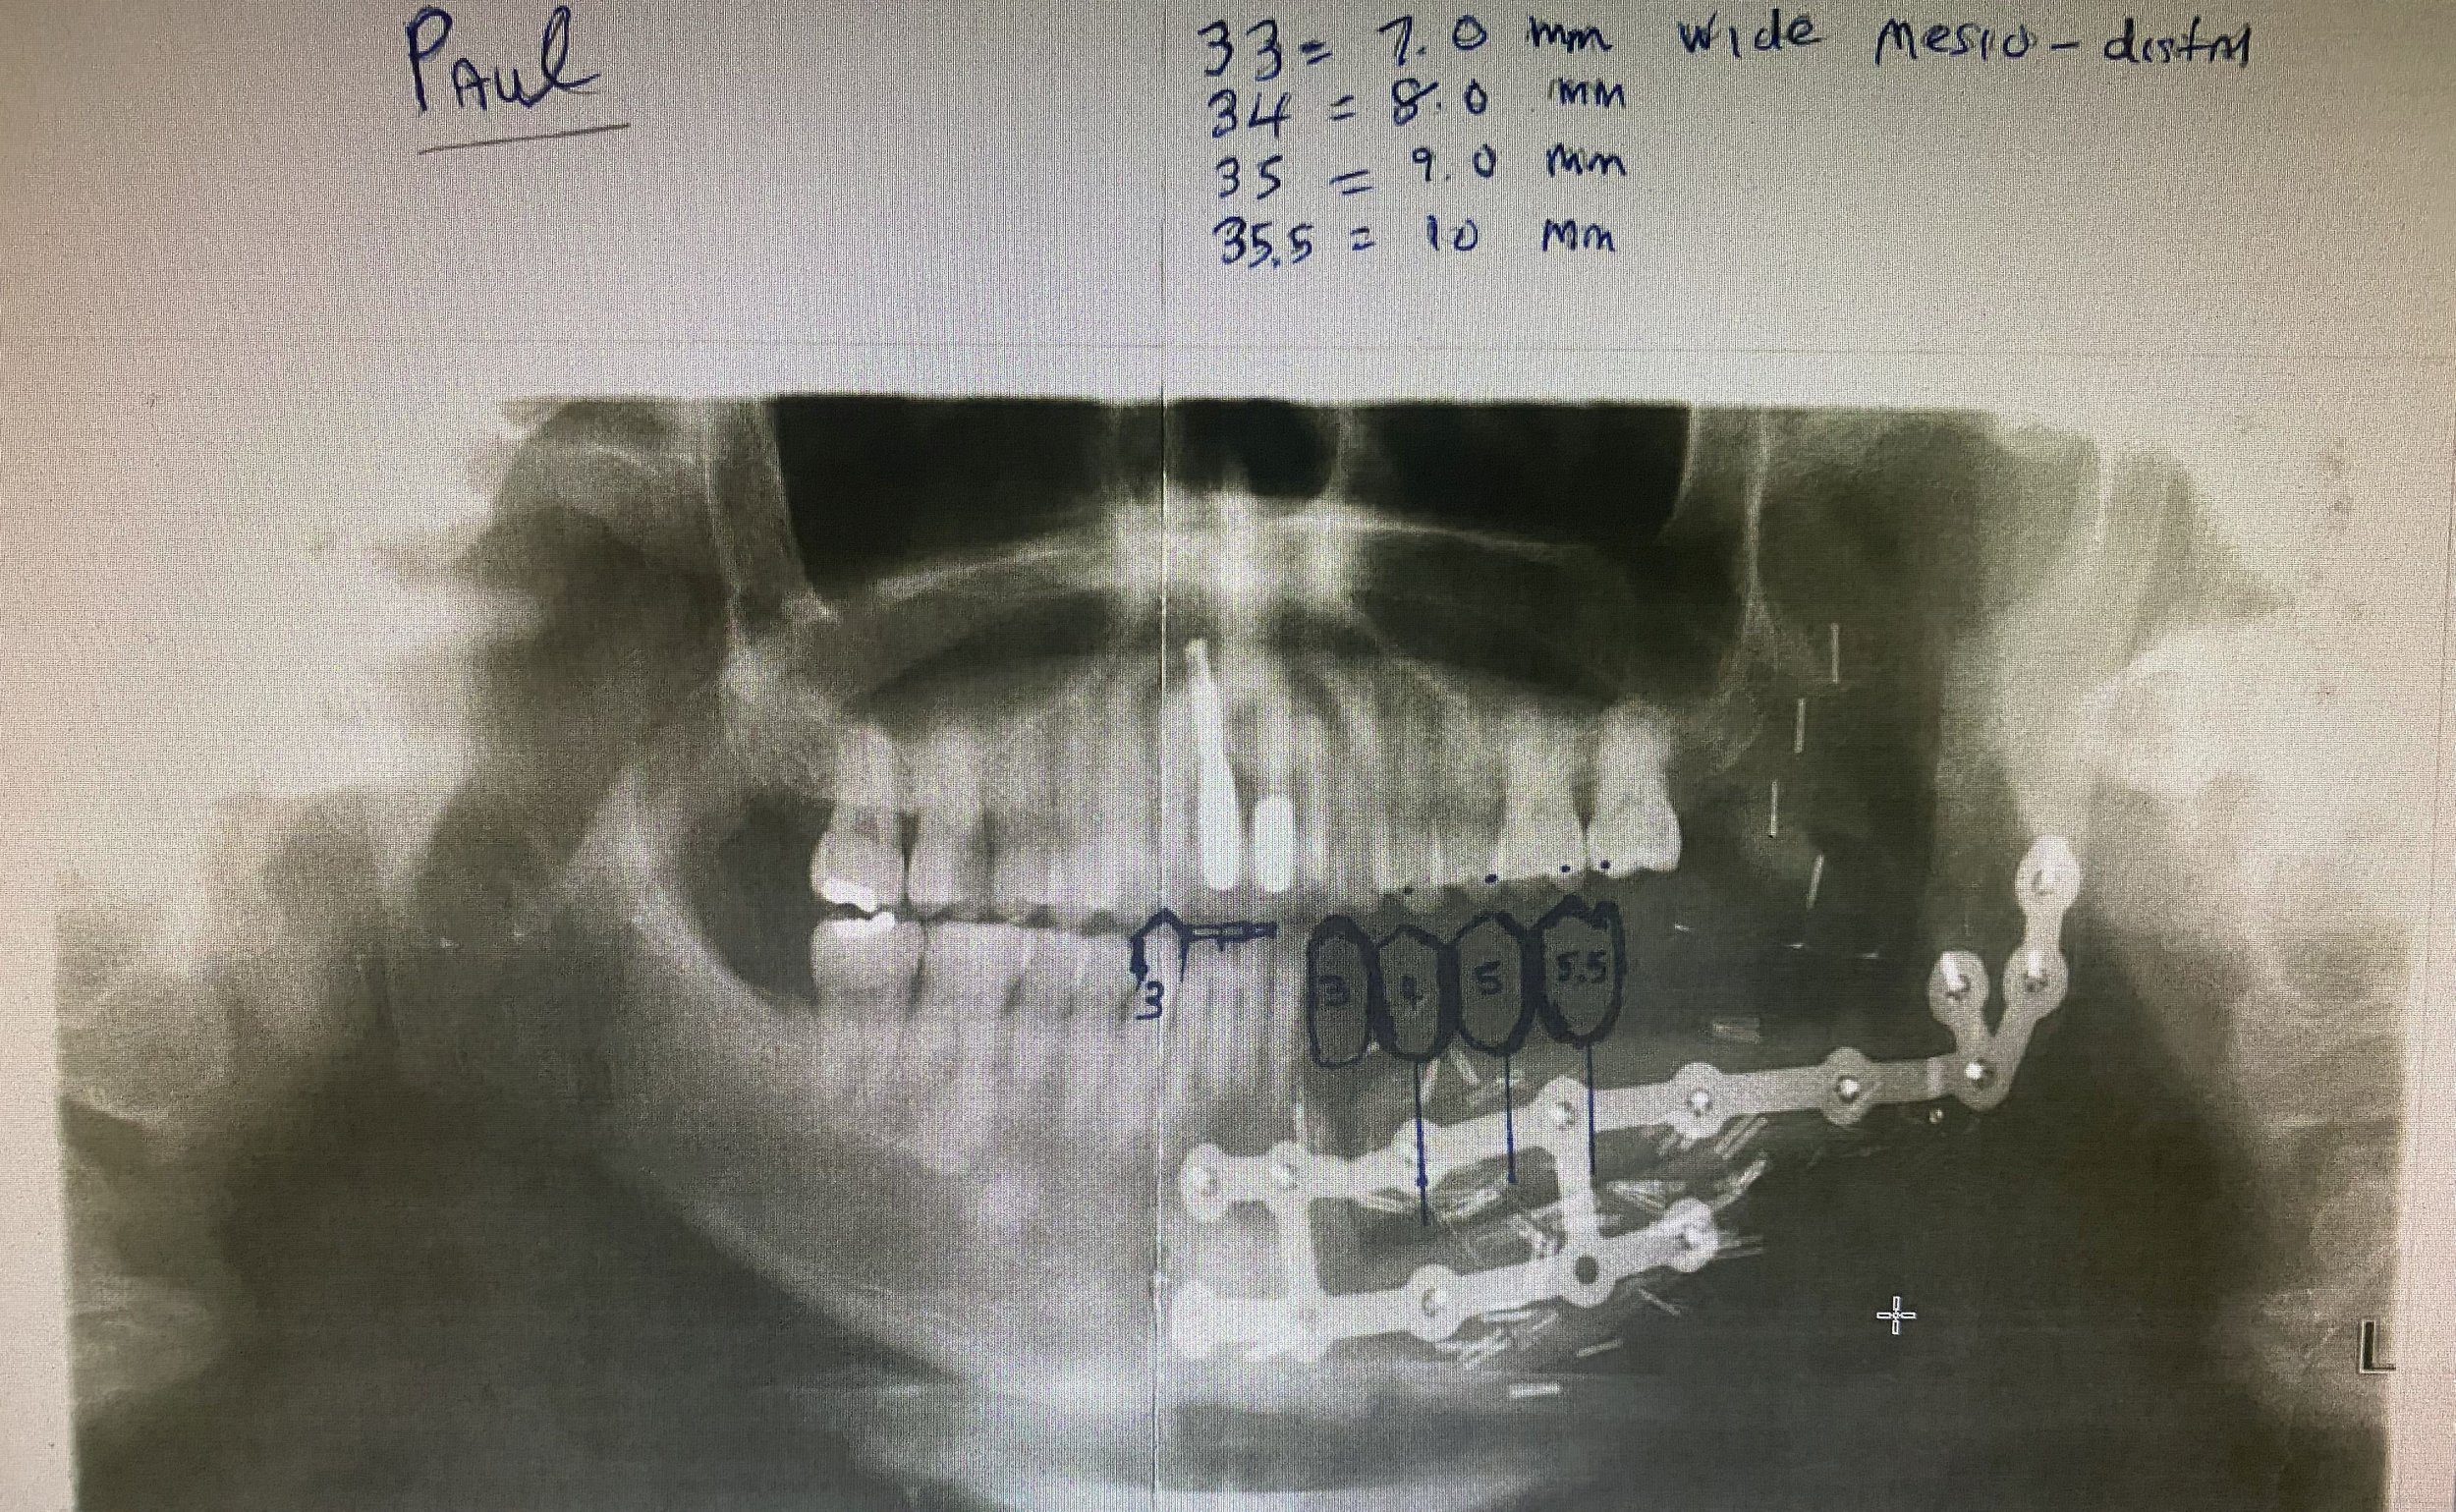
THIS IS A CT SCAN OF A PATIENT’S LOWER JAW IN THE 36 MOLAR REGION FOR TREATMENT PLANNING AND SELECTING THE APPROPRIATE LENGTH AND DIAMETER IMPLANT FIXTURE. THIS SLICE REPRESETS THE CHOSEN CENTROID POSITION FOR THE FUTURE IMPLANT FIXTURE WHICH WAS 10 MM LONG BY 5 MM IN DIAMETER. COLOURED LINE DIAGRAMS WERE USED TO FIND AN APPROPRIATE POSITION AND ANGULATION FOR THIS IMPLANT FIXTURE TO AVOID ENDANGERING THE MANDIBULAR NERVE AND OTHER STRUCTURES.
-
![]()
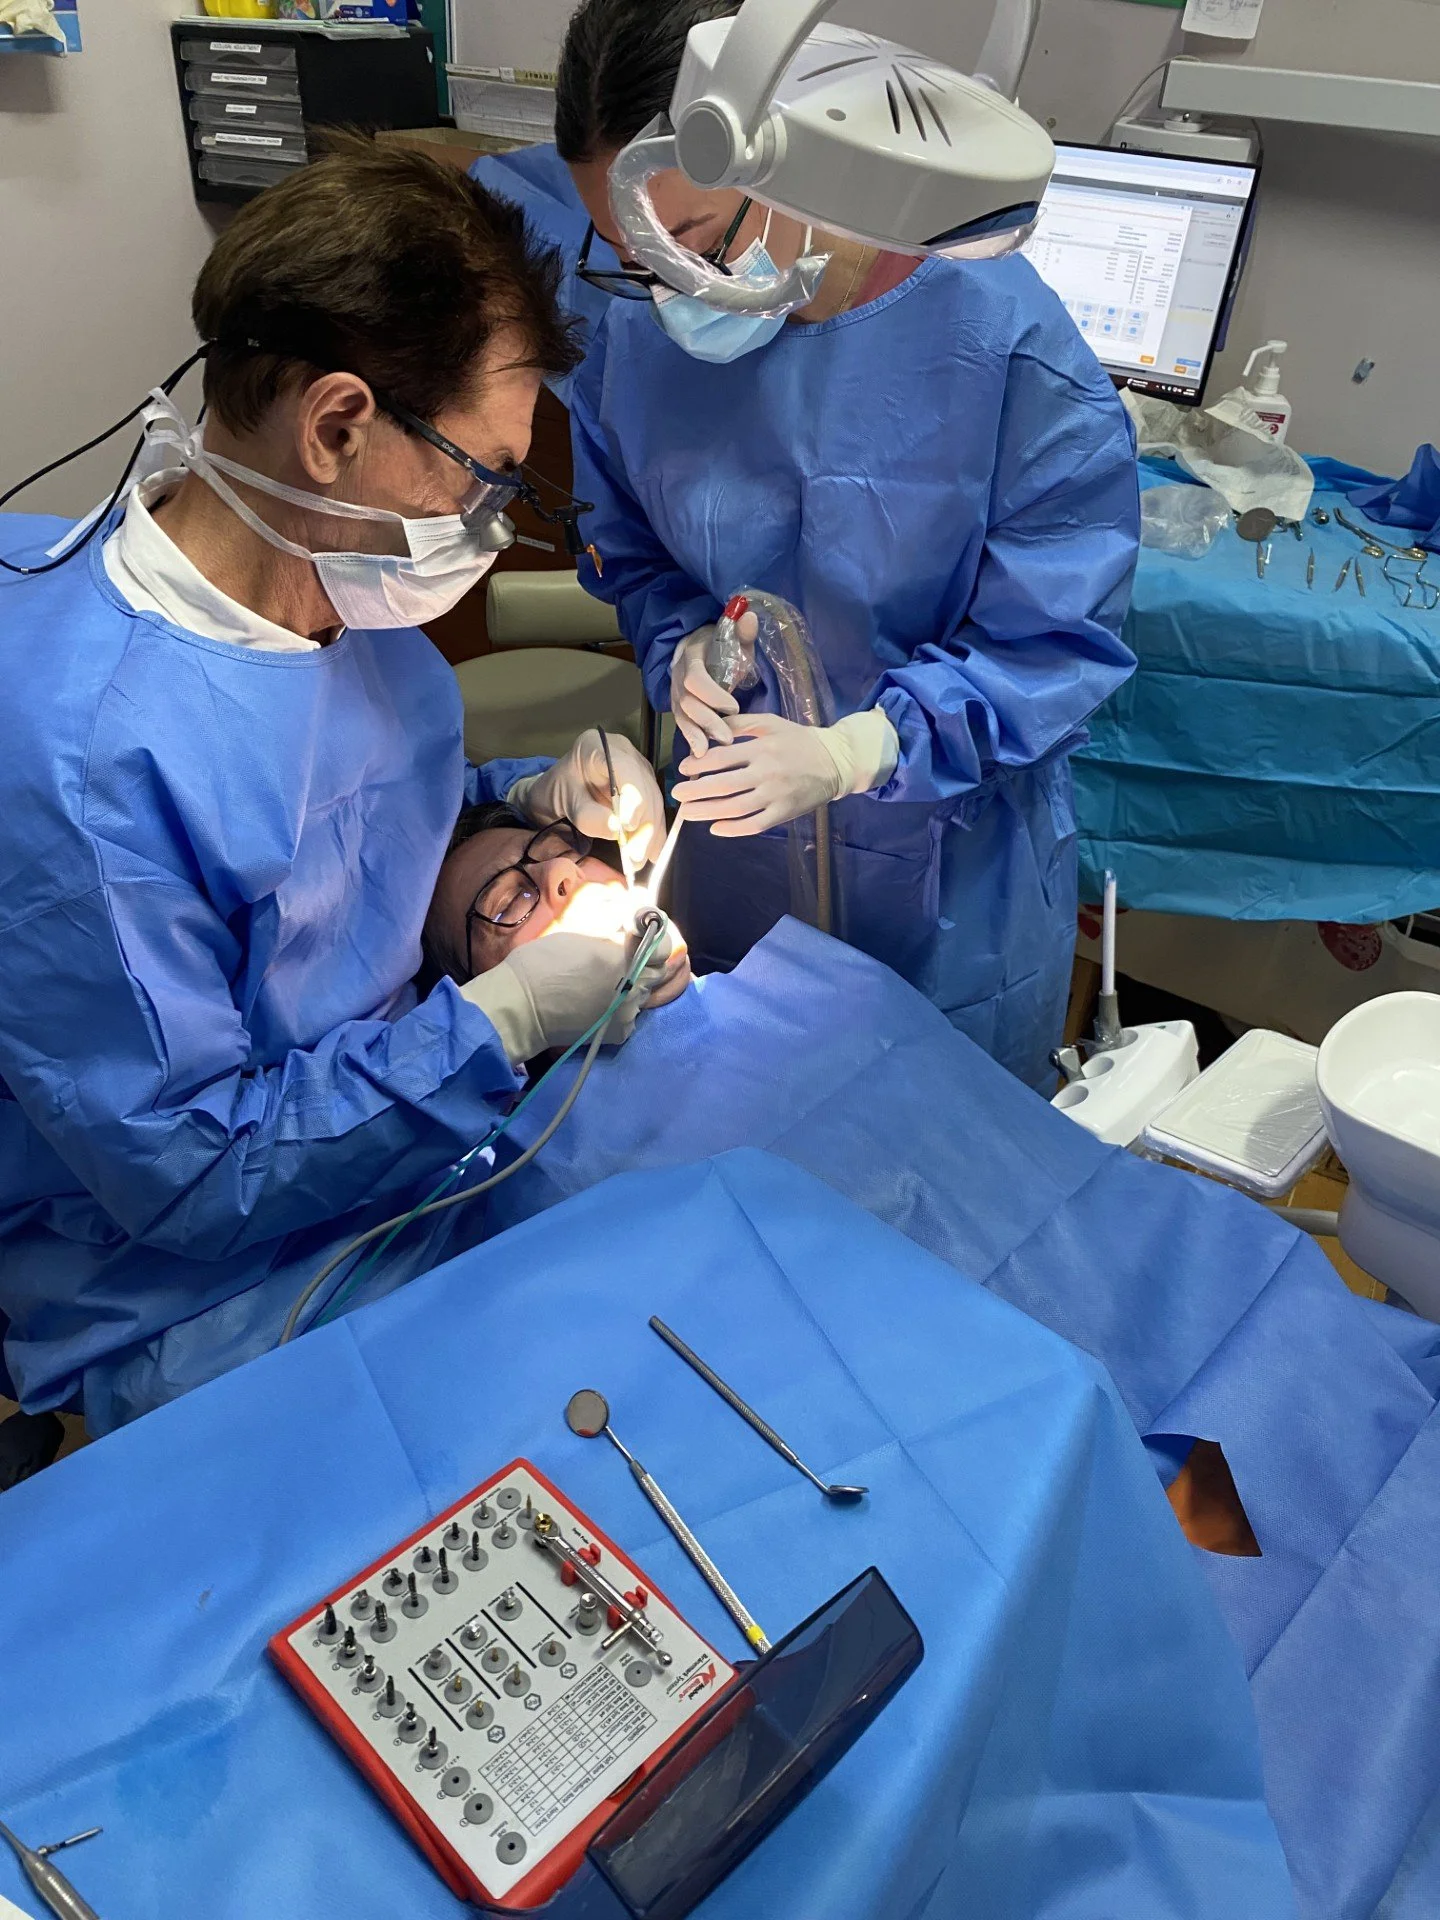
PHOTO TAKEN ON 3.5.2025 ILLUSTRATES DR. MICHAEL DARVENIZA AND THE DENTAL ASSISTANT PREPARING THE OSTEOTOMY OR IMPLANT HOLE USING DIFFERENT TWIST DRILLS FROM THE BRANEMARK SYSTEM.
-
![]()
PHOTO TAKEN ON 3.5.2025 ILLUSTRATES DR. MICHAEL DARVENIZA AND THE DENTAL ASSISTANT PREPARING THE OSTEOTOMY OR IMPLANT HOLE USING DIFFERENT TWIST DRILLS FROM THE BRANEMARK SYSTEM.
-
![]()
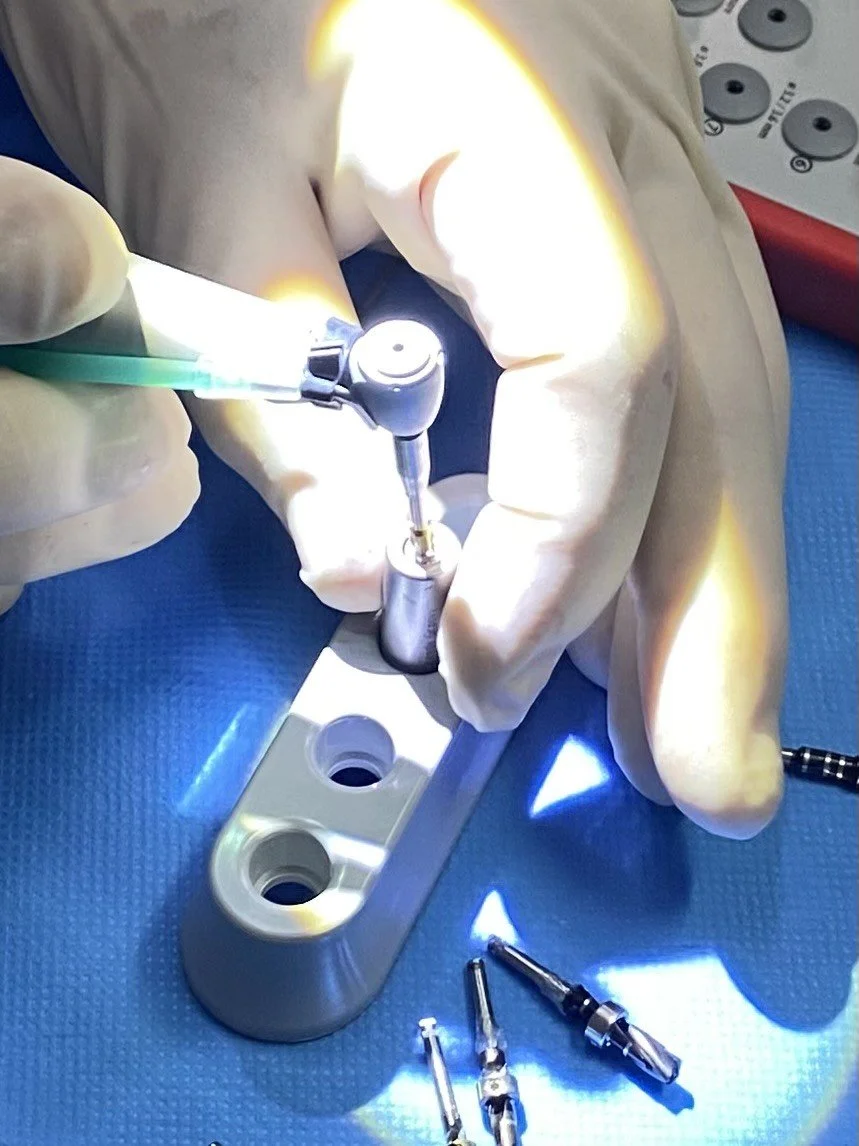
PHOTO ILLUSTRATES THE REMOVAL OF THE IMPLANT FIXTURE FROM A SEALED CONTAINER READY TO PLACE IN THE PREPARED JAW BONE. THE OSSEOSET BRANEMARK SURGICAL KIT DIGITALLY REGISTERS THE TORQUE OF THE IMPLANT WHEN SCREWED INTO THE BONE, IN THIS CASE THE FIXTURE WAS TORQUED AT 36 NCM.
-
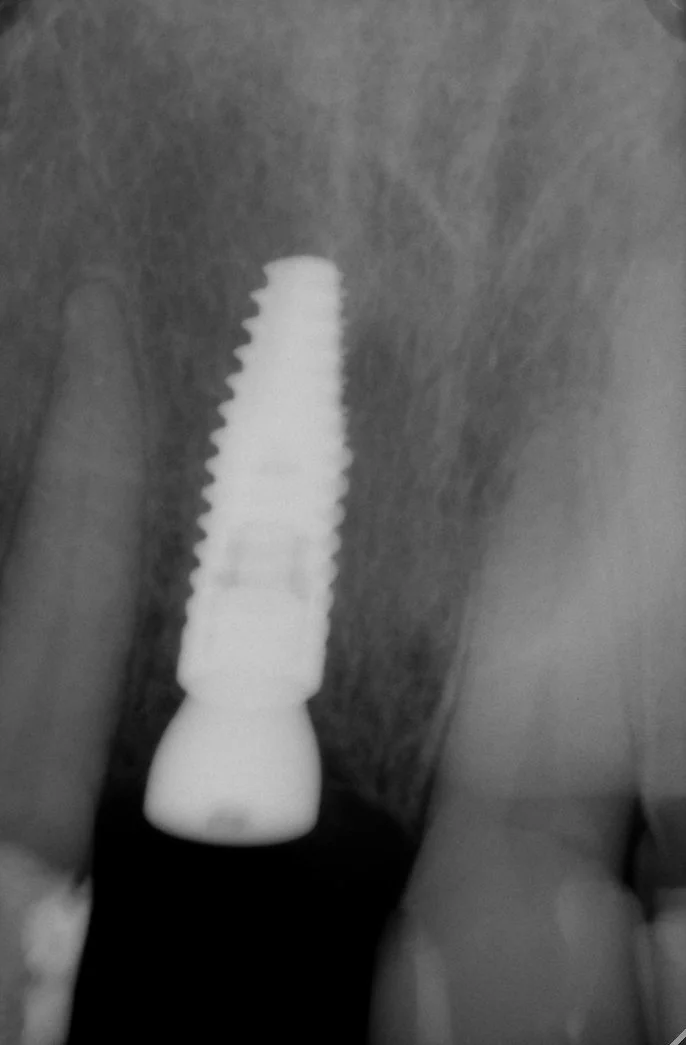
![]()
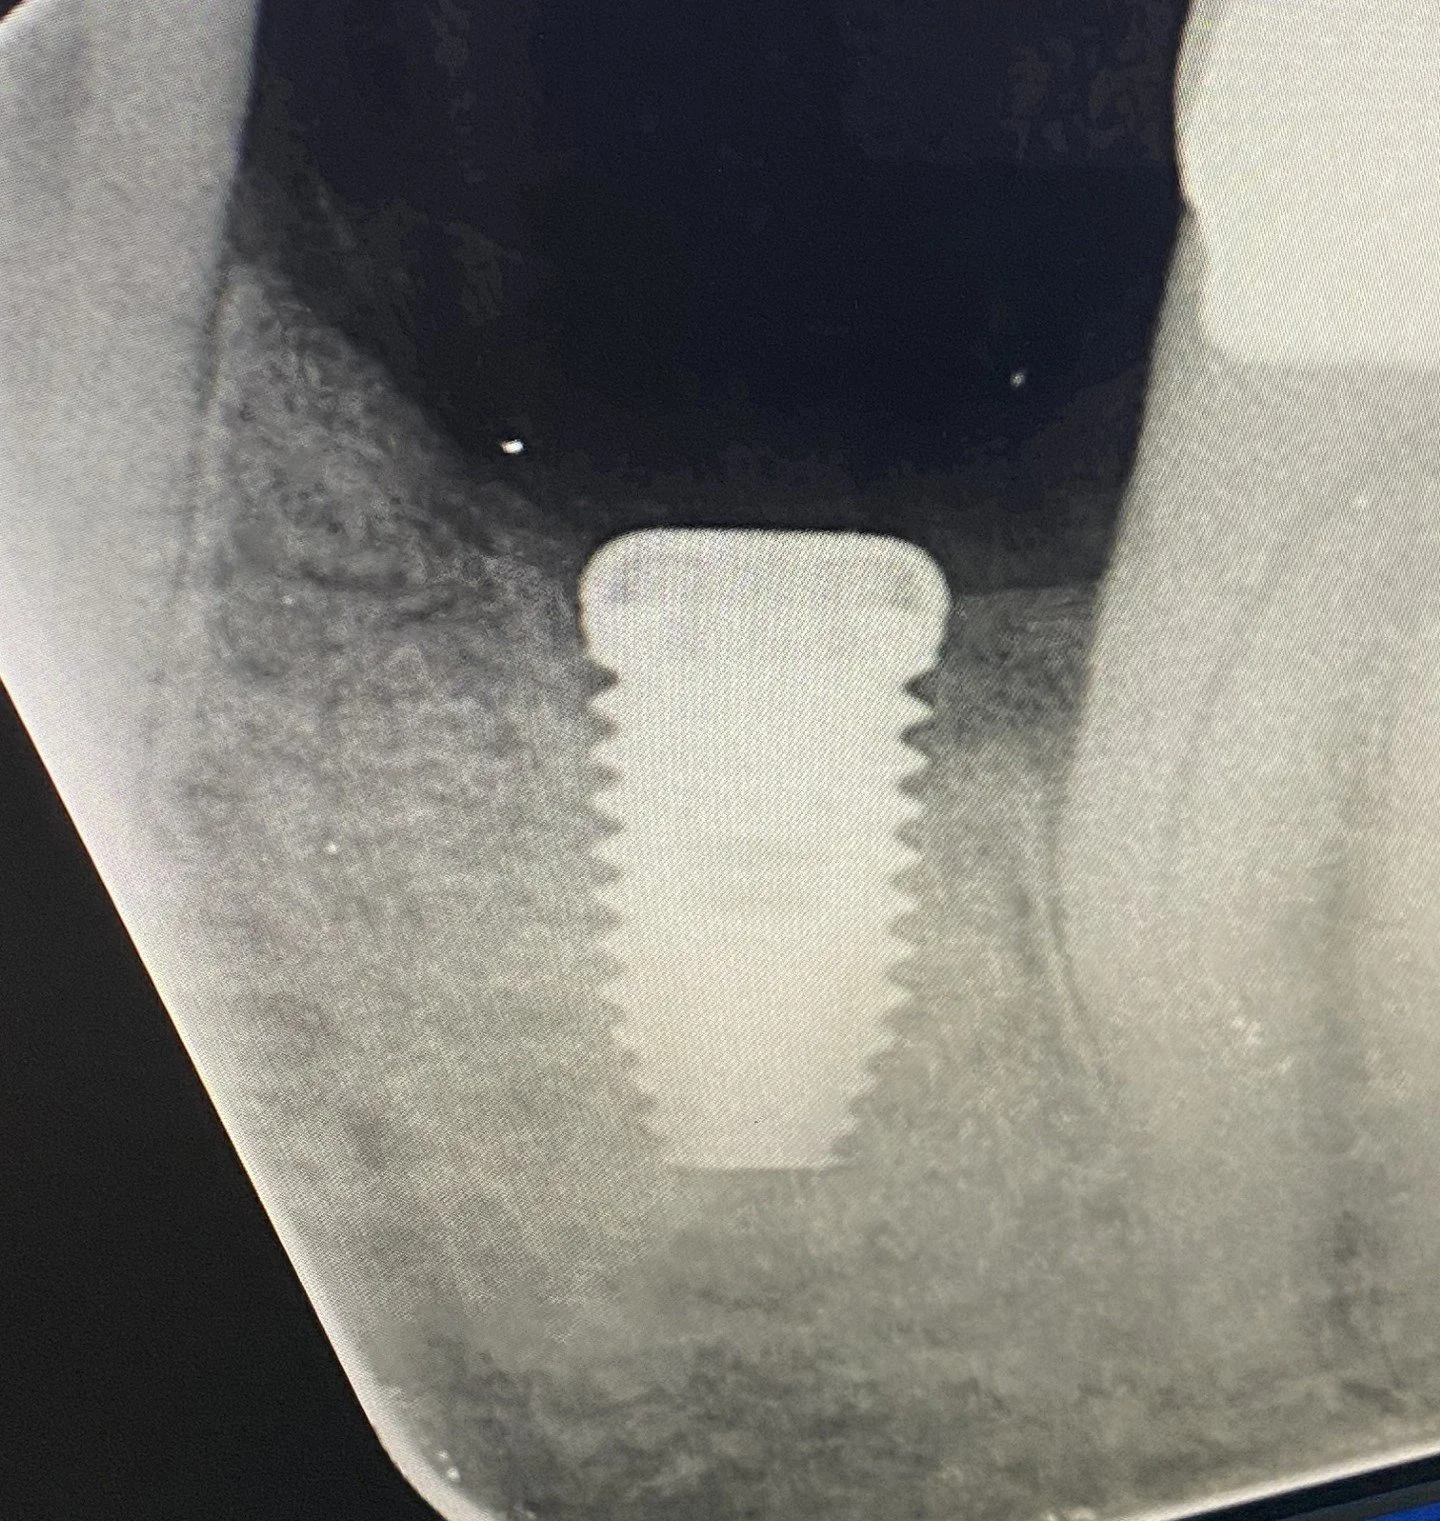
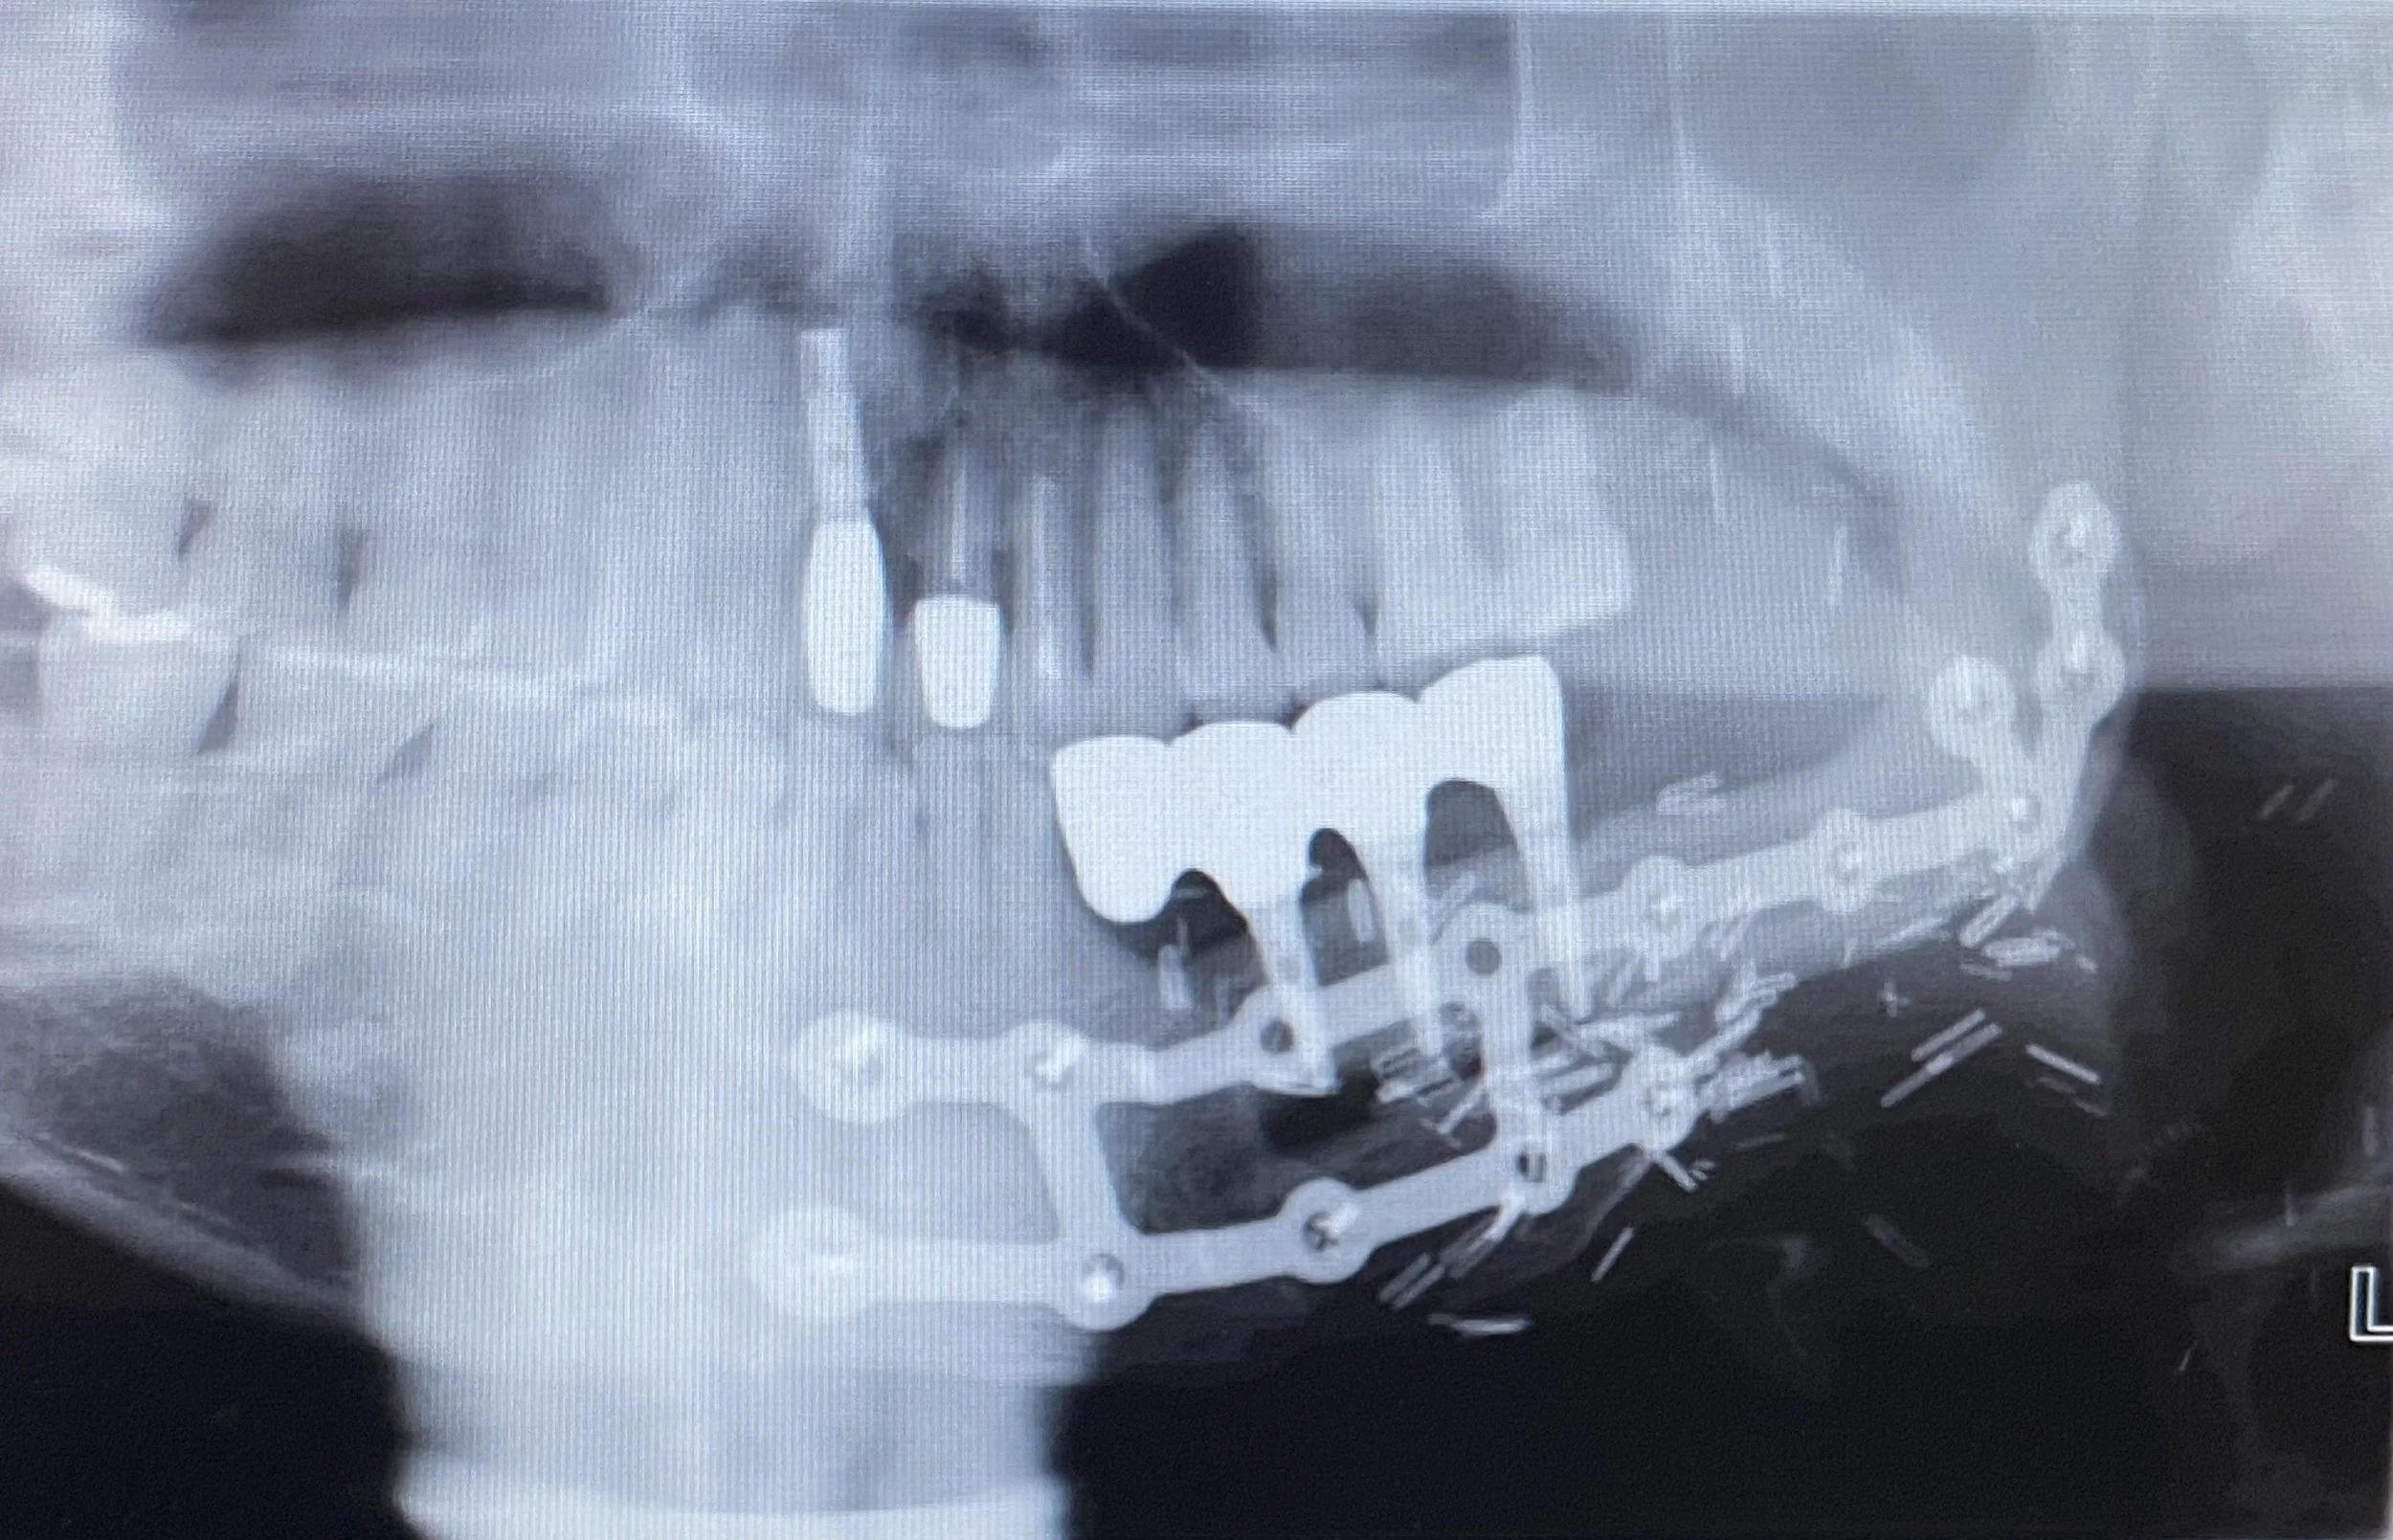
THIS RADIOGRAPH ILLUSTRATES THE WIDE PLATFORM 10 MM LONG BRANEMARK FIXTURE CENTRALLY PLACED BETWEEN THE TWO TEETH. A RADIOLUCENCY OR GREY/BLACK CIRCLE IS EVIDENT 2 MM BELOW THE END OF THE FIXTURE WHICH IS THE MANDIBULAR NERVE CANAL. THE TOP OF THE FIXTURE HAS BEEN SEALED WITH A COVER SCREW AND THE GUM LINE SUTURED.

Single implant crown front tooth and full occlusal reconstruction with crowns and composite overlays
-
![]()
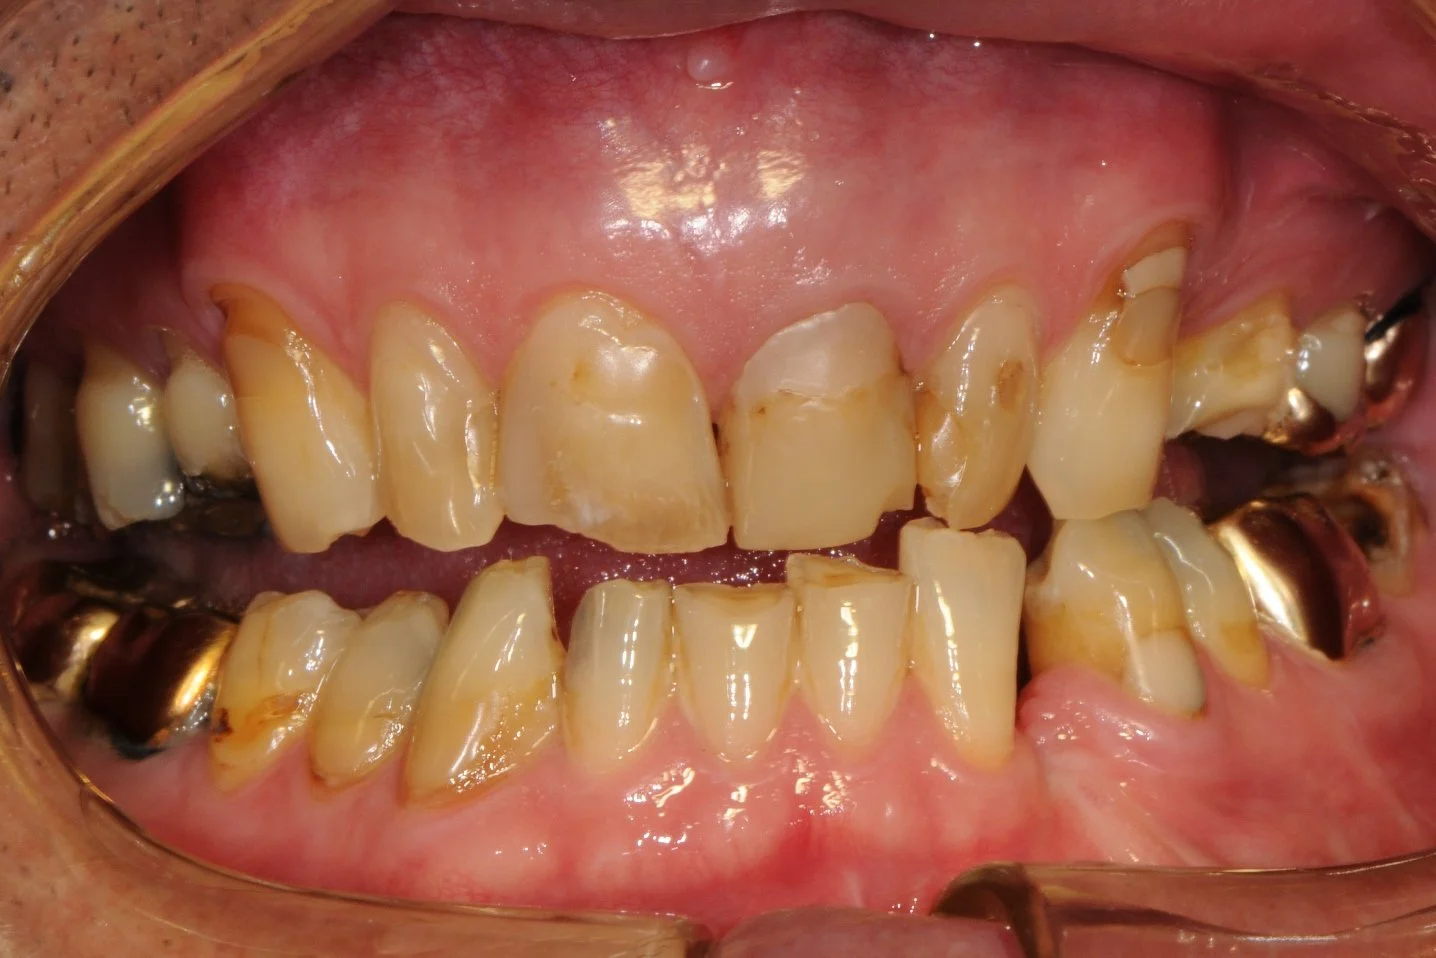
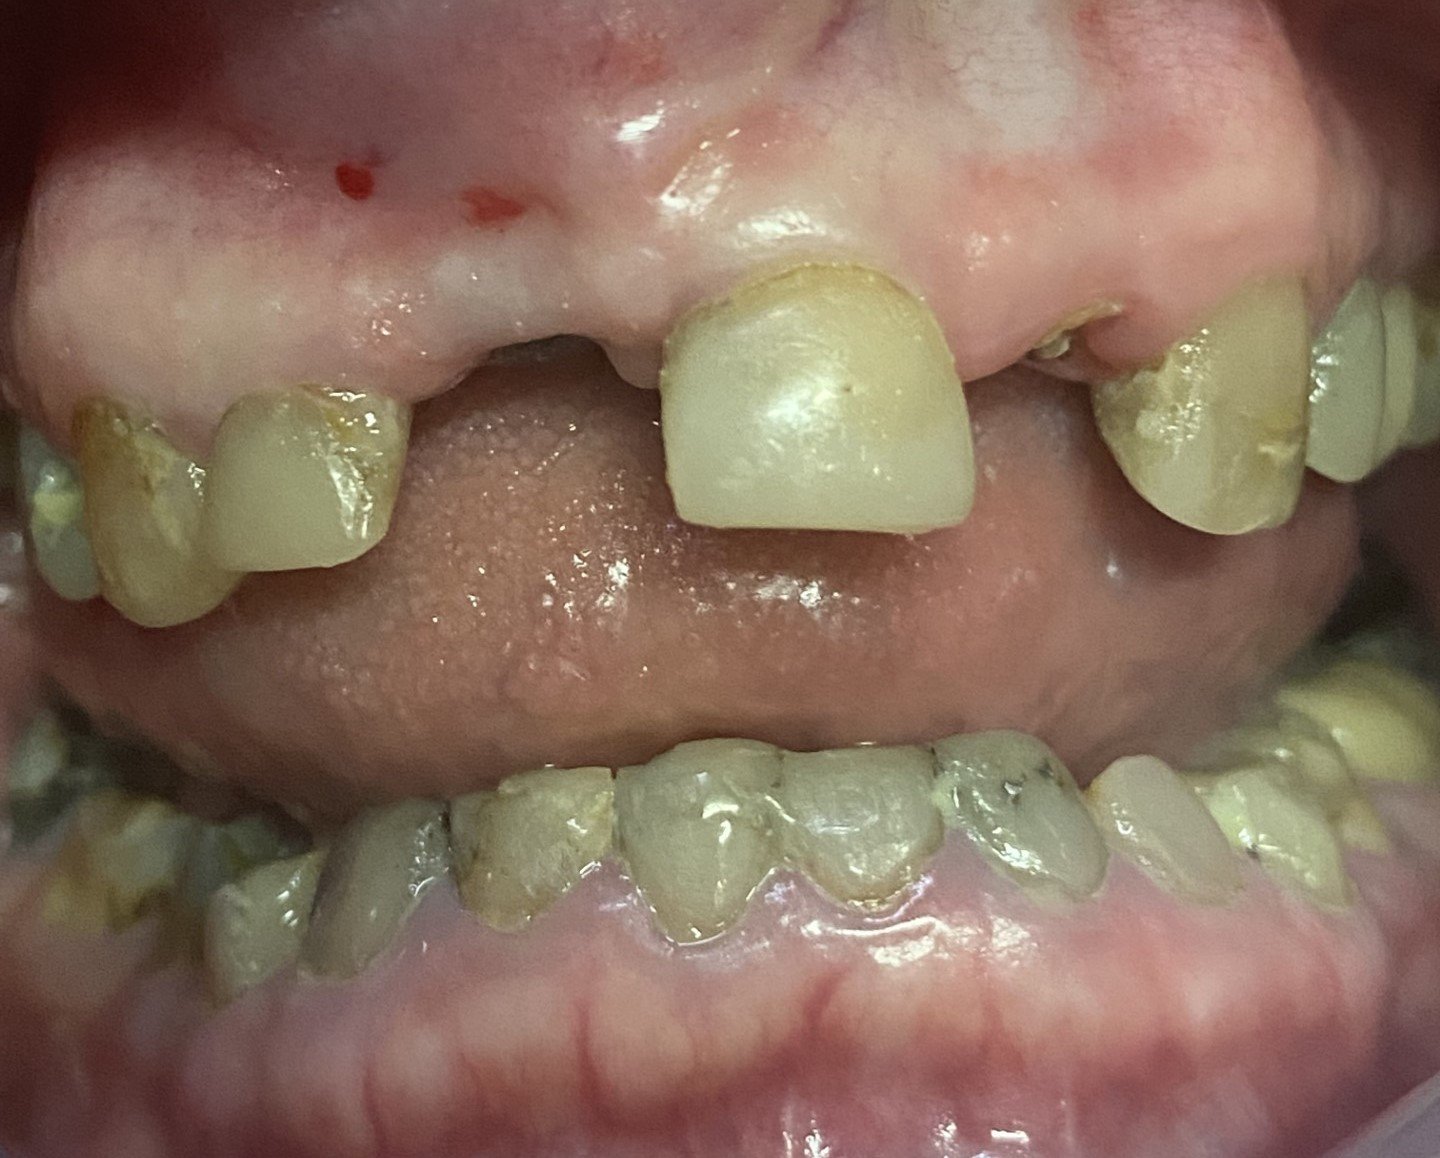
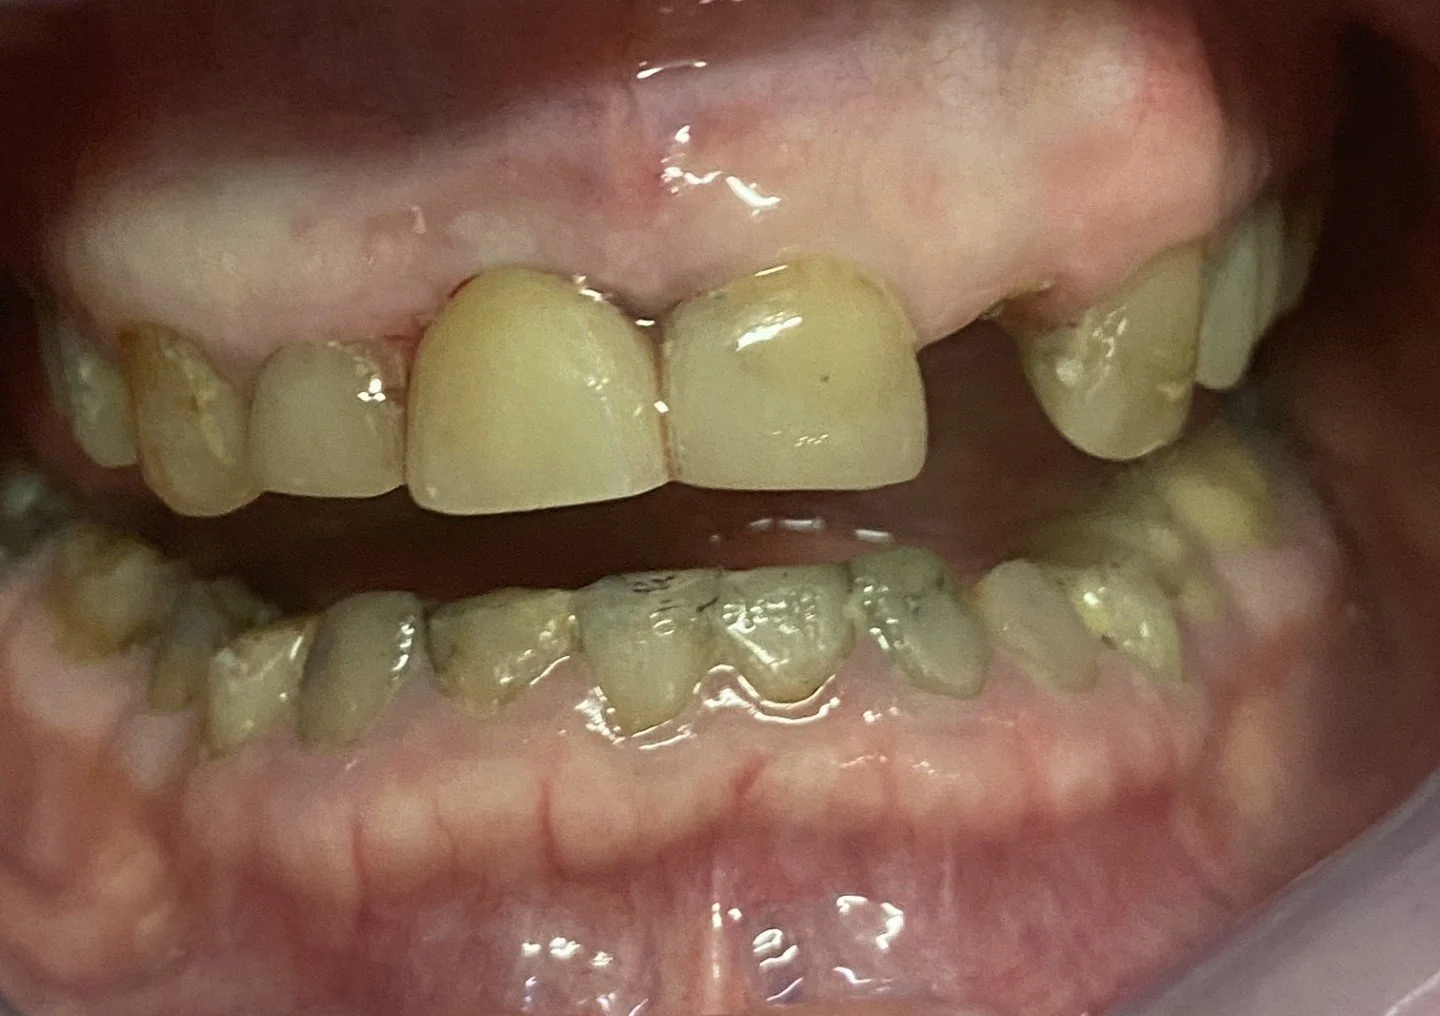
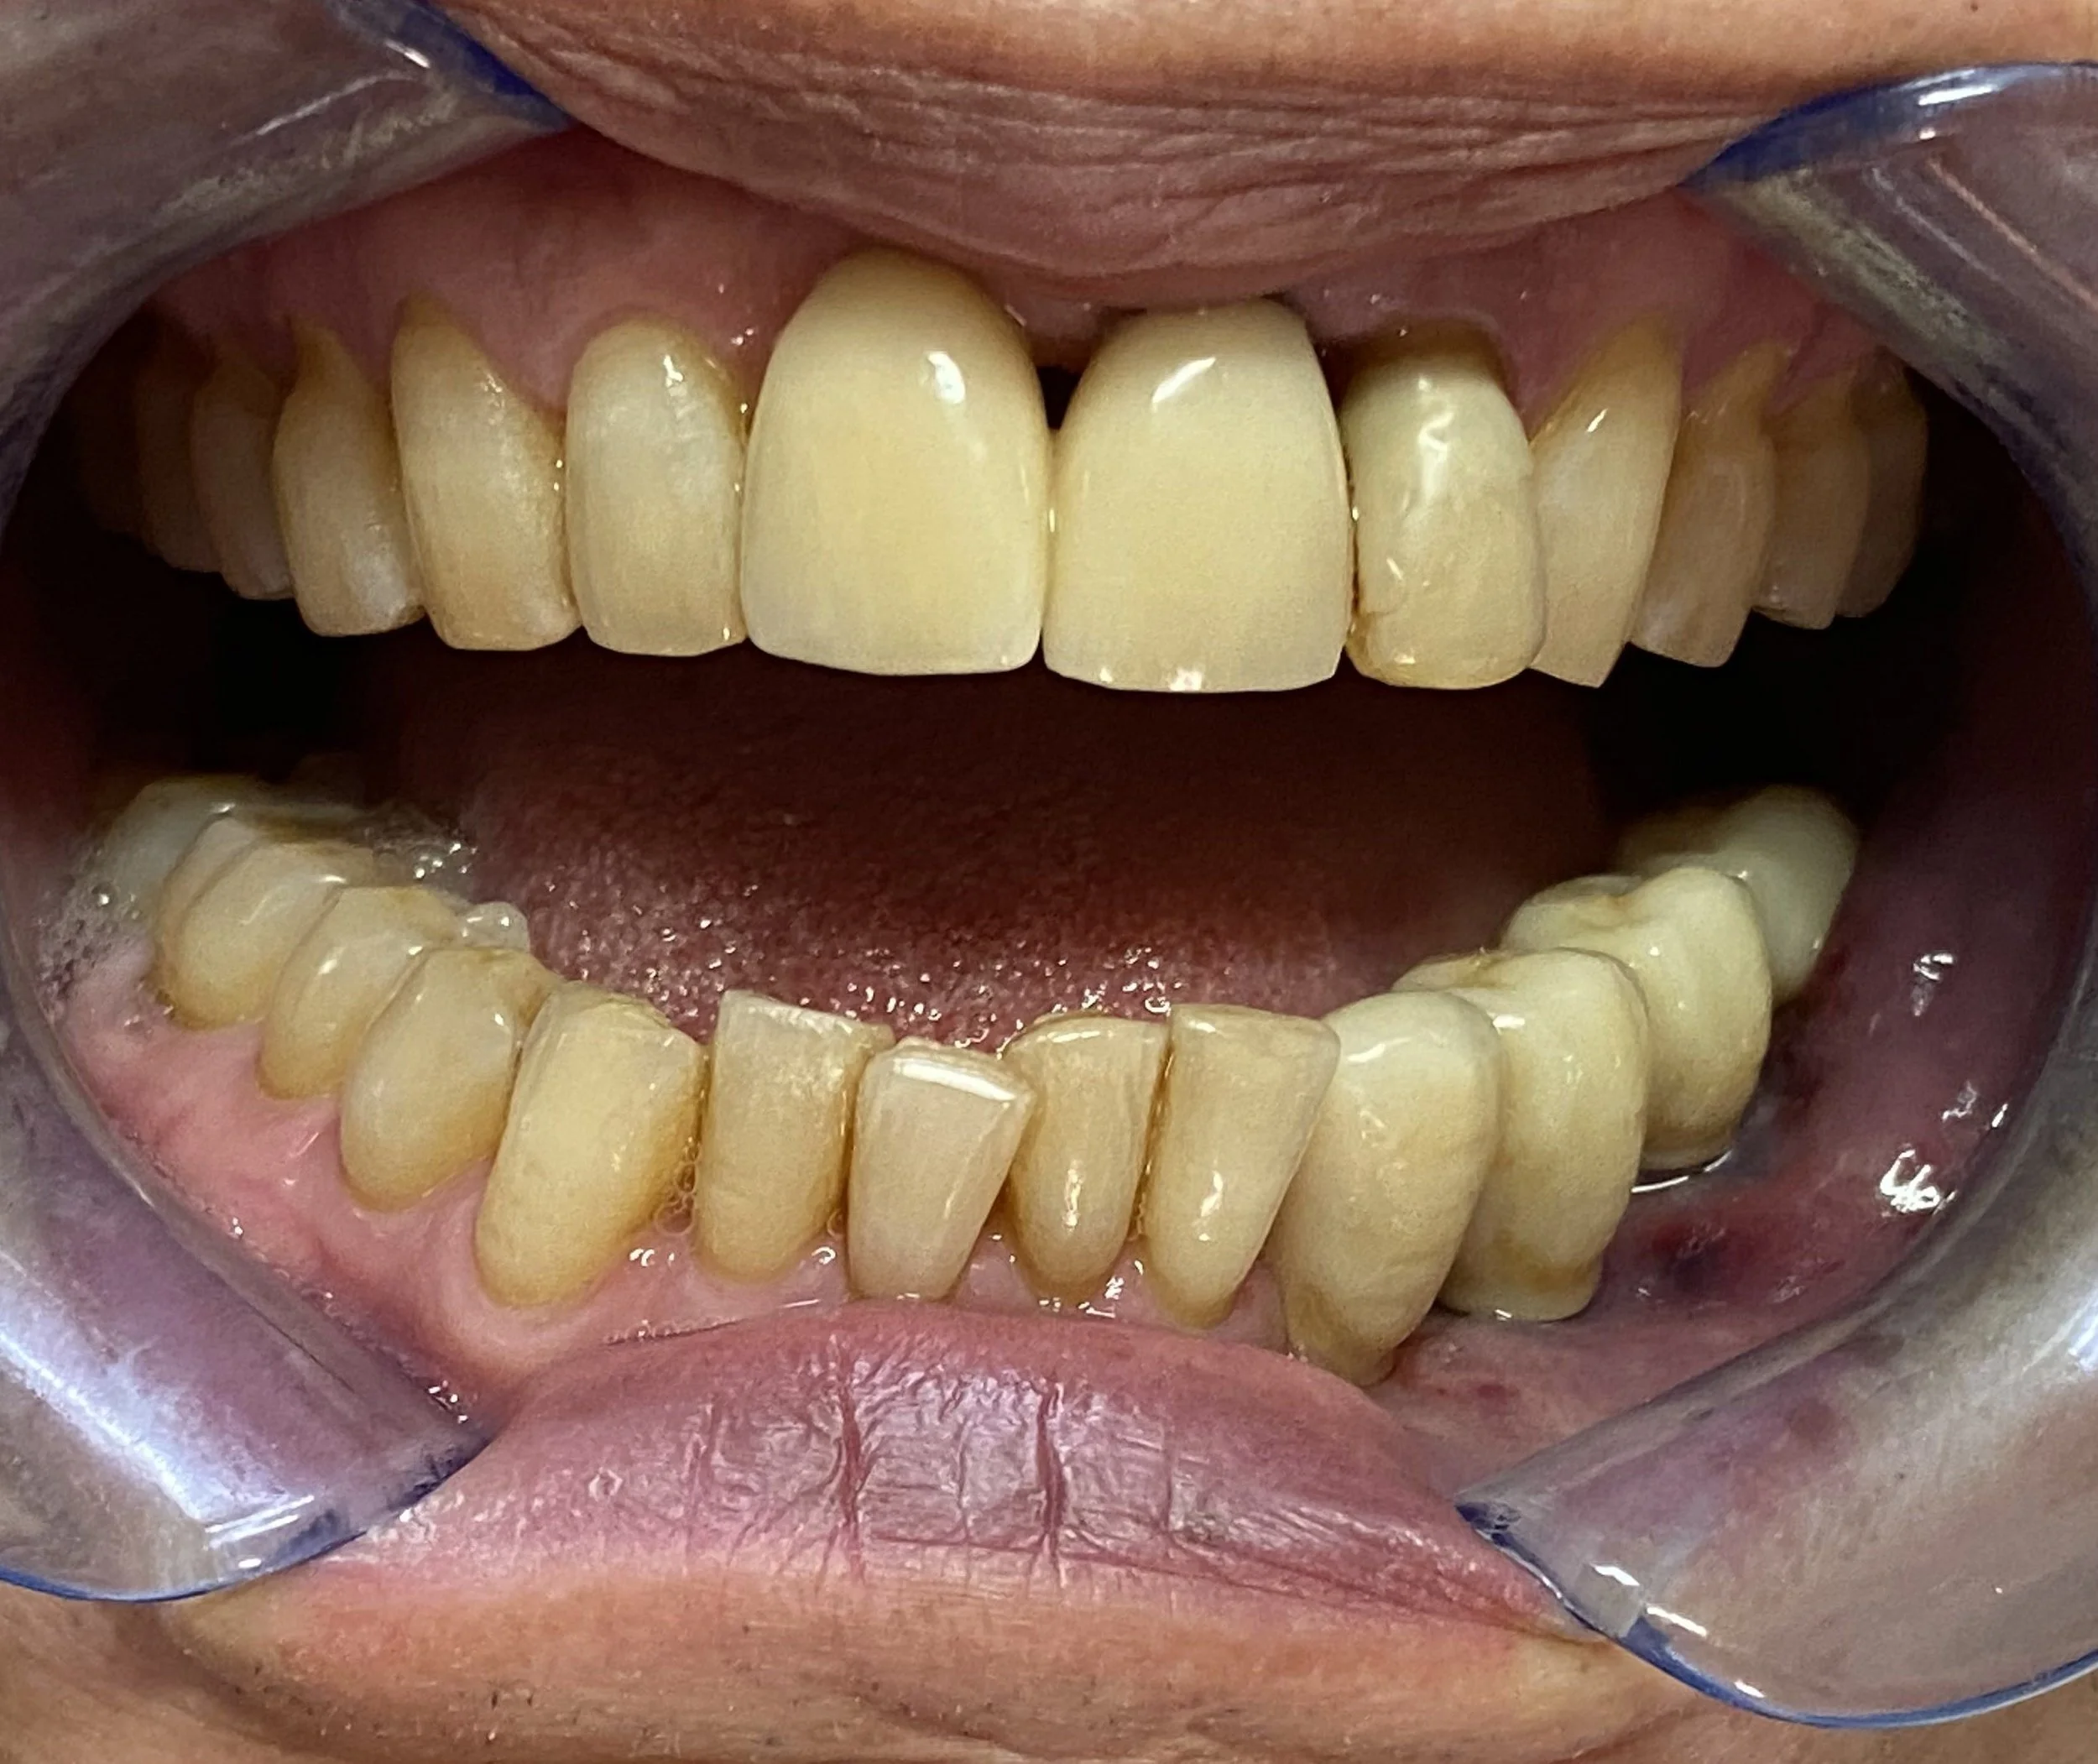
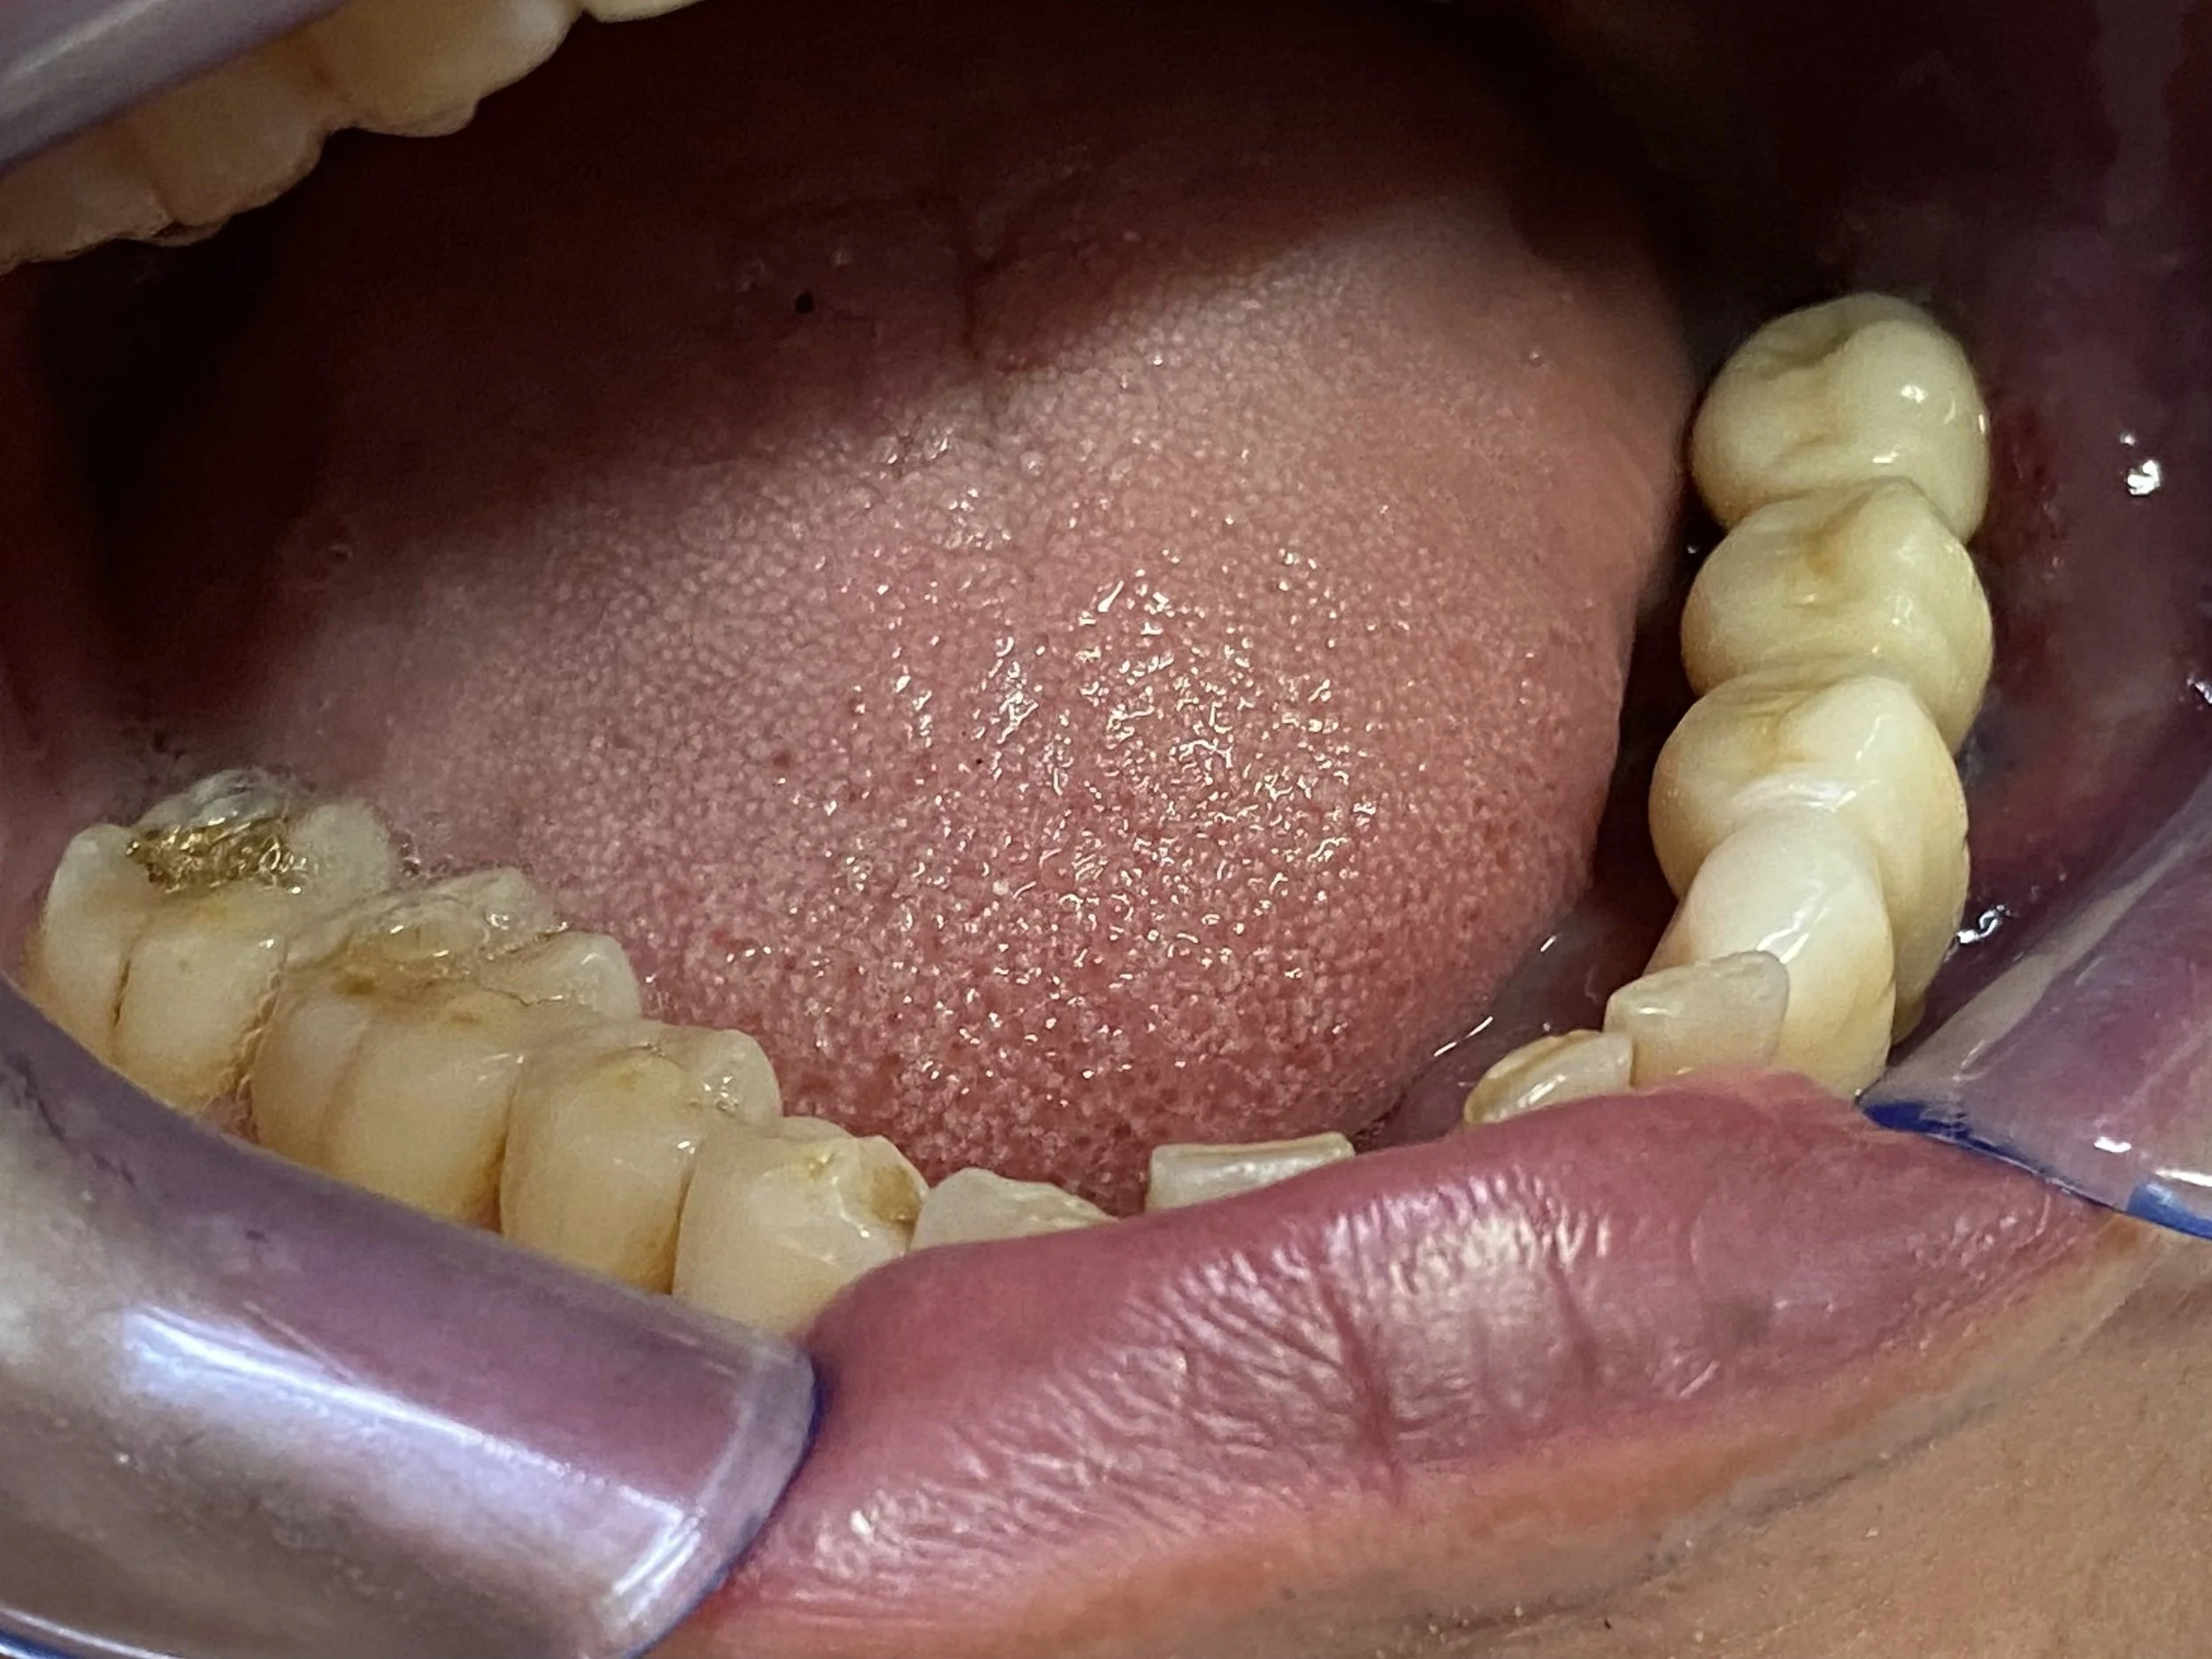
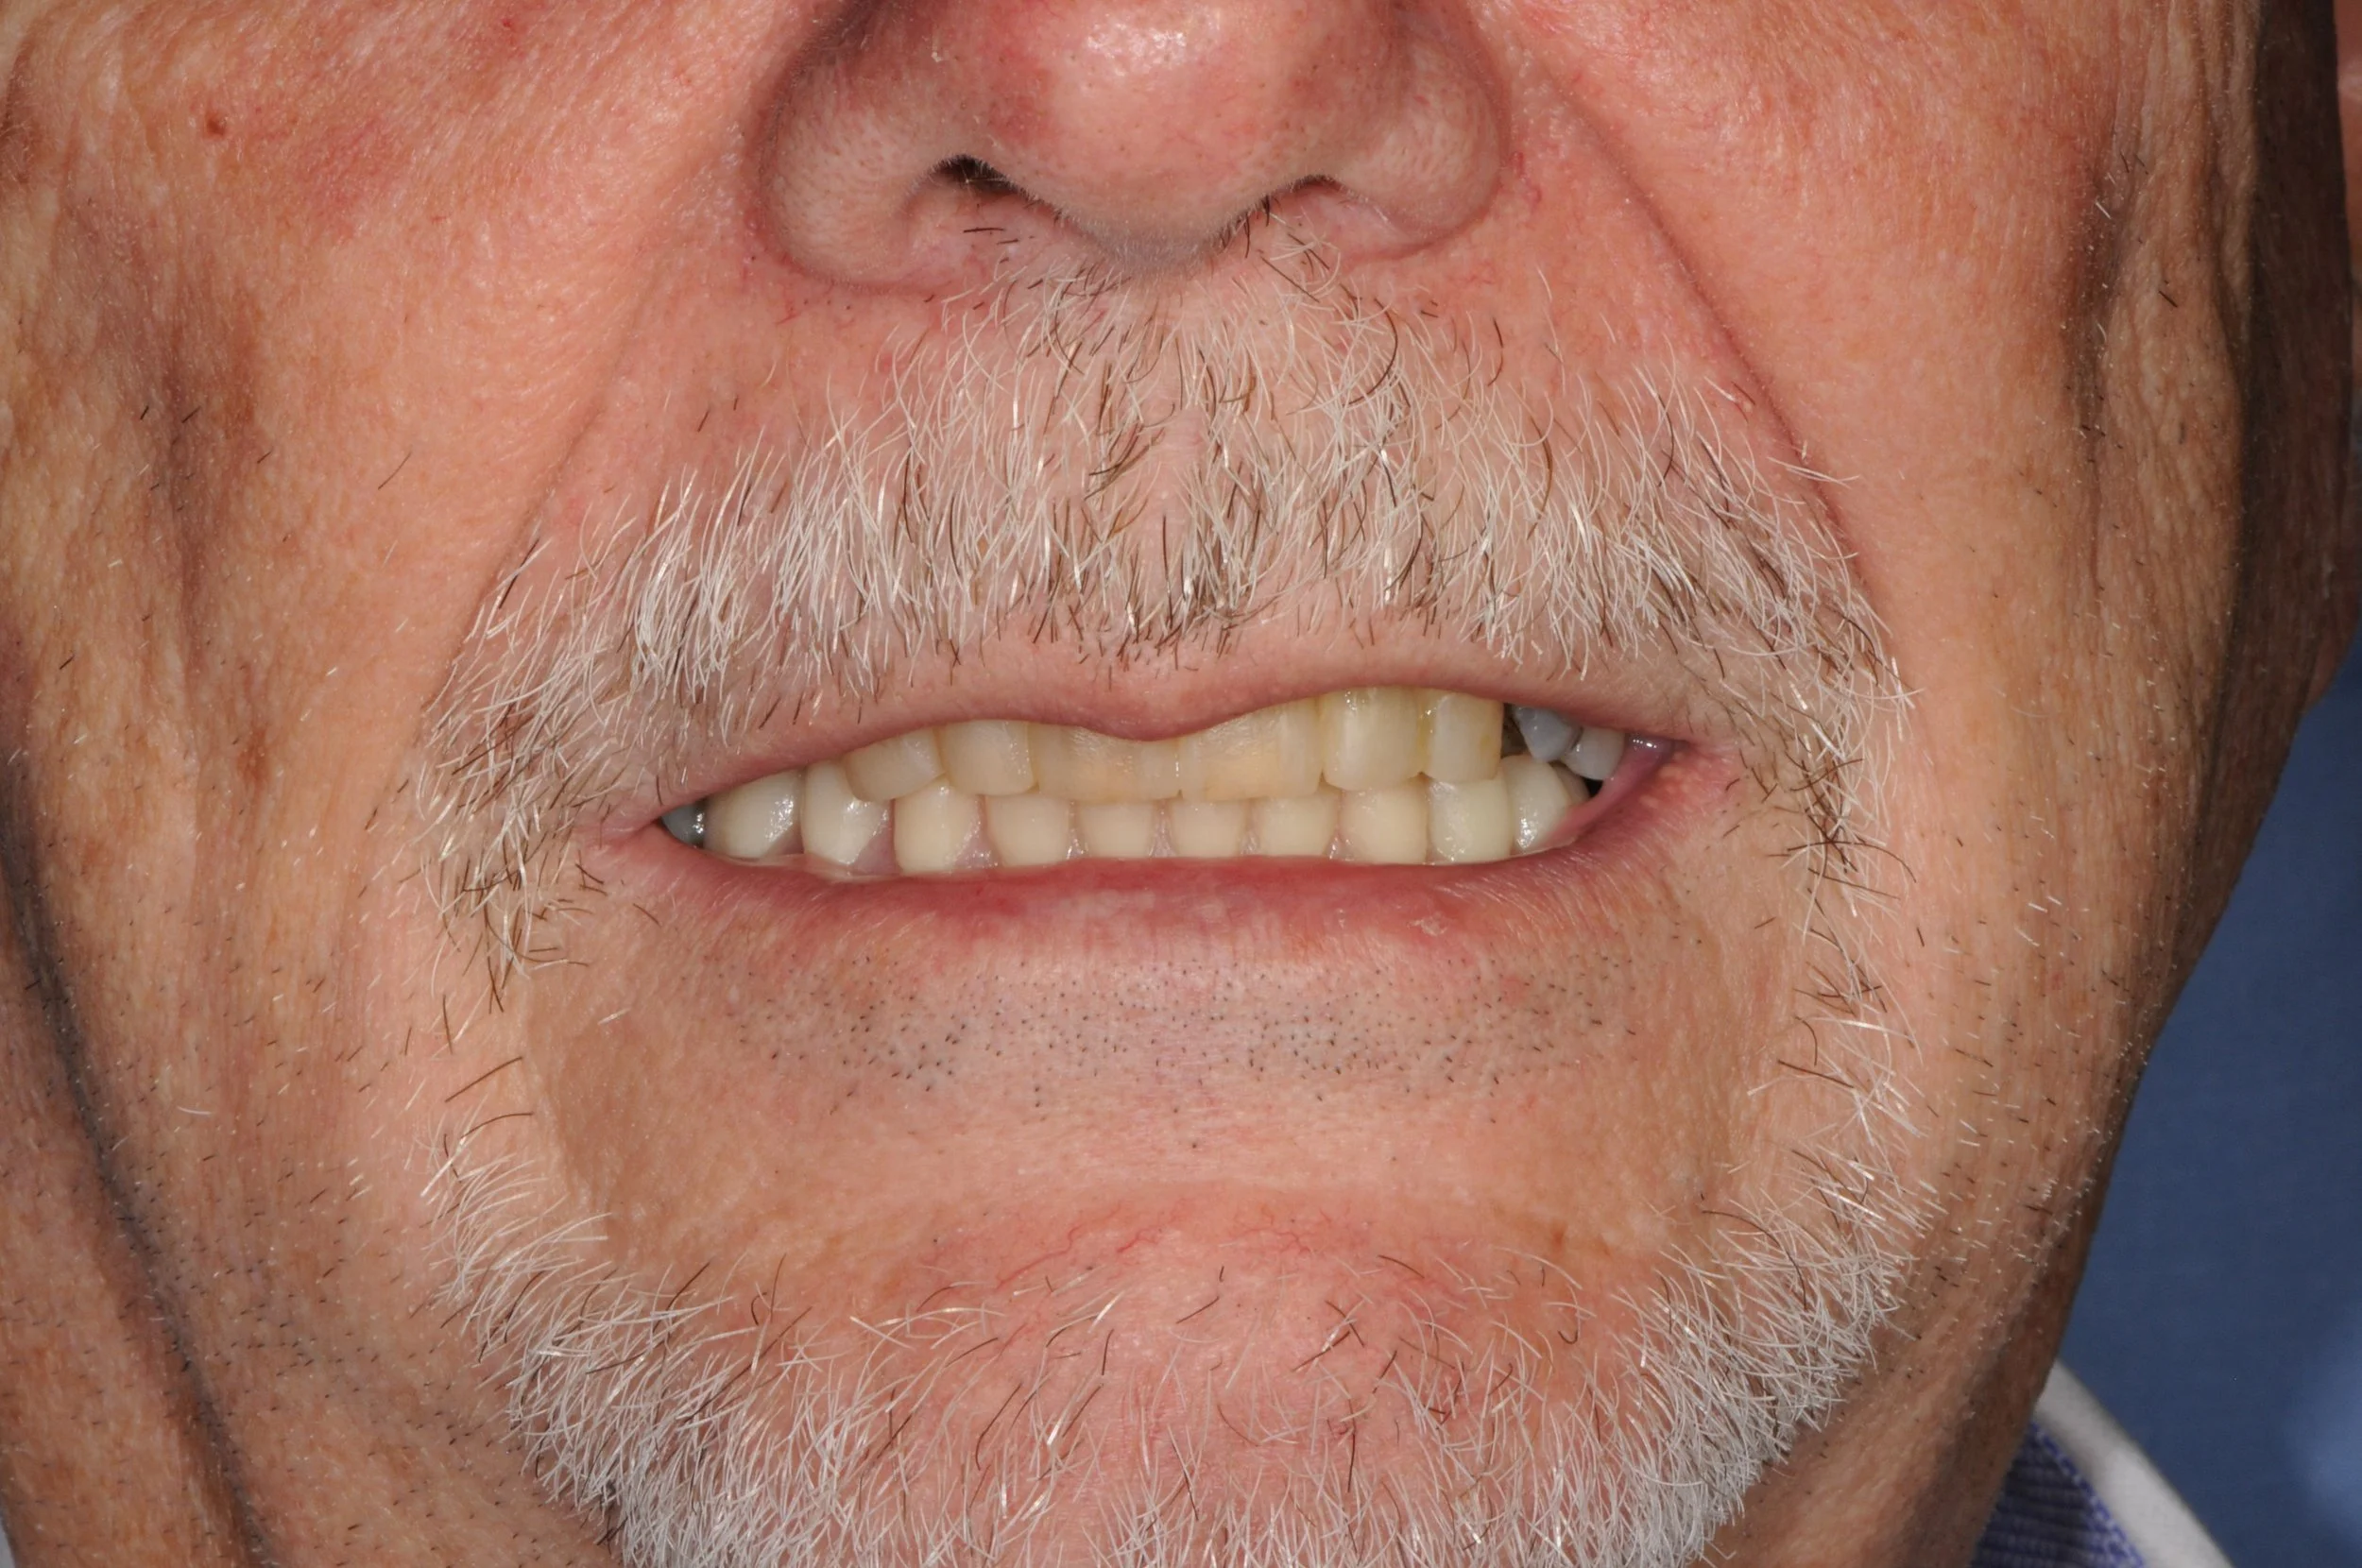
This 50 year old gentleman suffered severe dental wear, and heavily filled and stained teeth.
-
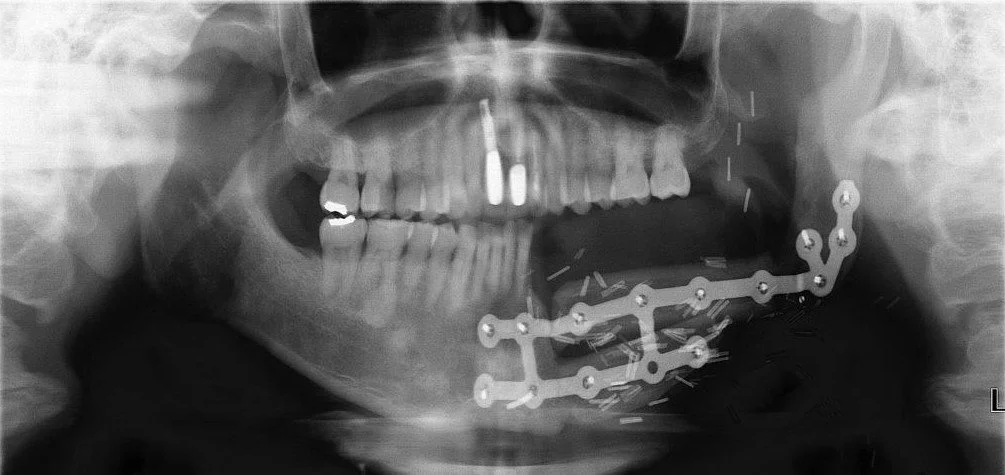
![]()
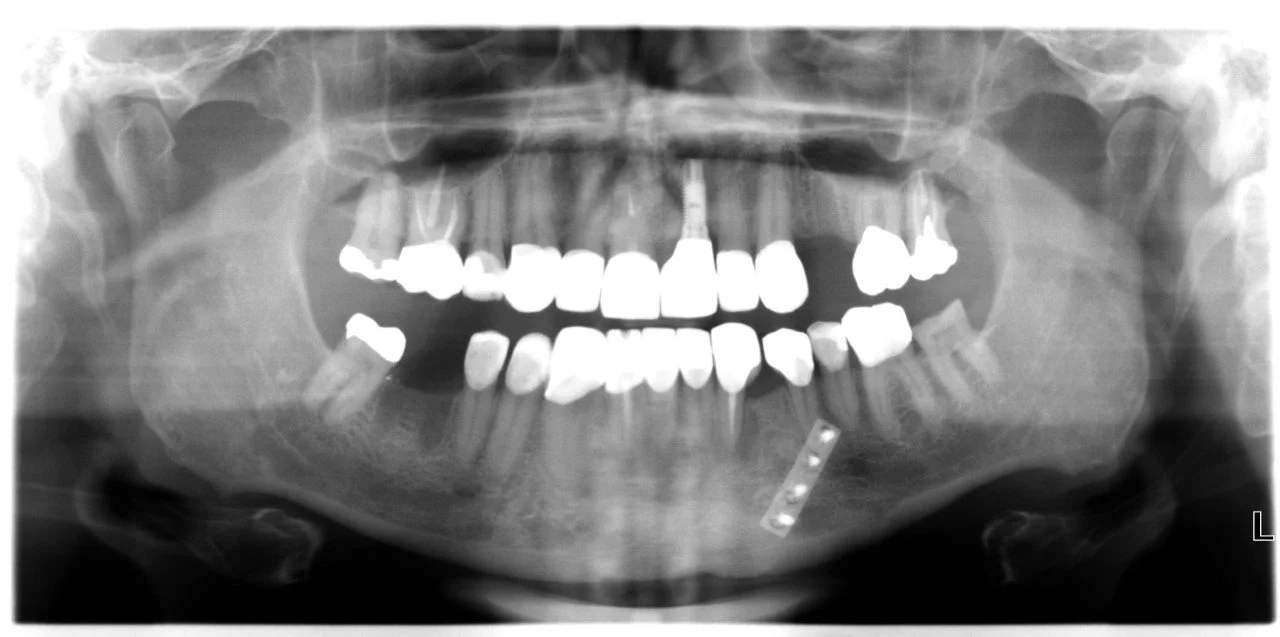
He endured a fractured lower jaw from a car accident resulting in the loss of the lower left canine with a residual space and a metal splint to fixate the broken jaw as is illustrated
-
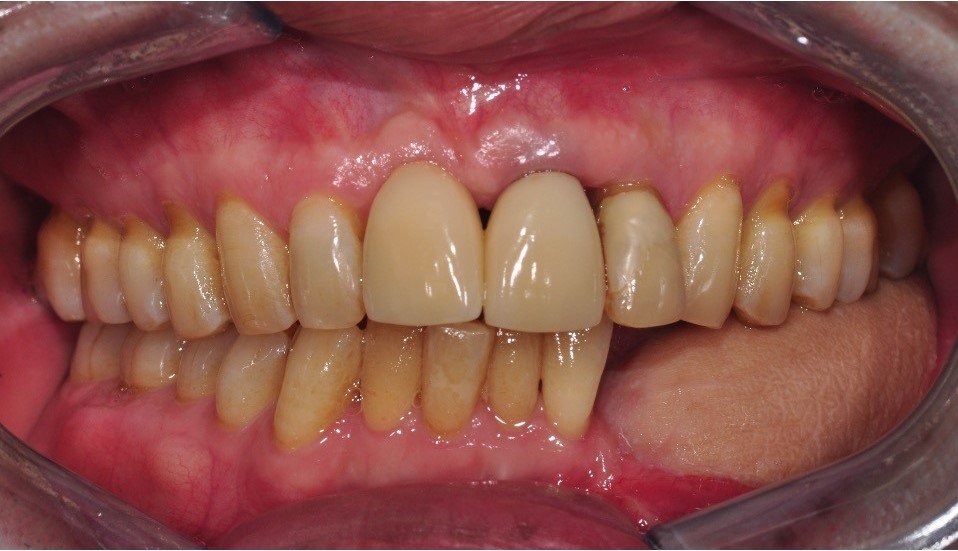
![]()
Subsequently, the upper left front tooth fractured and was removed and I surgically placed a Branemark implant fixture/implant crown
-
![]()
Single implant crown front tooth
-
![]()
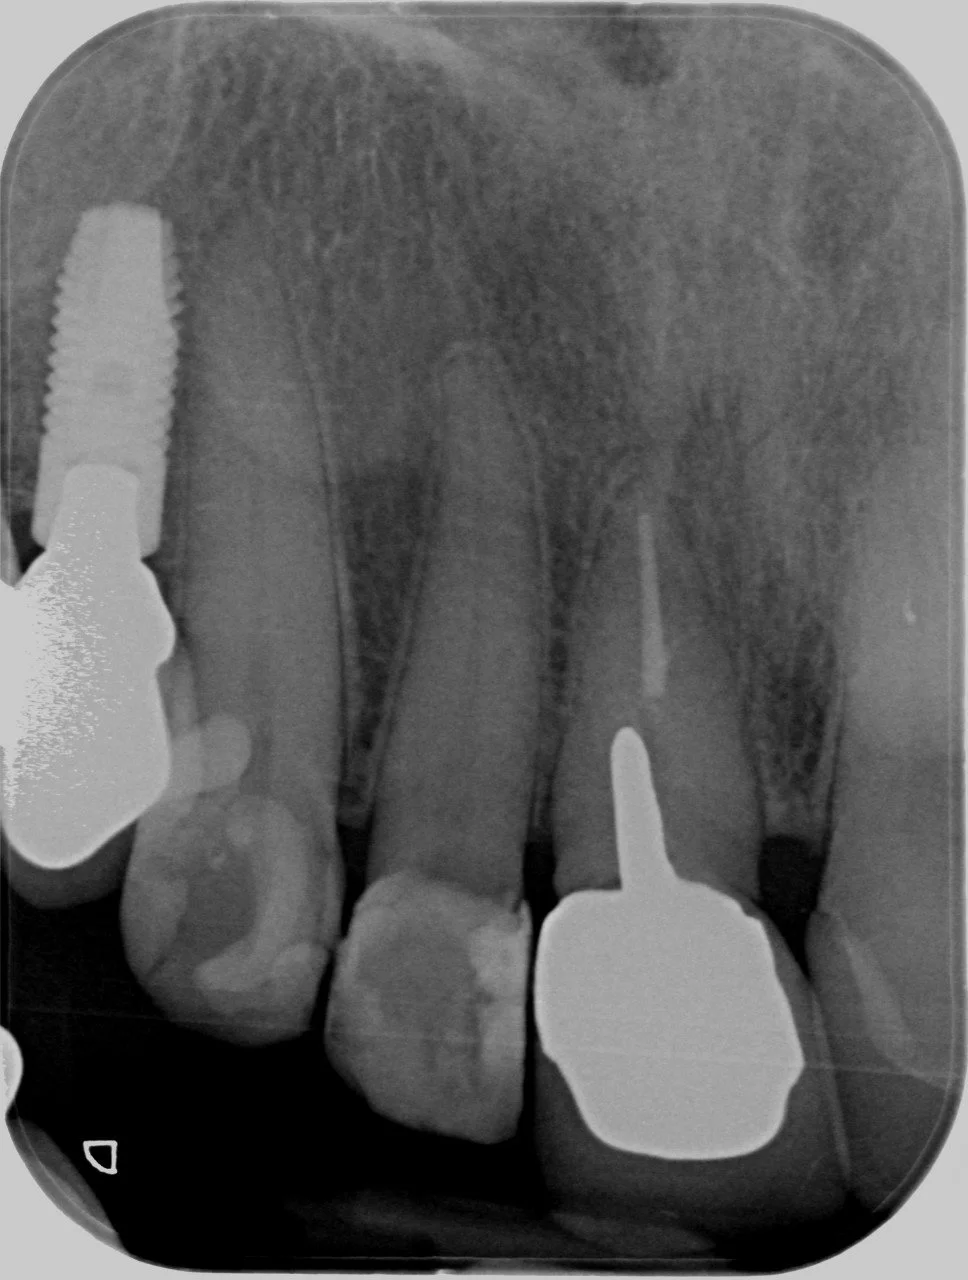
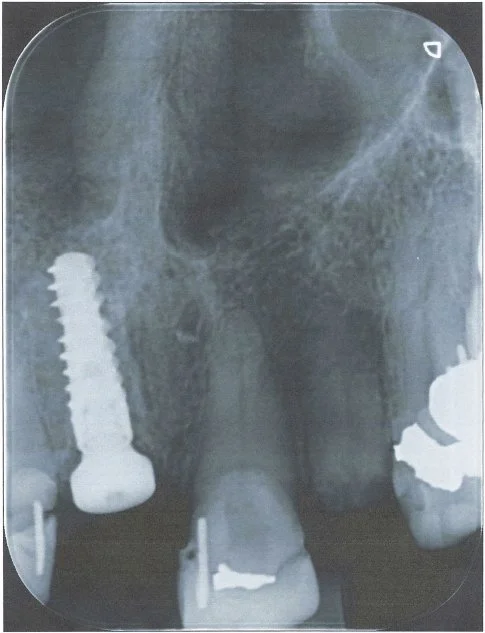
This 60 year old lady had recurring problems with the top right crowned front tooth which was restored with a gold post crown. This post was short and angled and the post crown kept on debonding from the root and the post crown kept falling out of her mouth. Eventually decay ensued and the root cracked as illustrated in the radiograph.
-
![]()
The patient was referred to me in 2021 at Lismore and I referred the patient to a Periodontist in Brisbane. He extracted the tooth, placed a temporary partial denture plate to fill the space and subsequently placed a Straumann implant fixture and healing cap
-
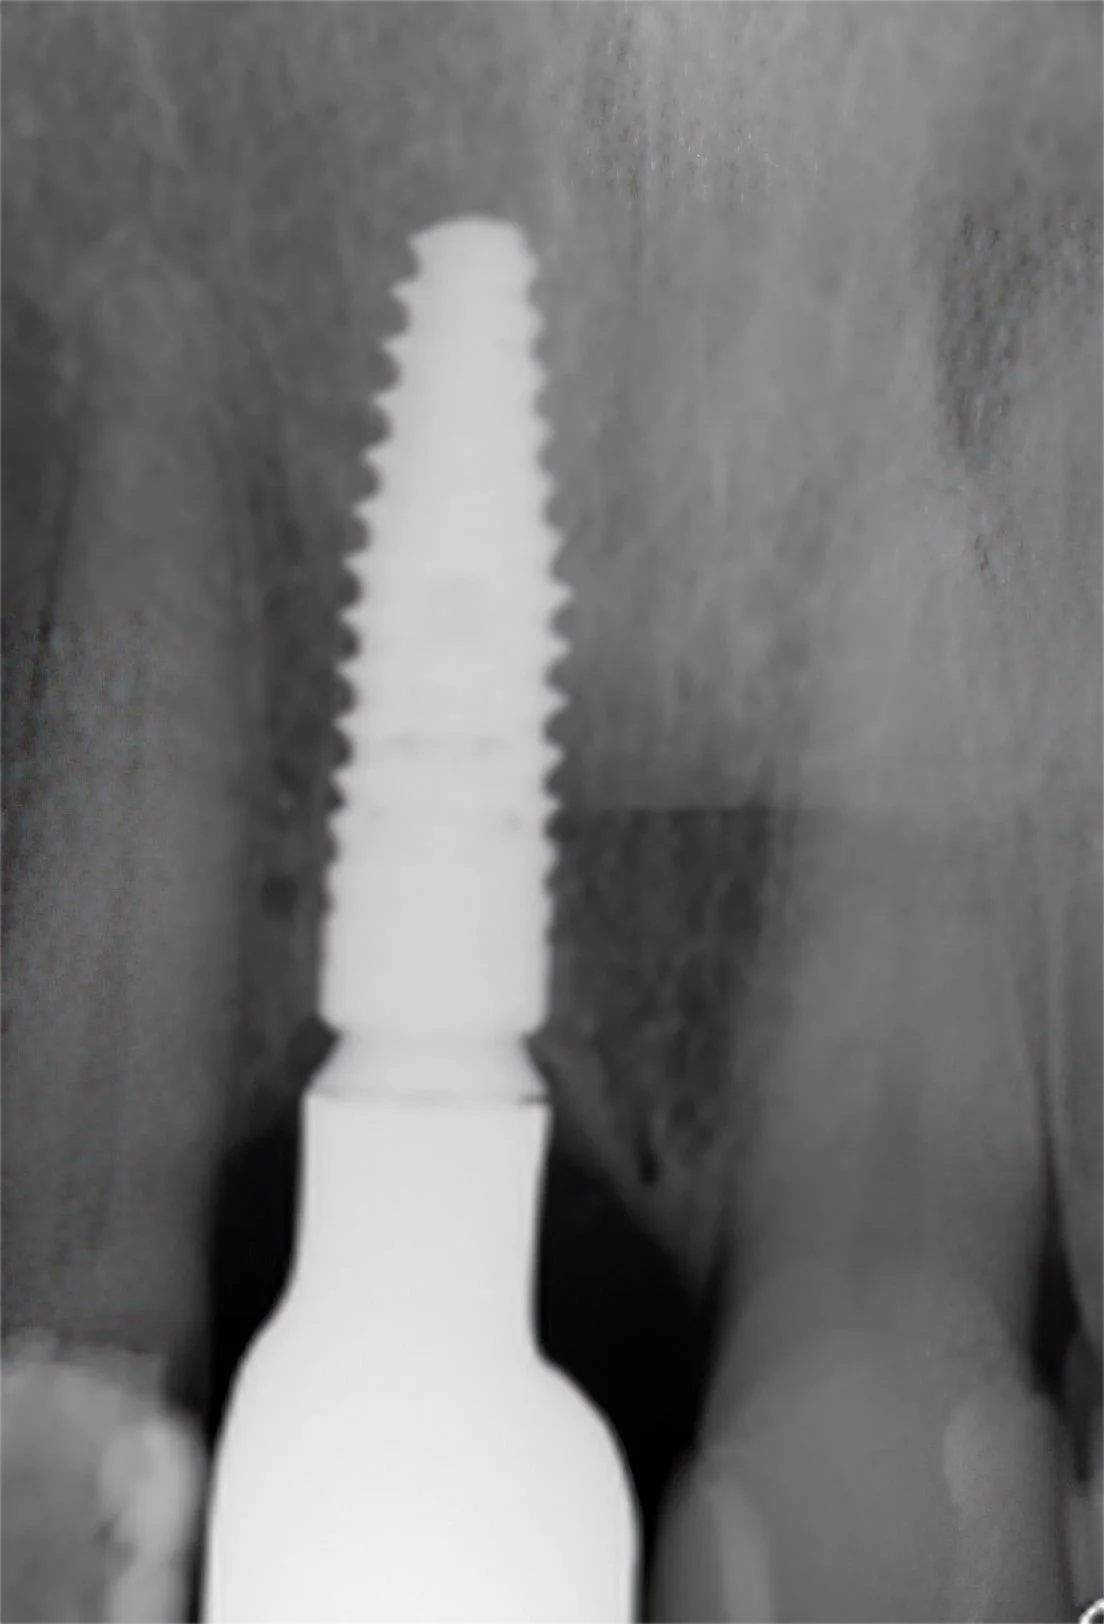
![]()
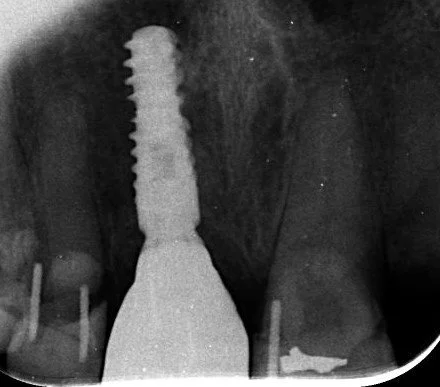
I completed this case at Lismore in 2022 and this radiograph illustrates the completed the screw accessible zirconia implant crown
-
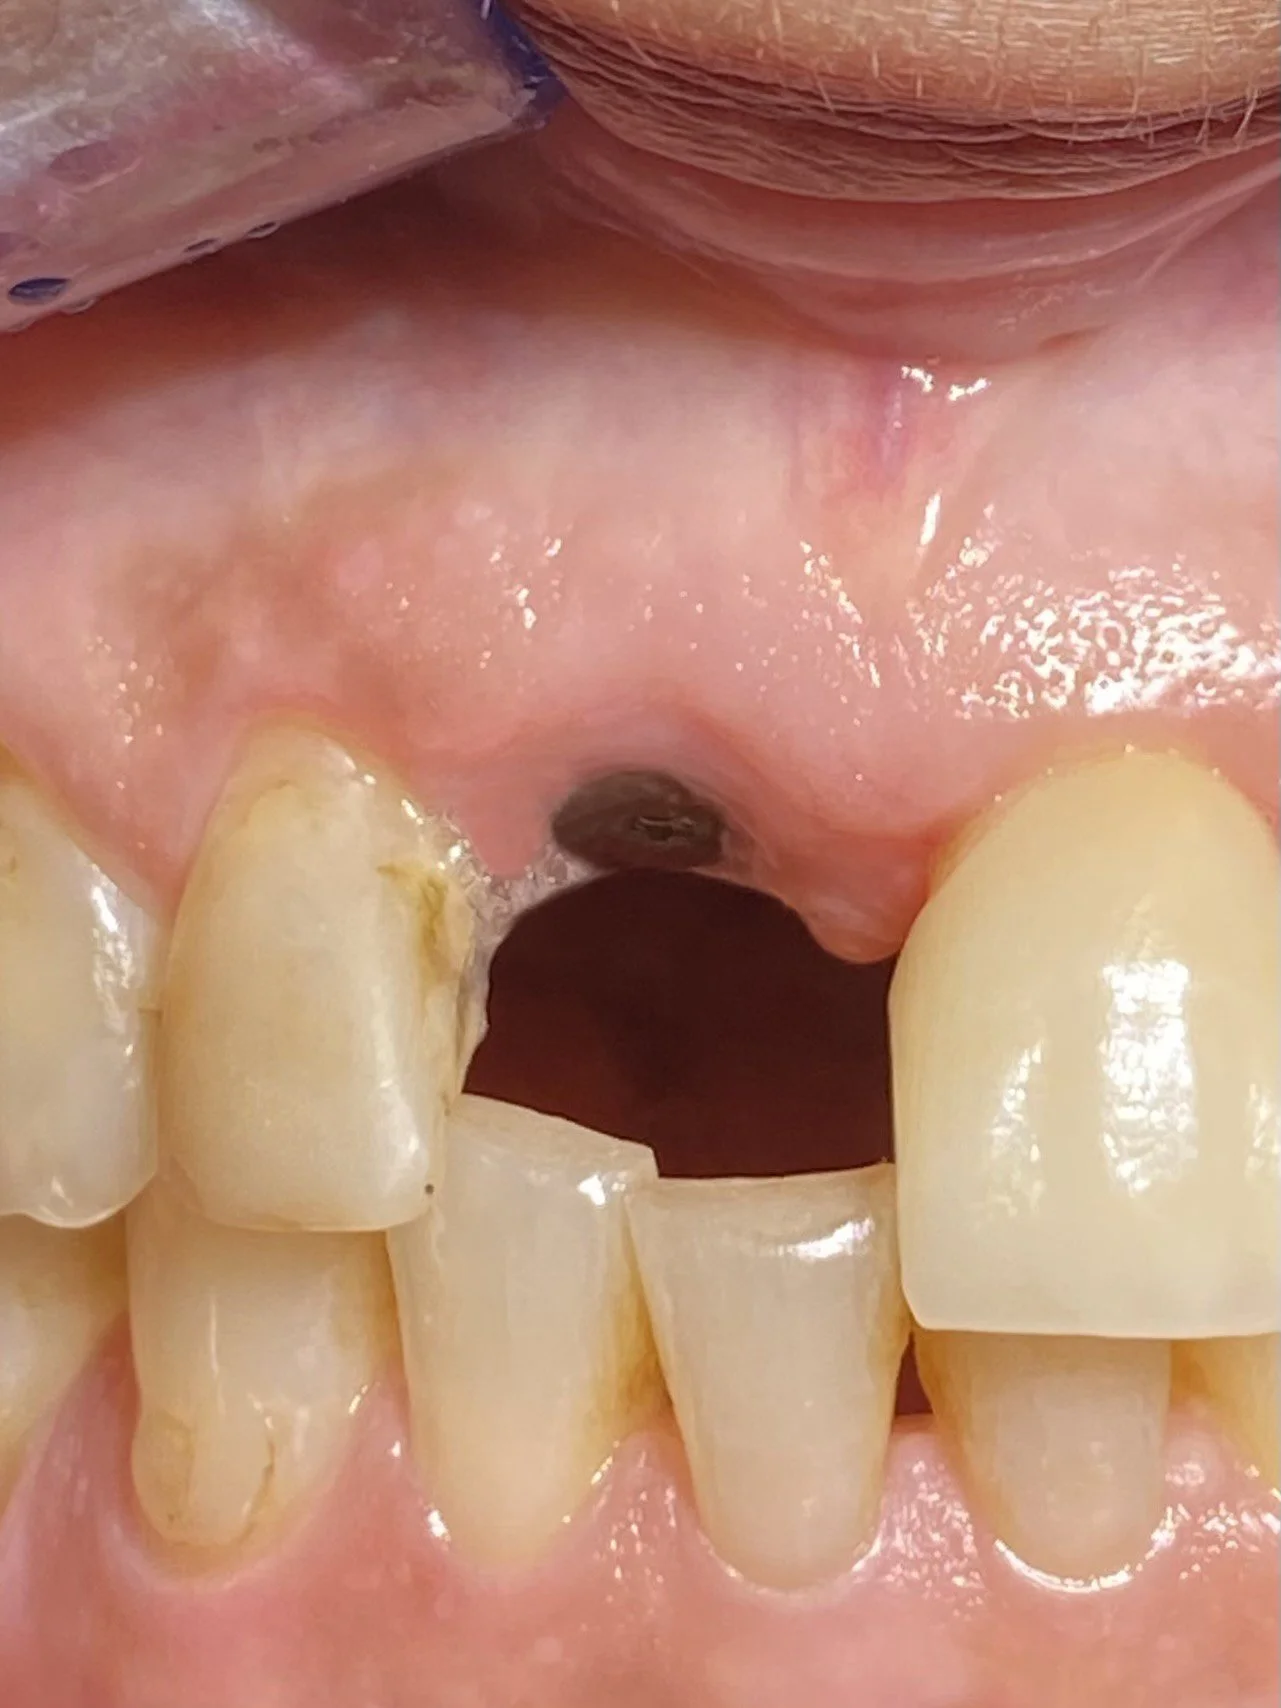
![]()
The completed case on the day of fitting and the gum is pale whitish in colour from the local anaesthetic.
-
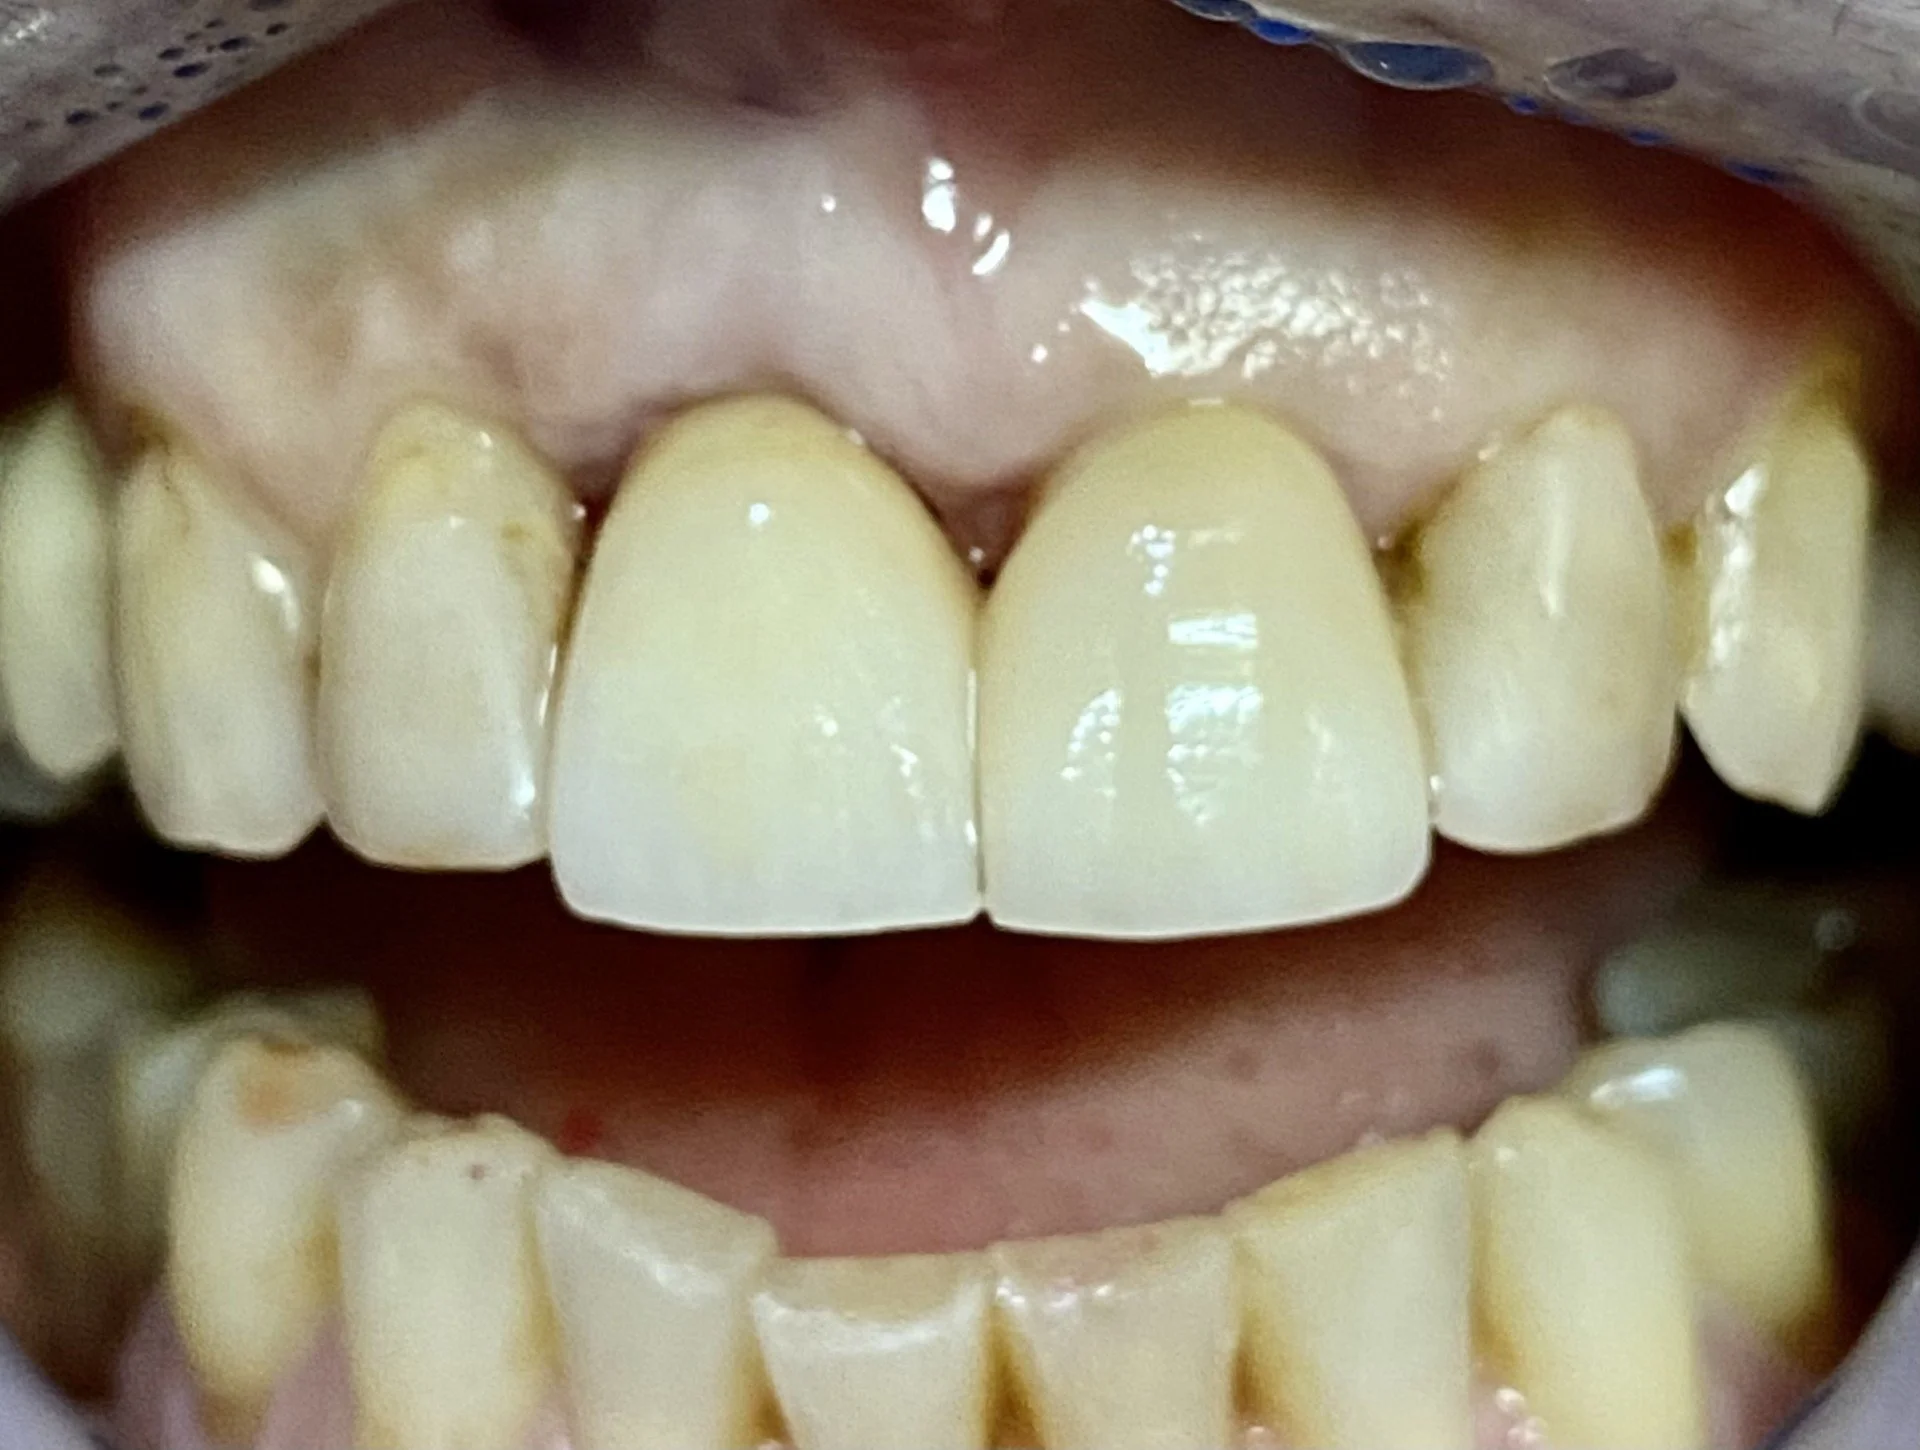
![]()
This is the follow up in 2025
-
![]()

Single implant crown to replace a right front tooth
-
![]()
This 70 year old patient was referred to me at Lismore in 2024 by a Ballina dentist to complete an implant crown
-
![]()
after an Oral Surgeon placed a Straumann implant fixture and healing abutment/cap
-
![]()
The implant crown was secured into place and torqued
-
![]()
The final photograph on the day of fitting the implant crown in 2025 and colour matched with the adjacent filled left front tooth
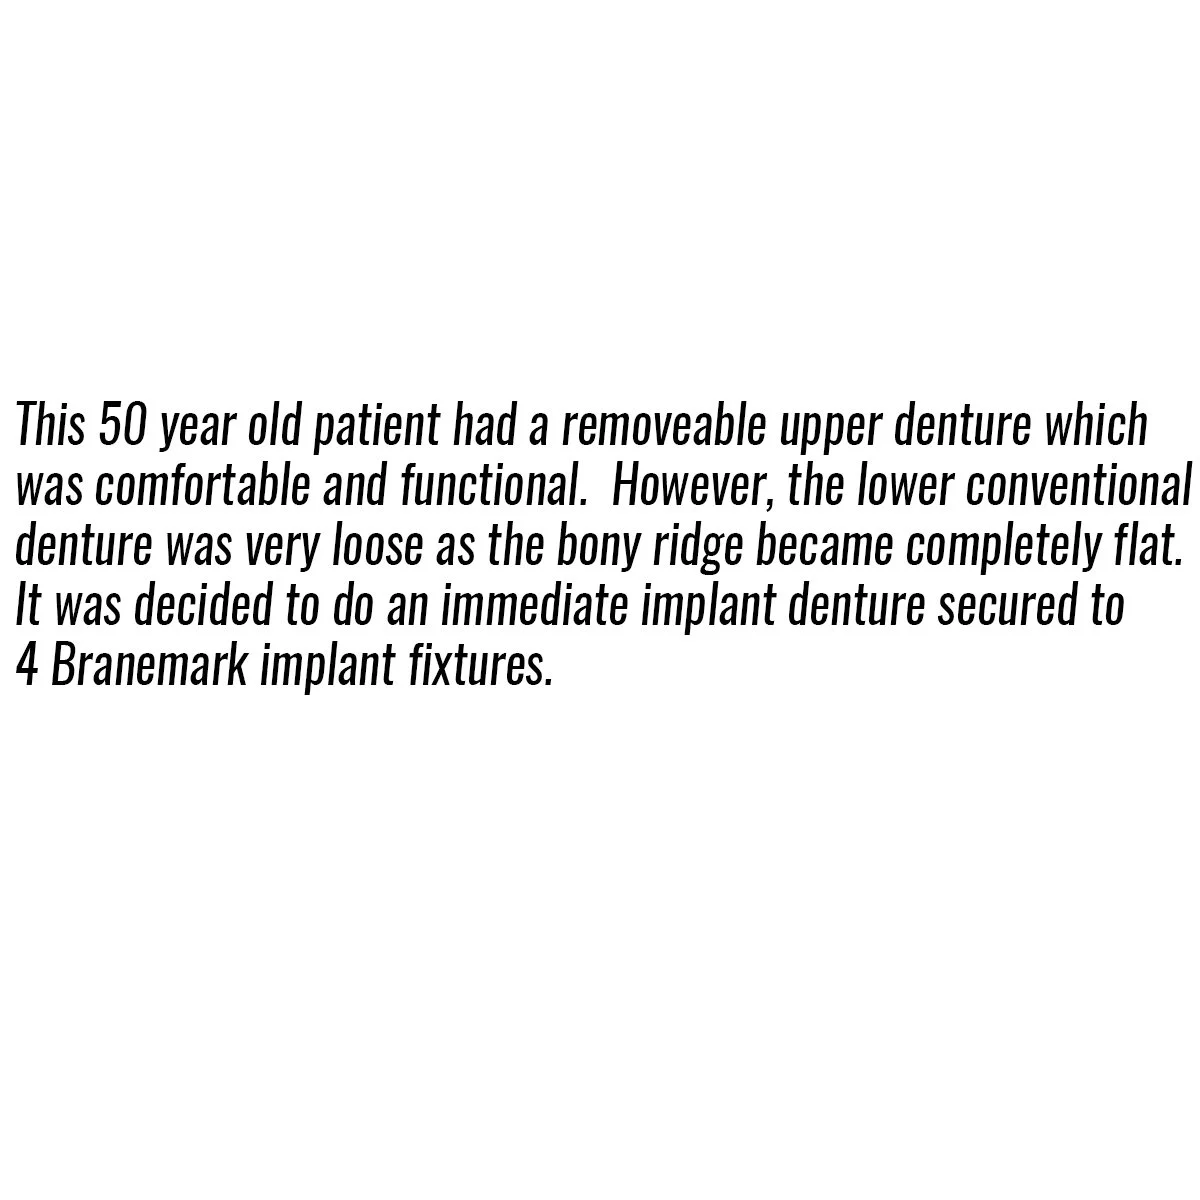
Implant bridge - Fixed 4 unit cemented zirconia bridge following rebuilding lower jaw after cancer surgery
-
![]()
This 50 year old patient unfortunately developed cancer in his mouth on the lower left hand side which required complete resection or removal of the teeth, gums and lower left jawbone by a Facio-Maxillary Surgeon.
-
![]()
The lower jawbone was reconstructed by harvesting bone from the tibia of the leg along with a soft tissue graft consisting of calf muscle and surrounding fat tissue. Two pieces of bone were splinted in place with metal plates and screws to the remaining jawbone .
-
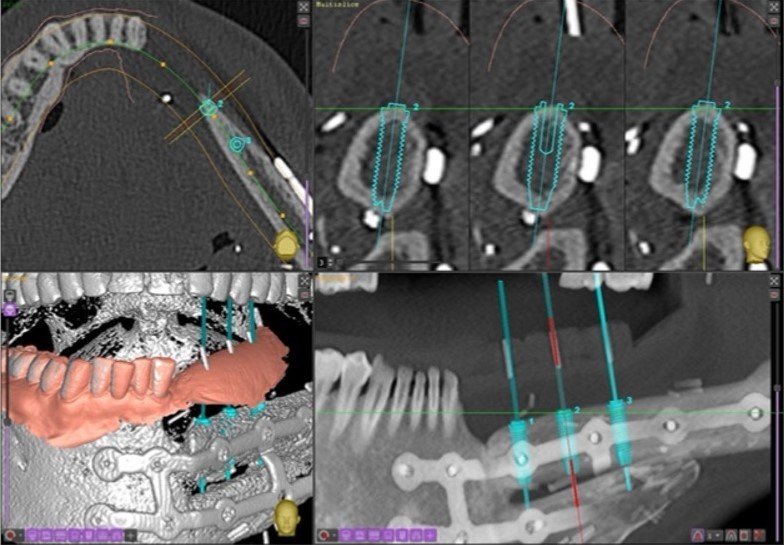
![]()
The patient was referred to me at Lismore in 2021 to replace the missing teeth with a fixed prosthesis involving an implant bridge. I designed the bridge on an OPG radiograph and issued instructions to my ceramist technician to fabricate a diagnostic wax up of the future teeth .
-
![]()
A surgical guiding device was fabricated with radiographic markers (vertical pink GP points) placed in the centre of the teeth to demarcate the future centroid position of the implant fixtures .
-
![]()
The guiding device was designed to bite optimally on the upper opposing teeth to duplicate where the future implant teeth would bite. Please note the soft tissue calf graft at this stage of treatment.
-
![]()
The surgical guiding device was given to the surgeon and his technical team to verify the position of my diagnostic teeth radiographic markers relative to the available bone to confirm the suitability for implant placement .
-
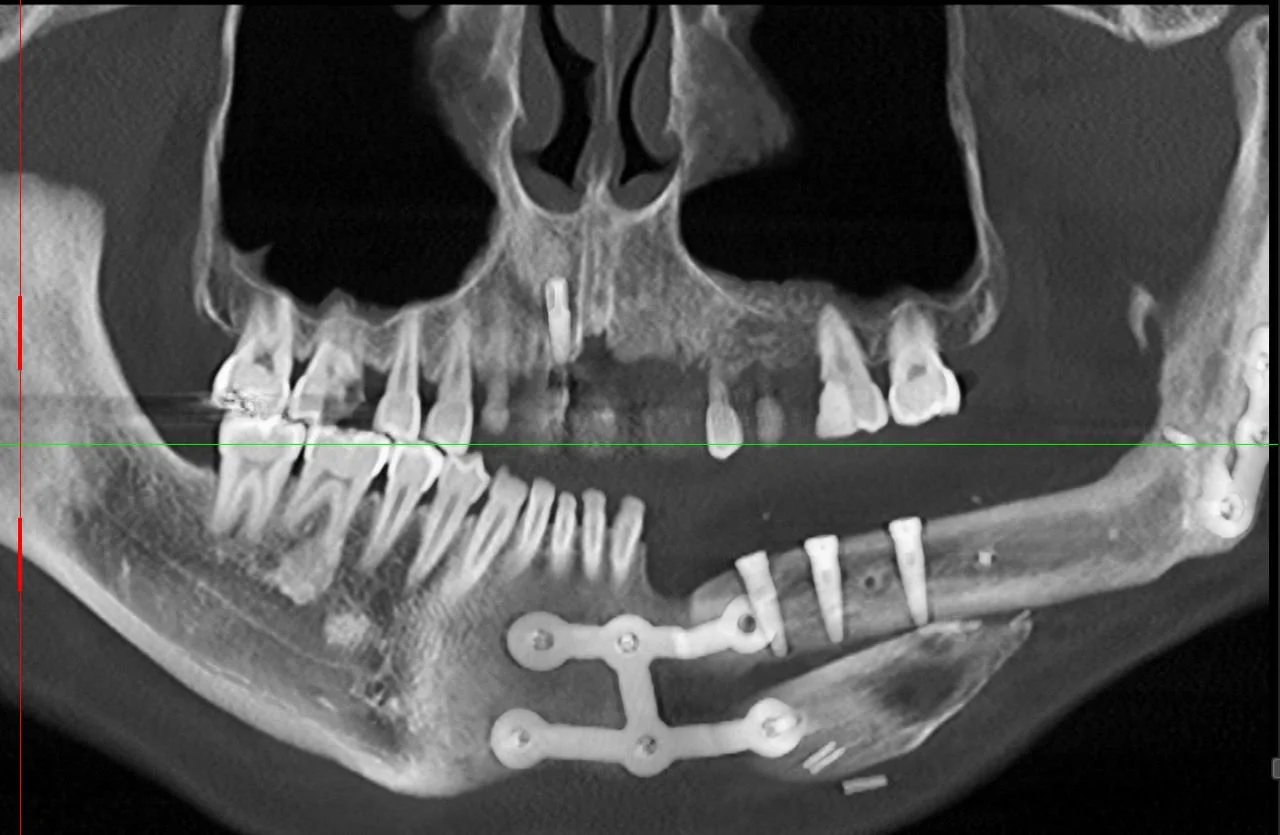
![]()
This OPG radiograph illustrates the completed 3 implant fixture and note that two of the metal splints had to be removed for implant placement. Note there was insufficient bone in the lower left canine region to place an implant which necessitated the designing of a cantilevered bridge tooth
-
![]()
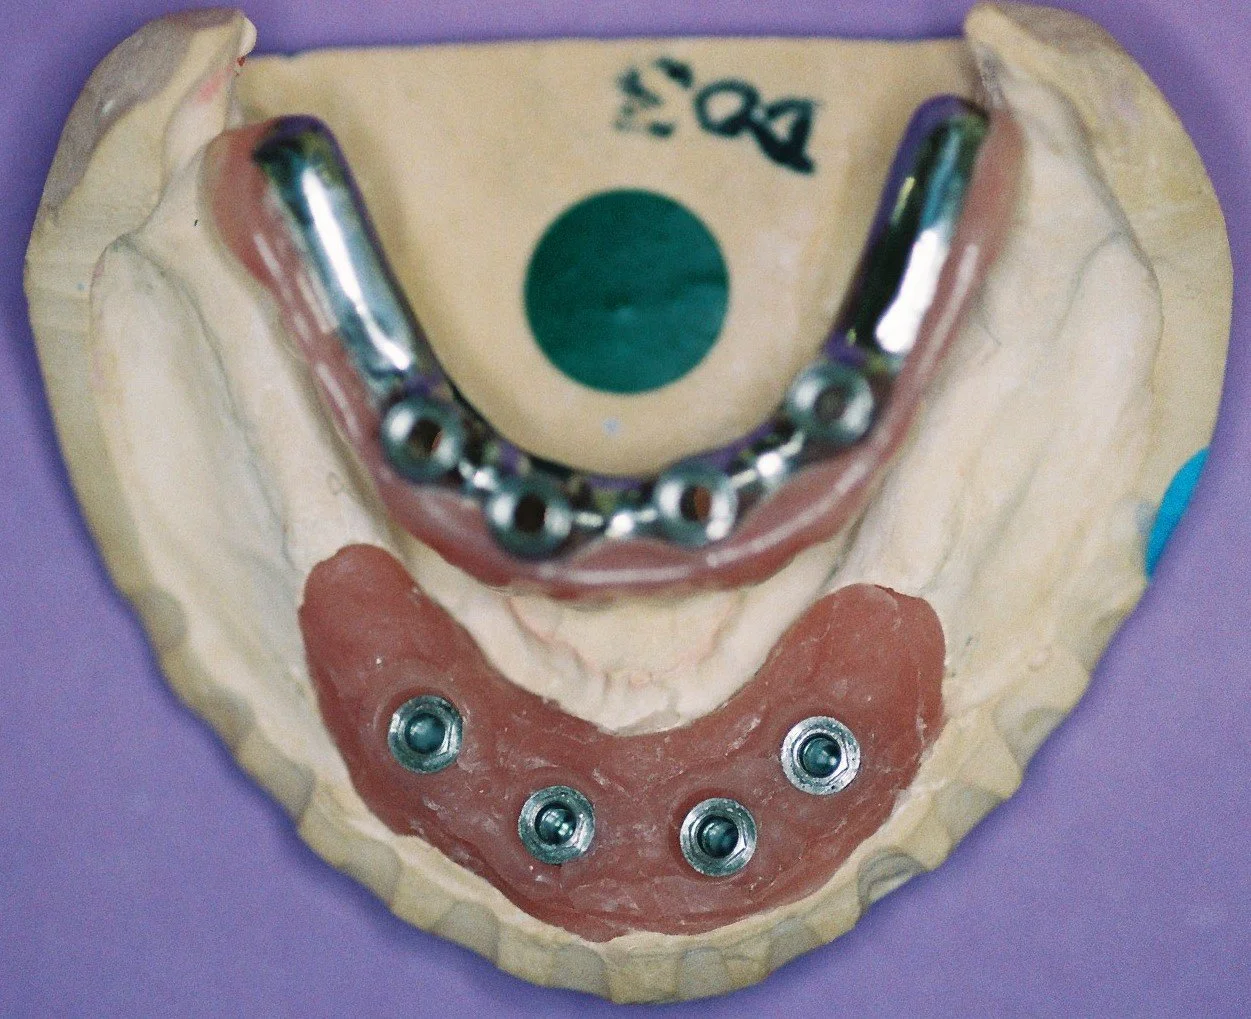
Cemented titanium abutments were chosen to retain the future bridge .
-
![]()
A view of the plaster model illustrates the 4 unit zirconia bridge replacing the missing canine tooth.
-
![]()
Another view of the plaster model.
-
![]()
The completed 4 unit zirconia bridge in 2022 with metal splints repositioned .
-
![]()
The completed aesthetic 4 unit implant bridge.
-
![]()
This long journey the patient endured has resulted in a hygienic and aesthetic bridge, functional bite, improvement to his speech and support to his cheeks and tongue.
IMPLANT DENTURES
There are two basic types of implant dentures:
1. Implant dentures that are screwed into the implant fixtures making the denture not removeable by the patient but only removeable by the Dentist is called a conventional implant denture, usually All-on-4 implants.
2. Implant dentures that are removeable by the patient but fixed in while chewing etc are called Fixed-Removeable Implant Dentures and are termed by Dr. Darveniza as HYGIENIC implant dentures.
Fixed Implant denture screw retained – only removeable by dentist
-
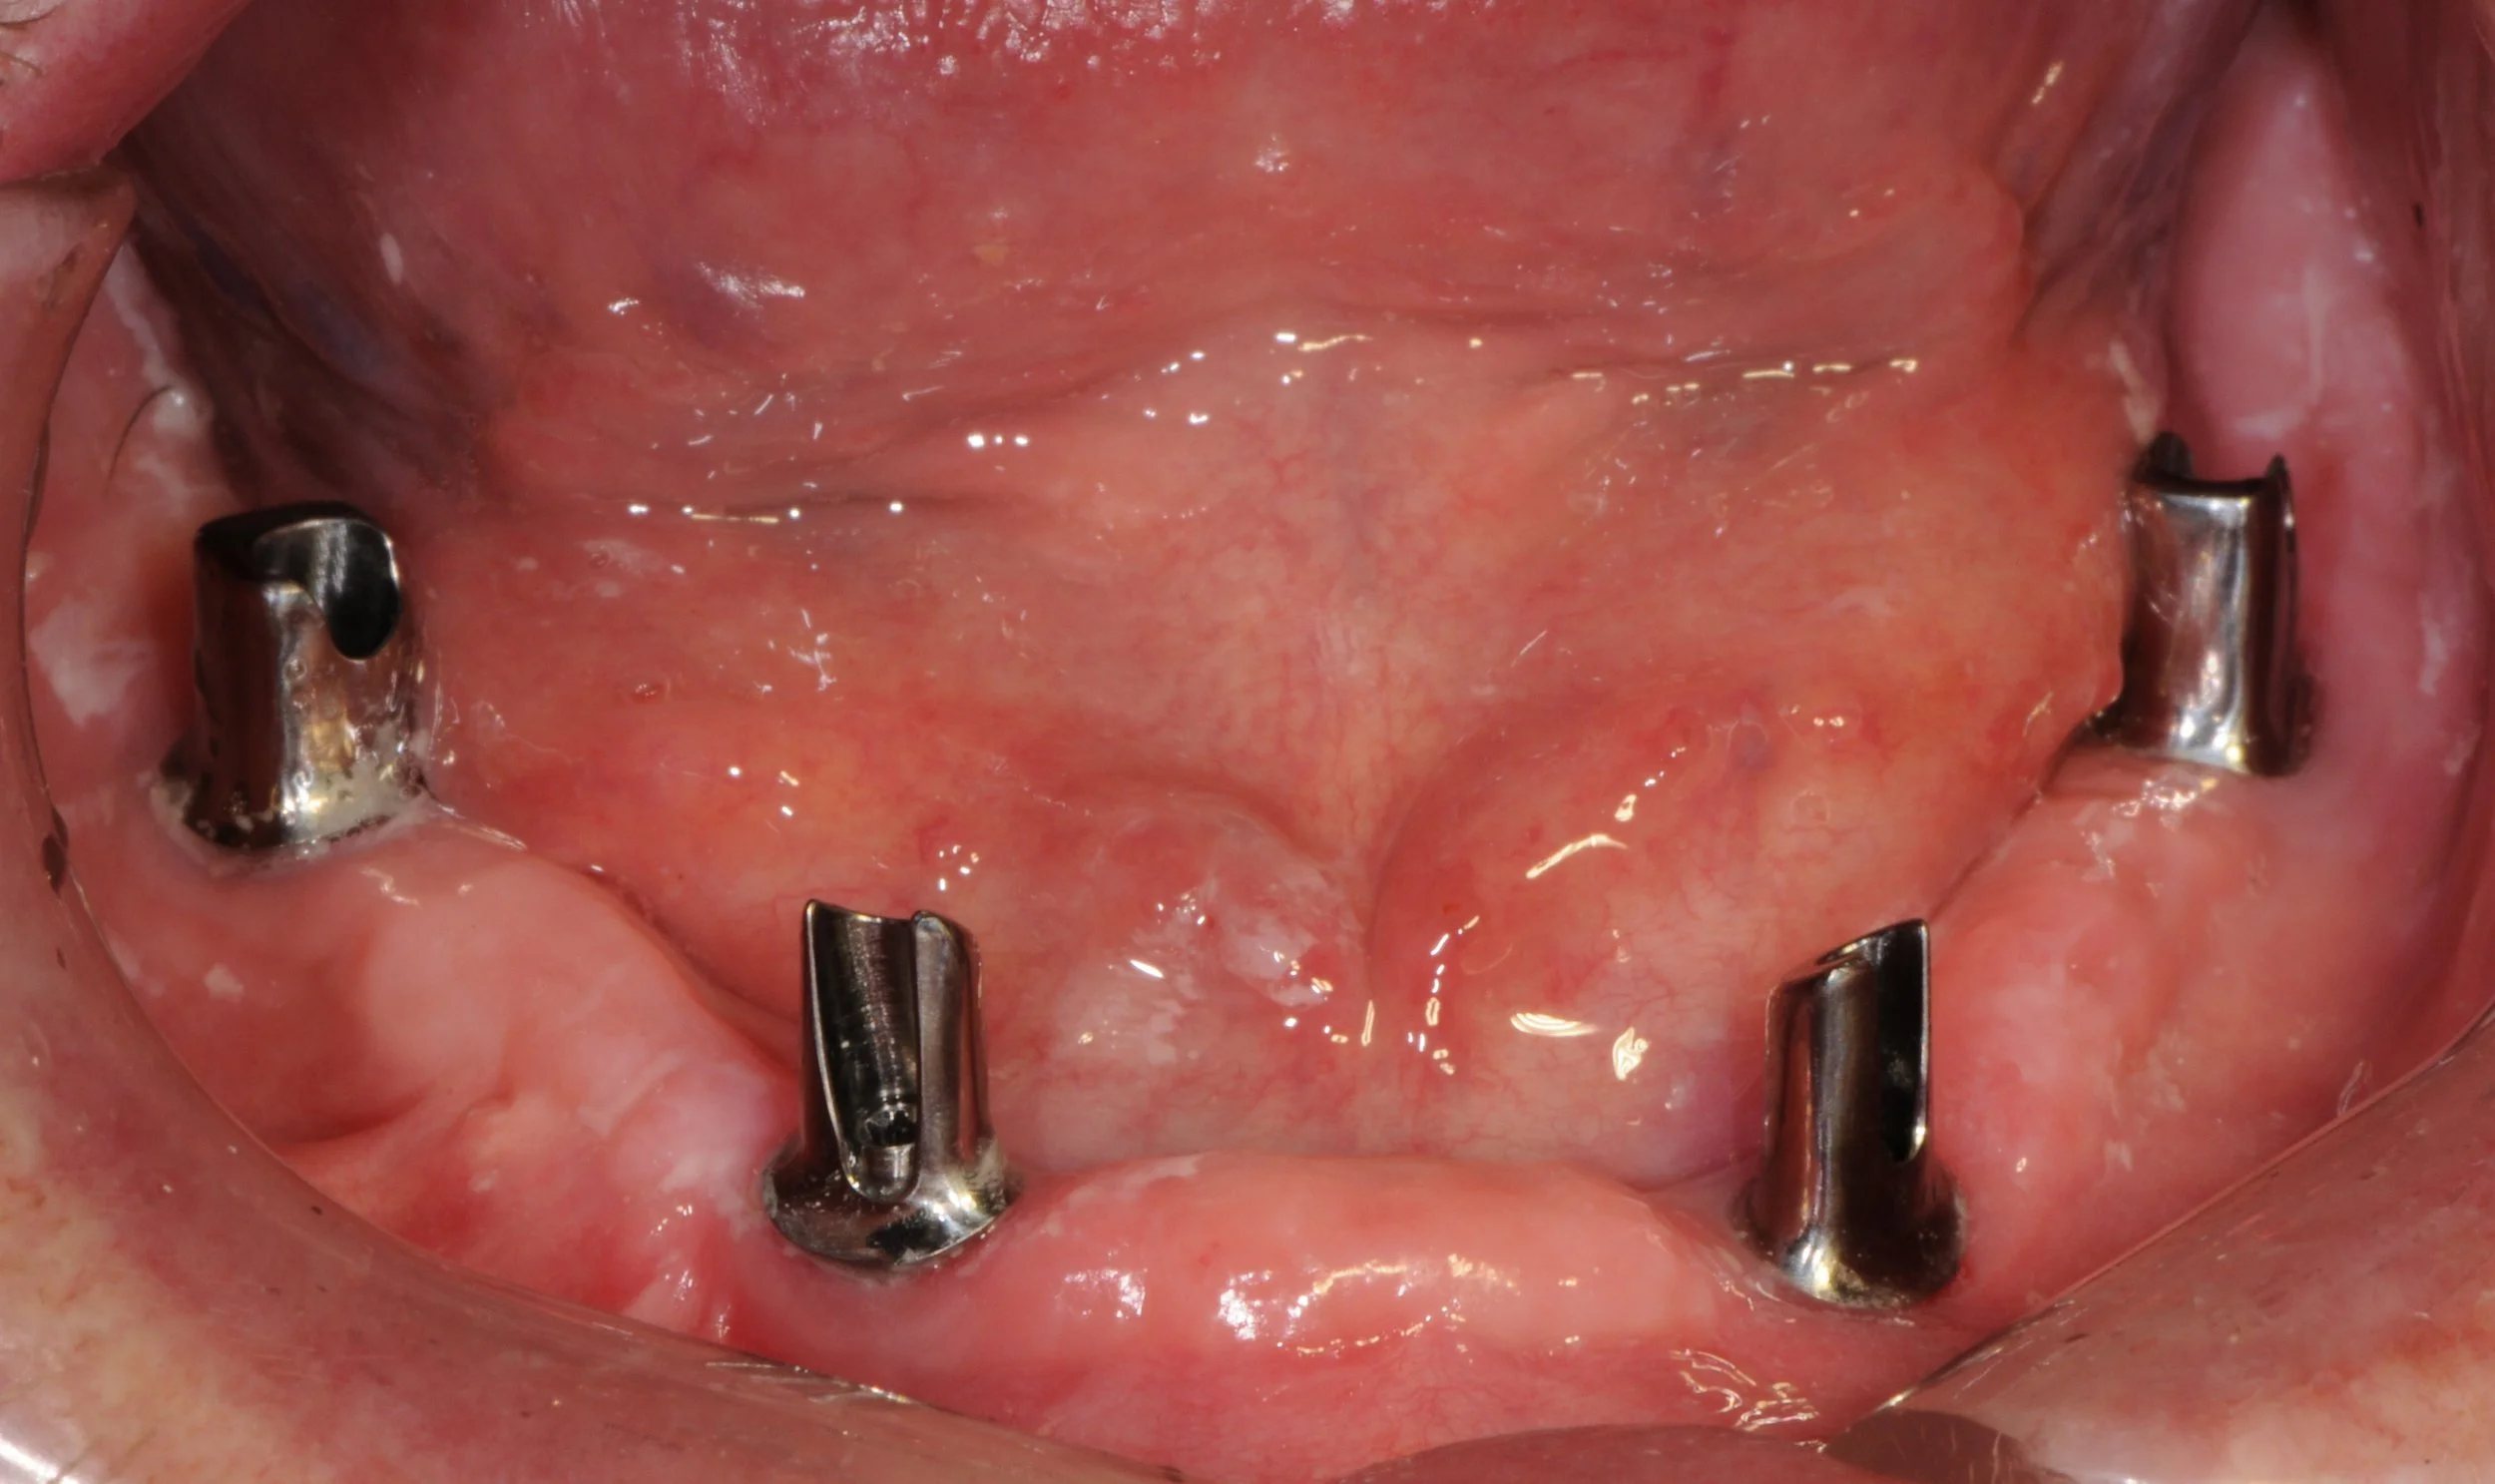
![]()
-
![]()
A plaster model with replicas of the implant fixtures and a photo of the base of the implant denture. The base was made of titanium, pink acrylic resin and acrylic denture teeth.
-
![]()
A view of the back of the implant denture showing the 4 housings for the screws used to secure the denture to the implant fixtures.
-
![]()
After these small screws are torqued to 35 N.cm the access openings are filled with composite resin filling material. The patient needs to return every 6 months or more to have the denture removed and professionally cleaned by a Dentist.
-
![]()
A gap between the pink resin and the implant fixtures, these gaps are used to allow the patient to clean around the implants using threaded Superfloss and other hygienic cleaning aids.
-
![]()
The final facial photograph illustrating good lip support from wearing a stable fixed implant denture.

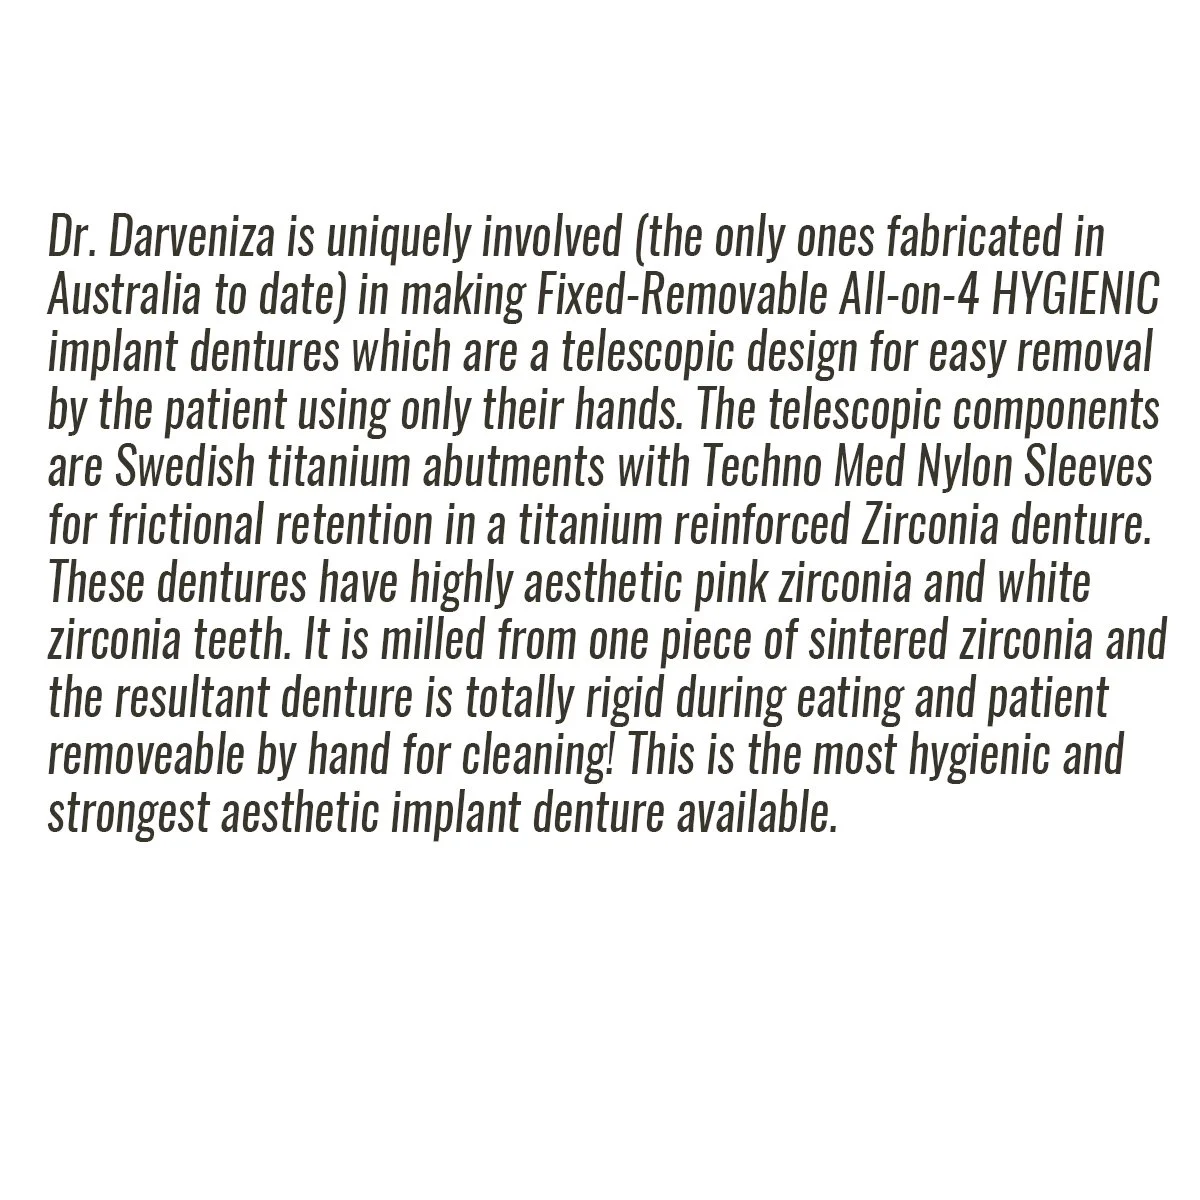
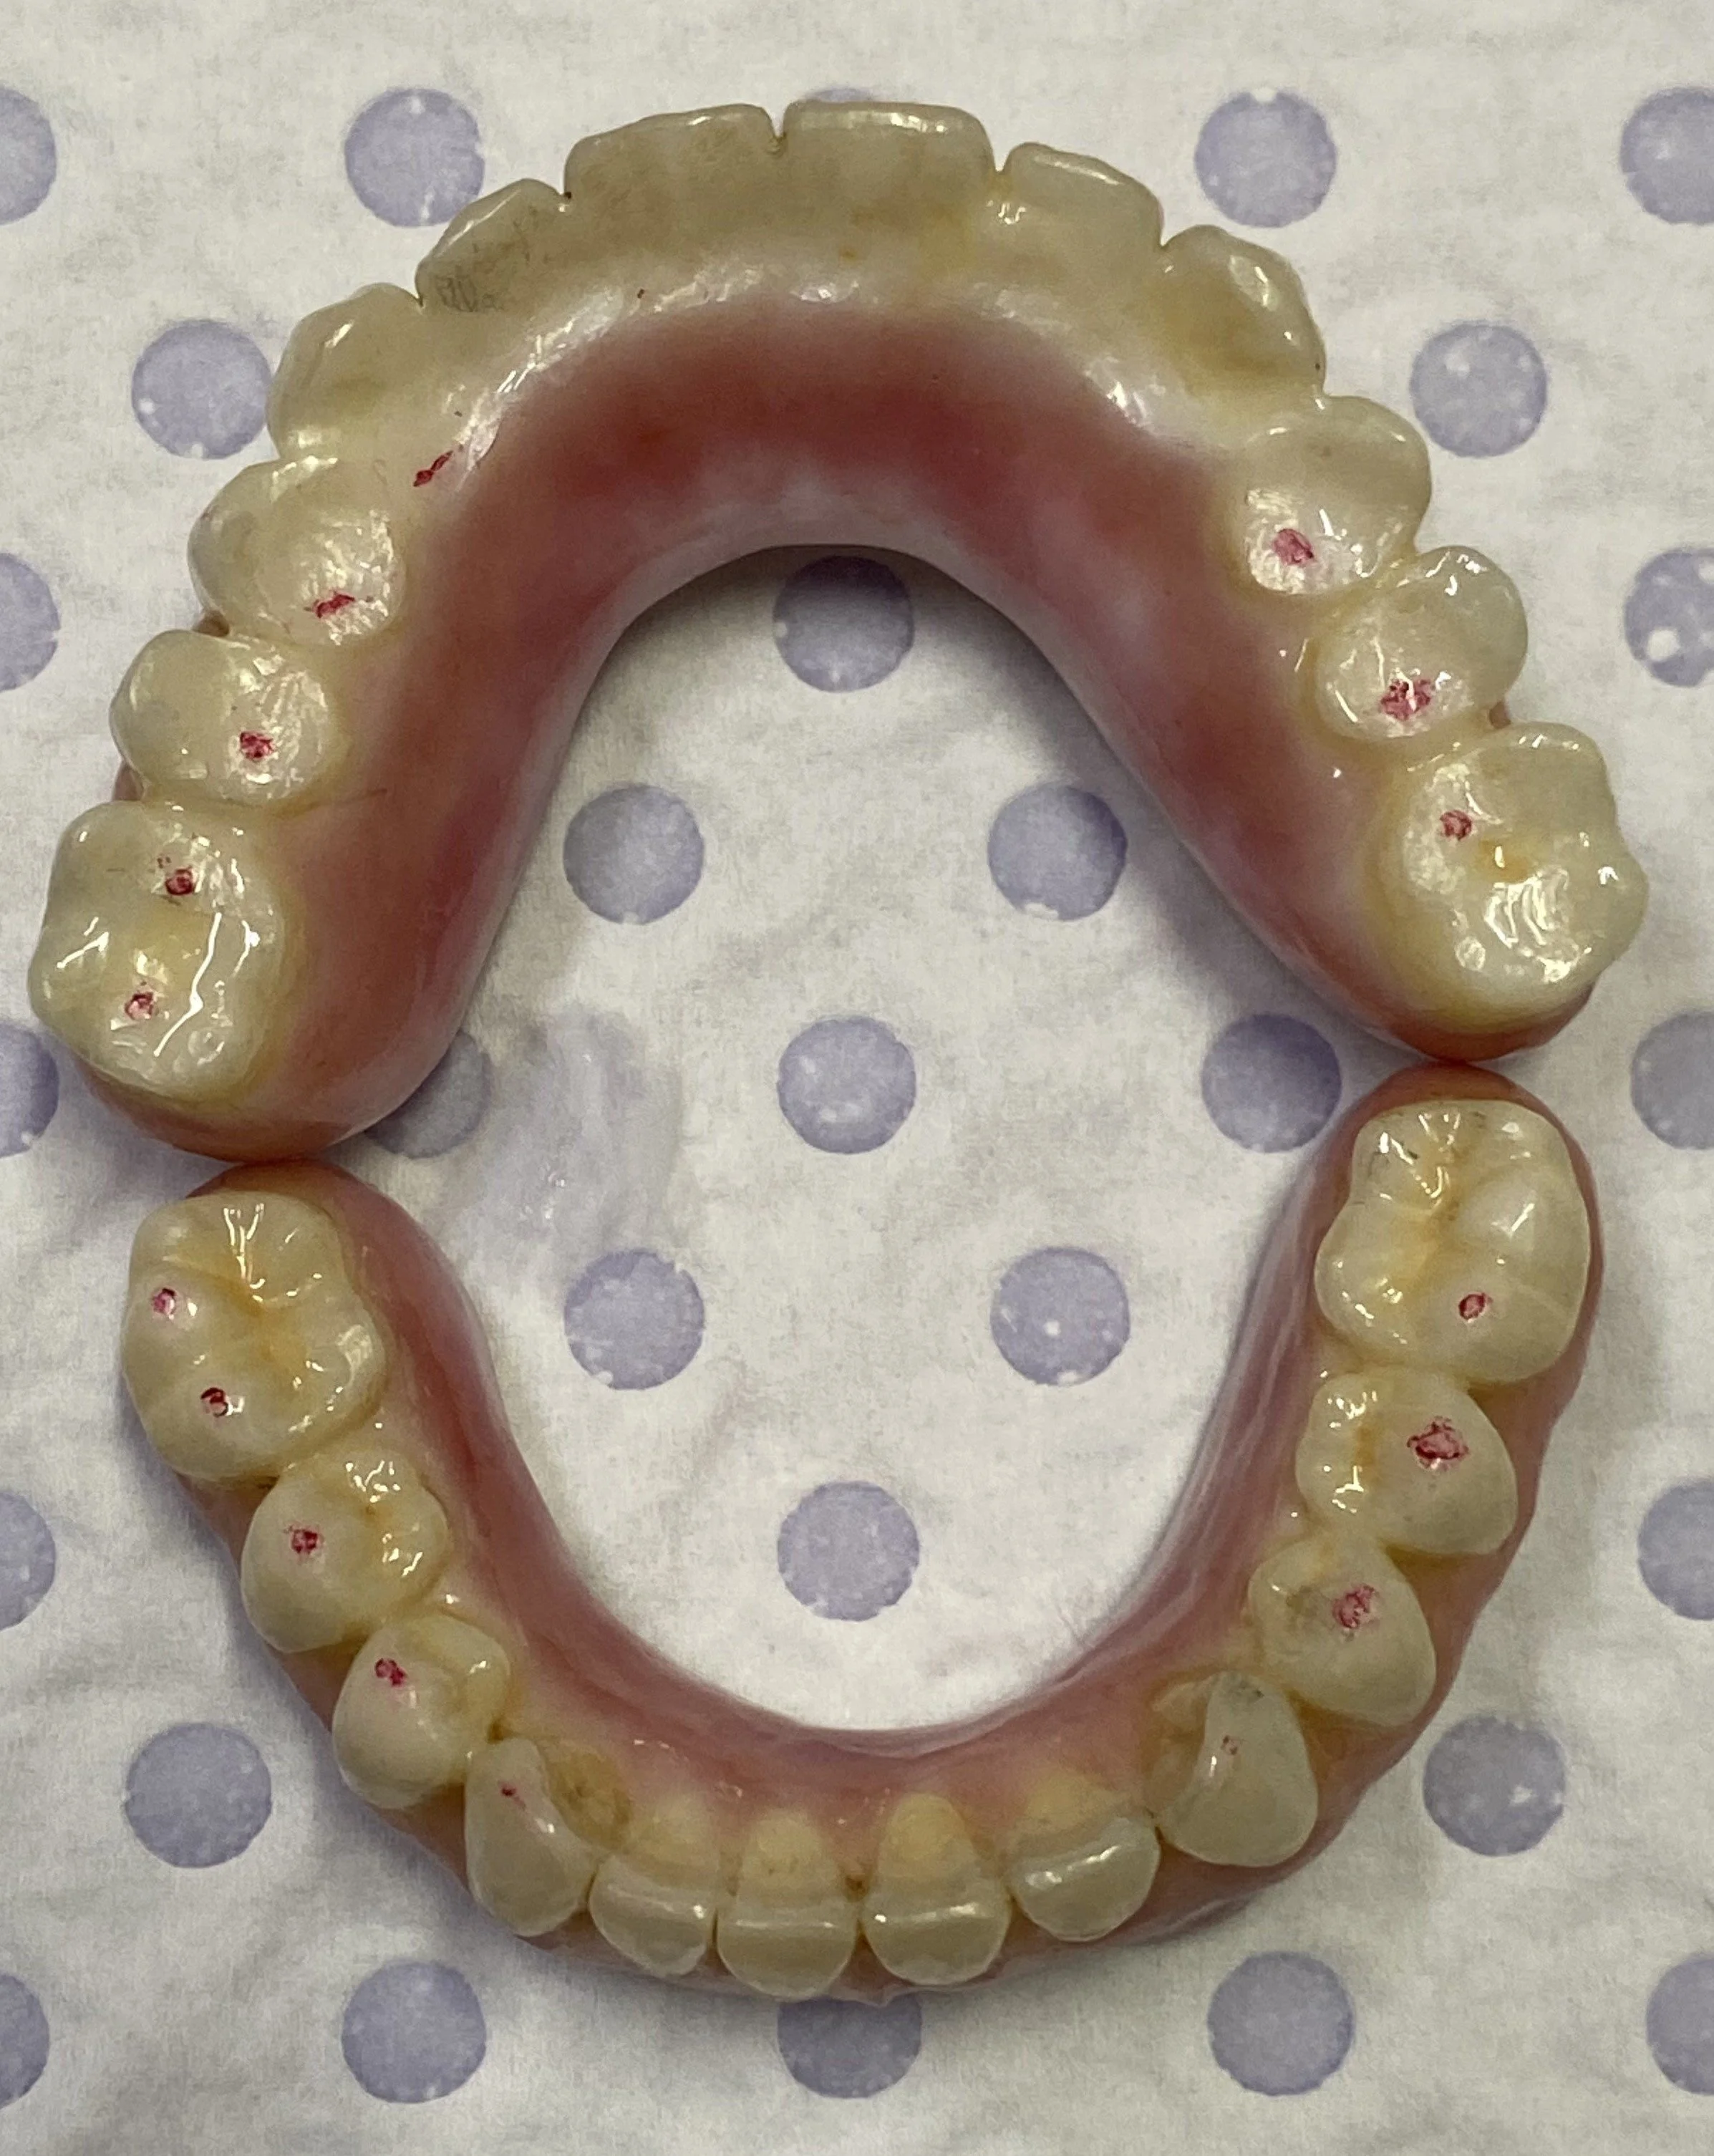
Fixed–Removeable Hygienic Implant Denture – Telescopic Denture Design - with titanium Atlantis abutments and nylon friction sleeves in a pink zirconia denture base and white zirconia teeth mounted on a titanium frame.
-
![]()
-
![]()
-
![]()
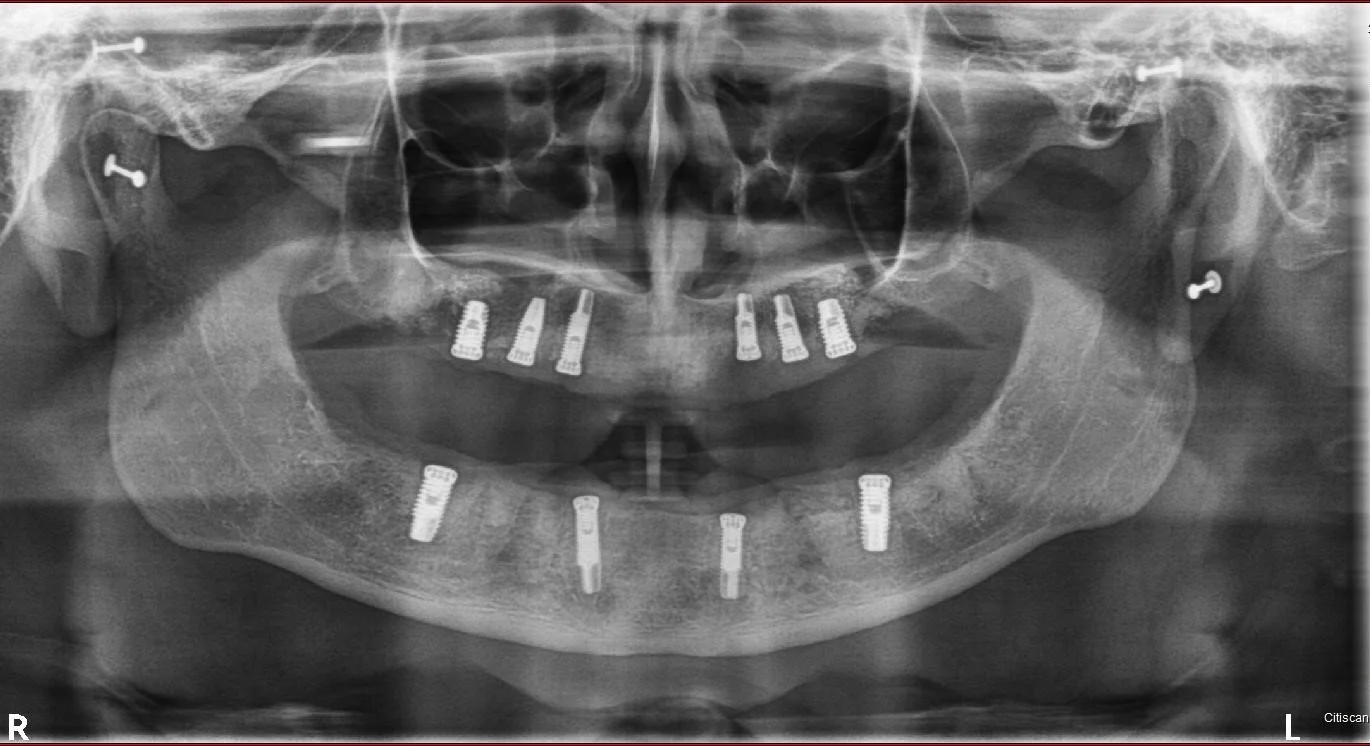
OPG radiograph illustrates Branemark implant fixtures placed in Brisbane by Dr. Darveniza for each of the upper and lower jaws in readiness for All-on-4 Fixed-Removeable implant dentures.
-
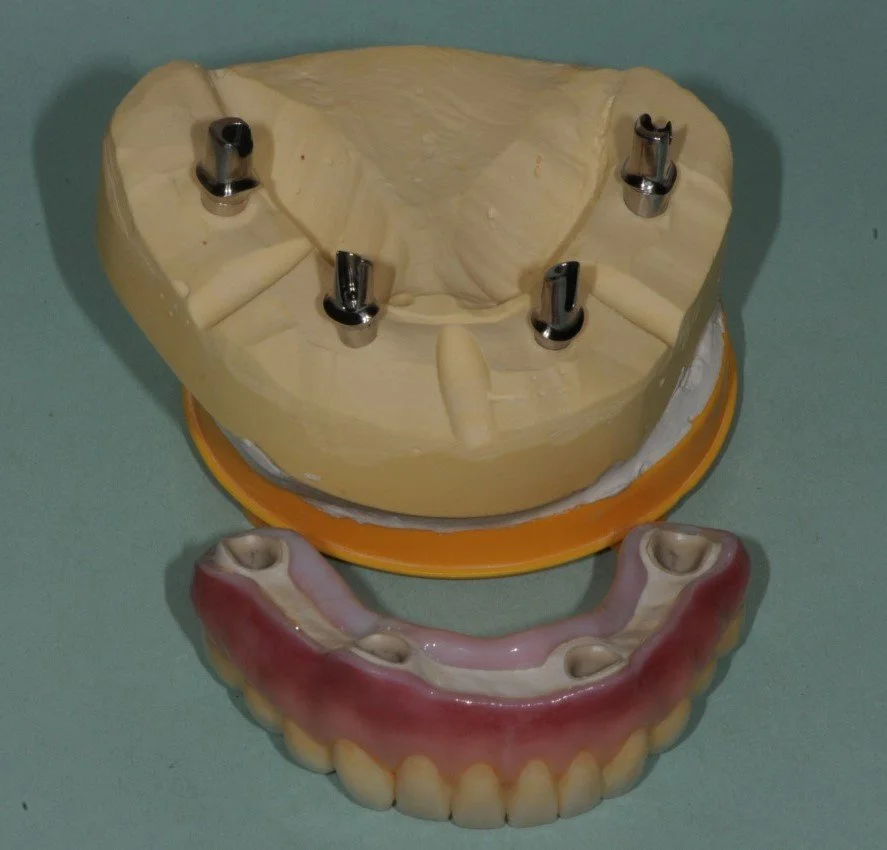
![]()
The results of the software program designed by a programmer in Belgium with Dr. Darveniza to create Atlantis Abutments of the correct size and shape overlaid inside the diagnostic conventional removeable acrylic resin dentures I made.
-
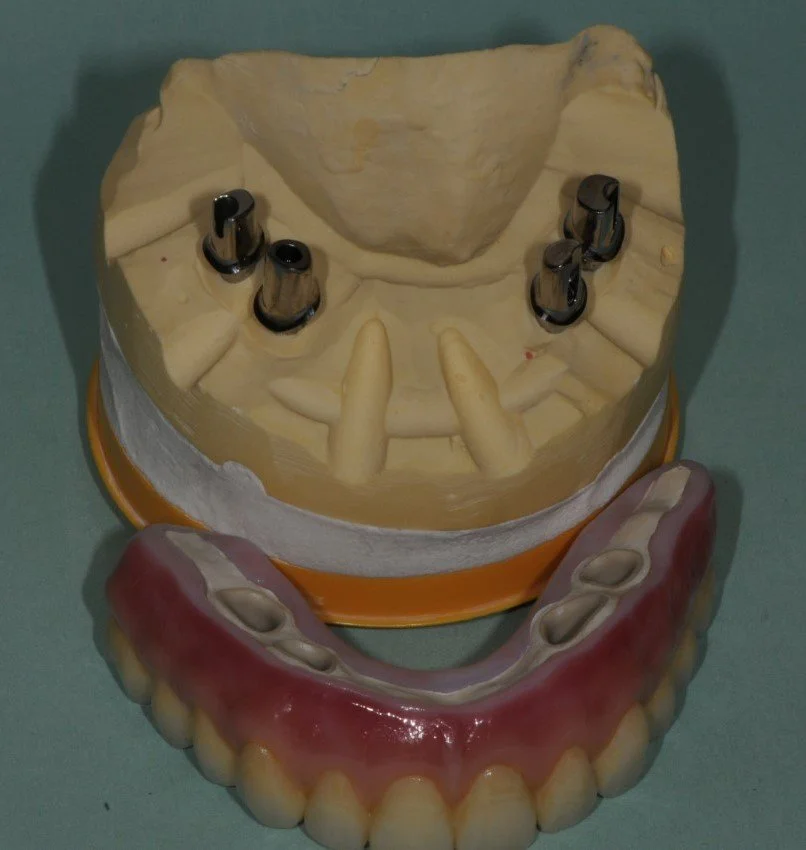
![]()
After designing the Atlantis titanium abutments with the Belgium programmer via email, the 8 abutments were milled of titanium in Sweden.
-
![]()
The milled abutments with 5 degree tapered walls and a millimetre wide chamfers, and with all 4 abutments being parallel to each other in each arch.
-
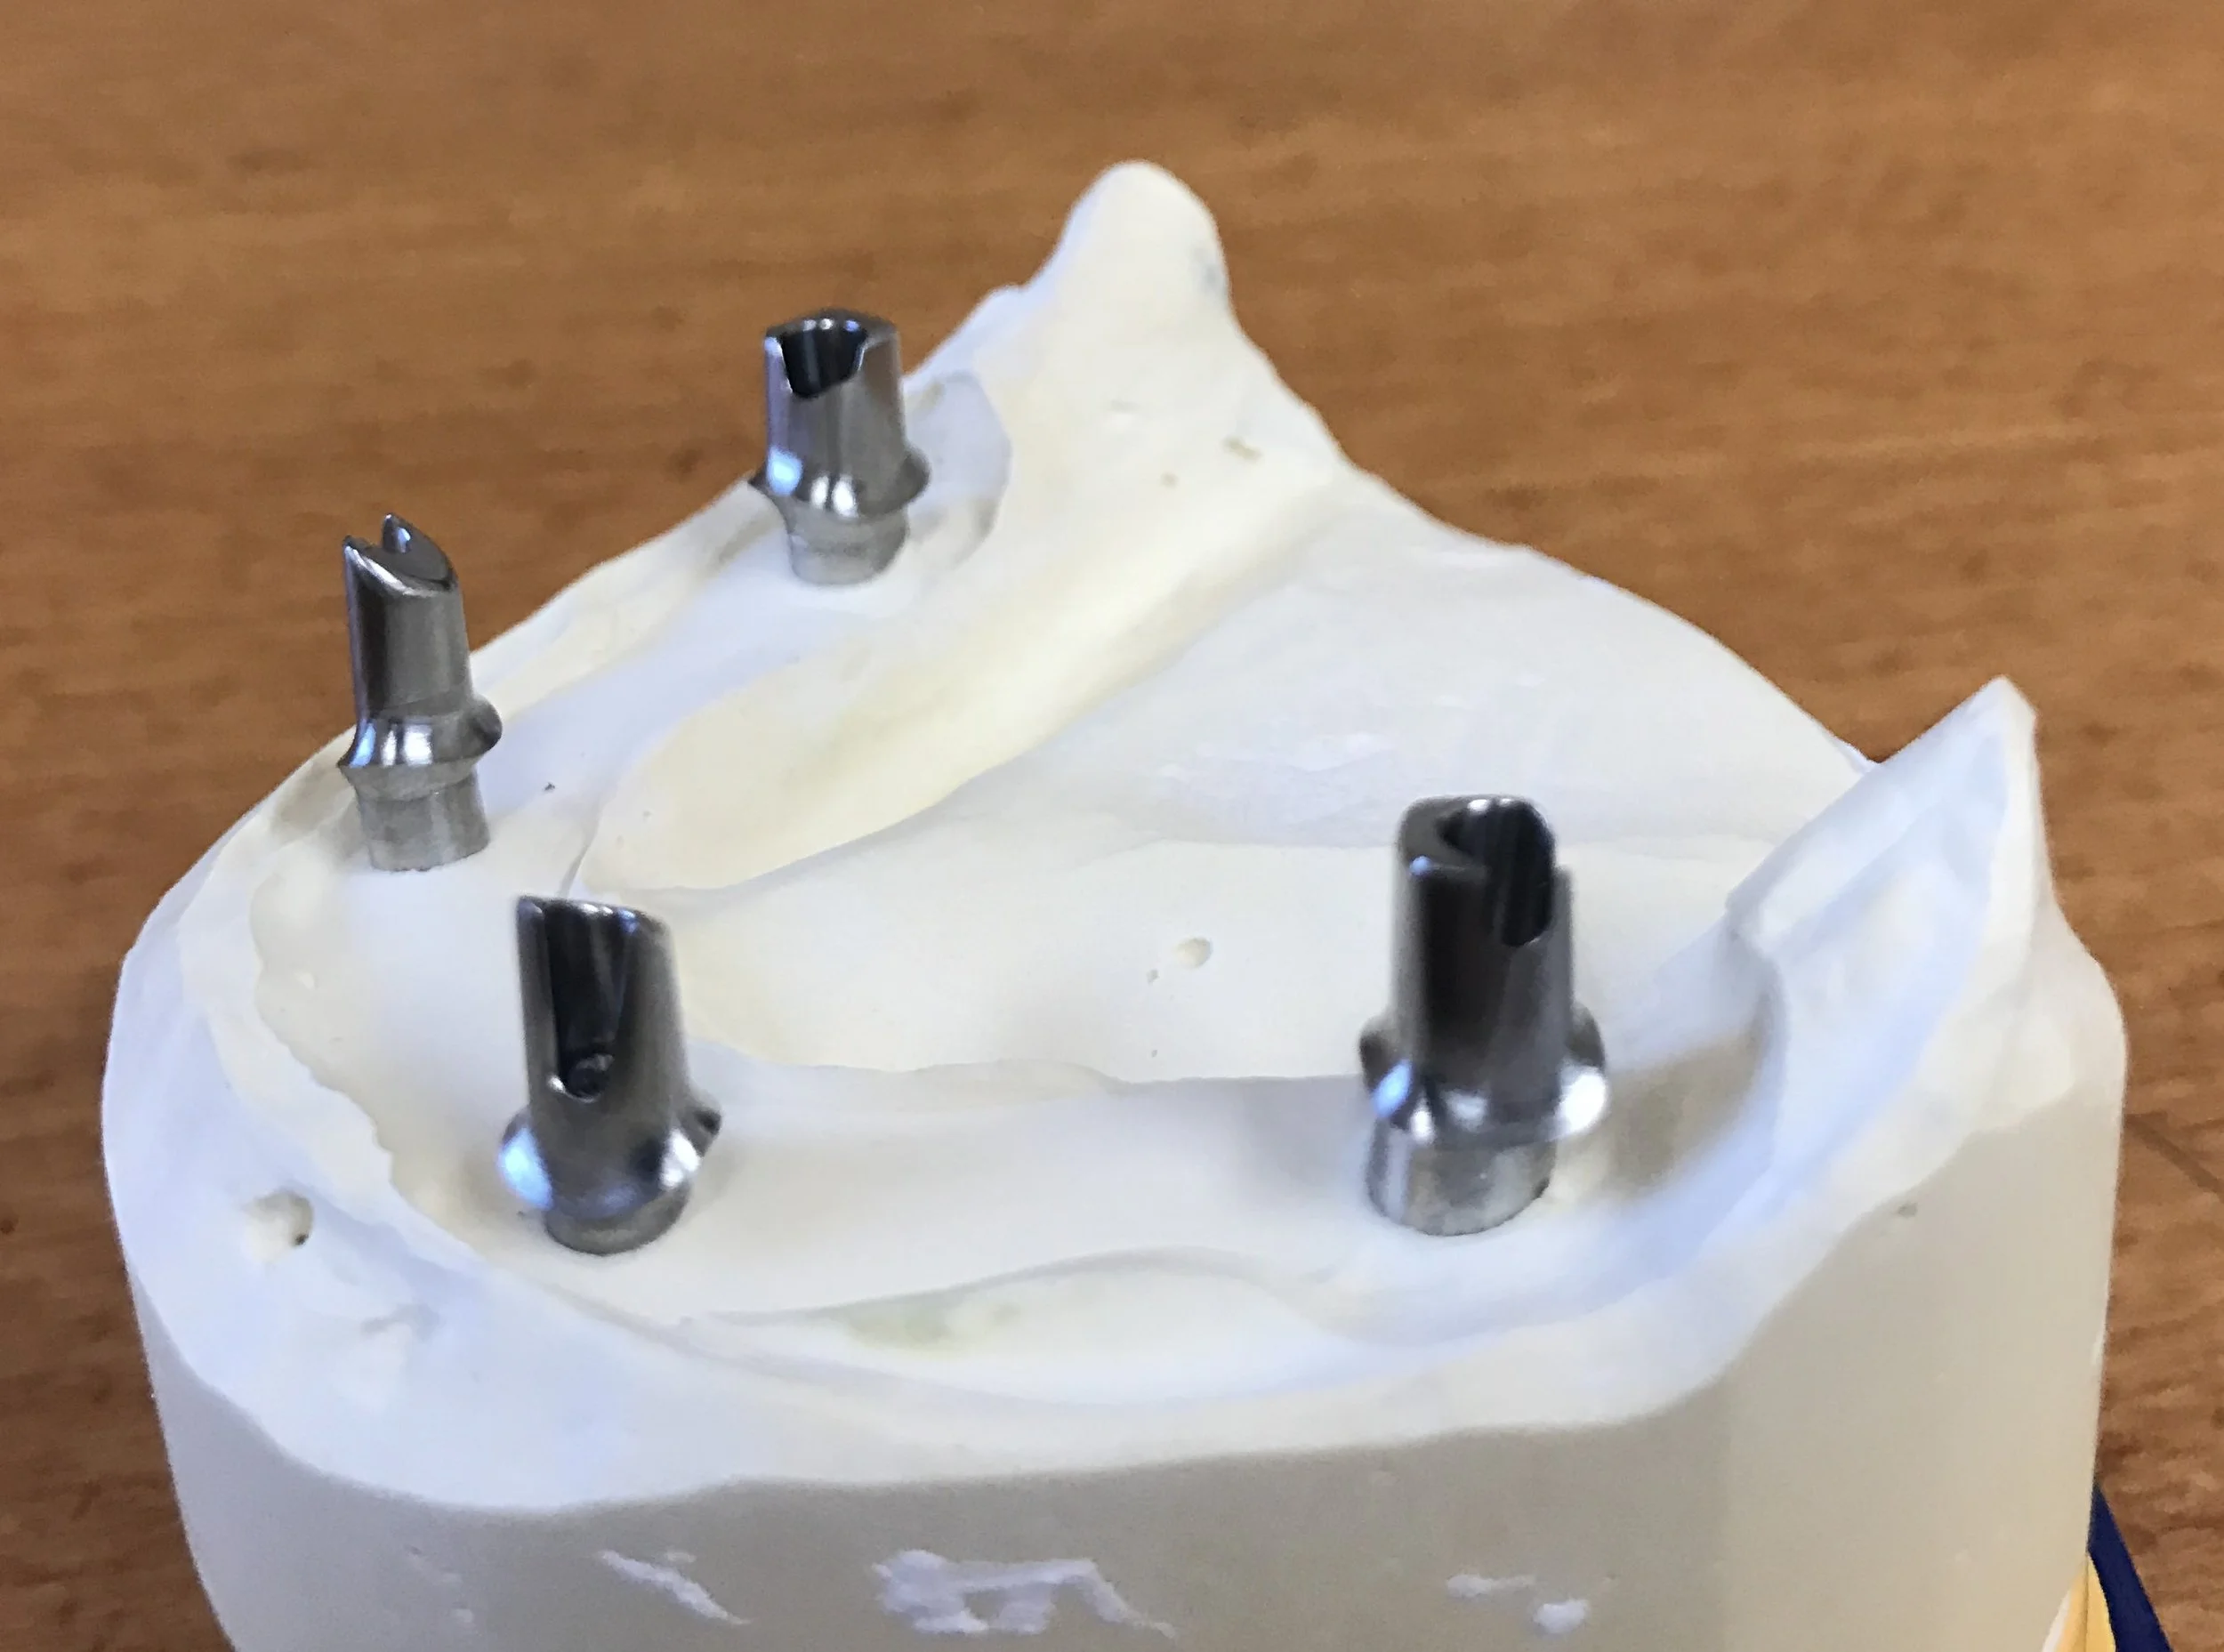
![]()
The titanium abutments screwed into the implant fixtures on the lower arch.
-
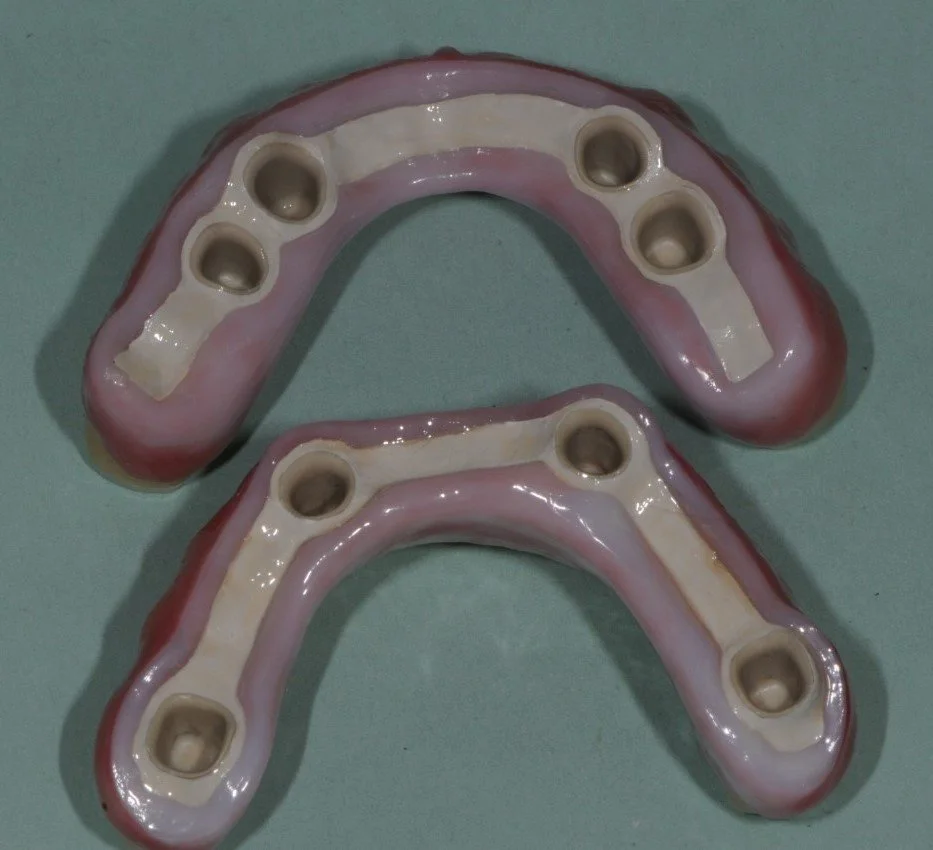
![]()
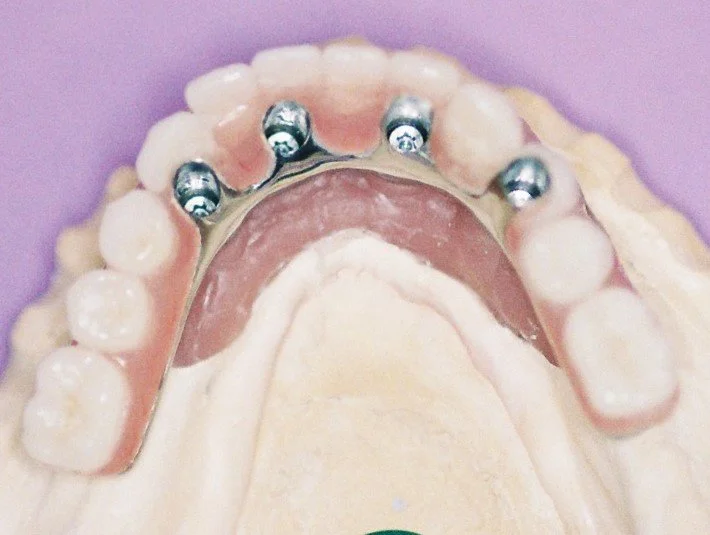
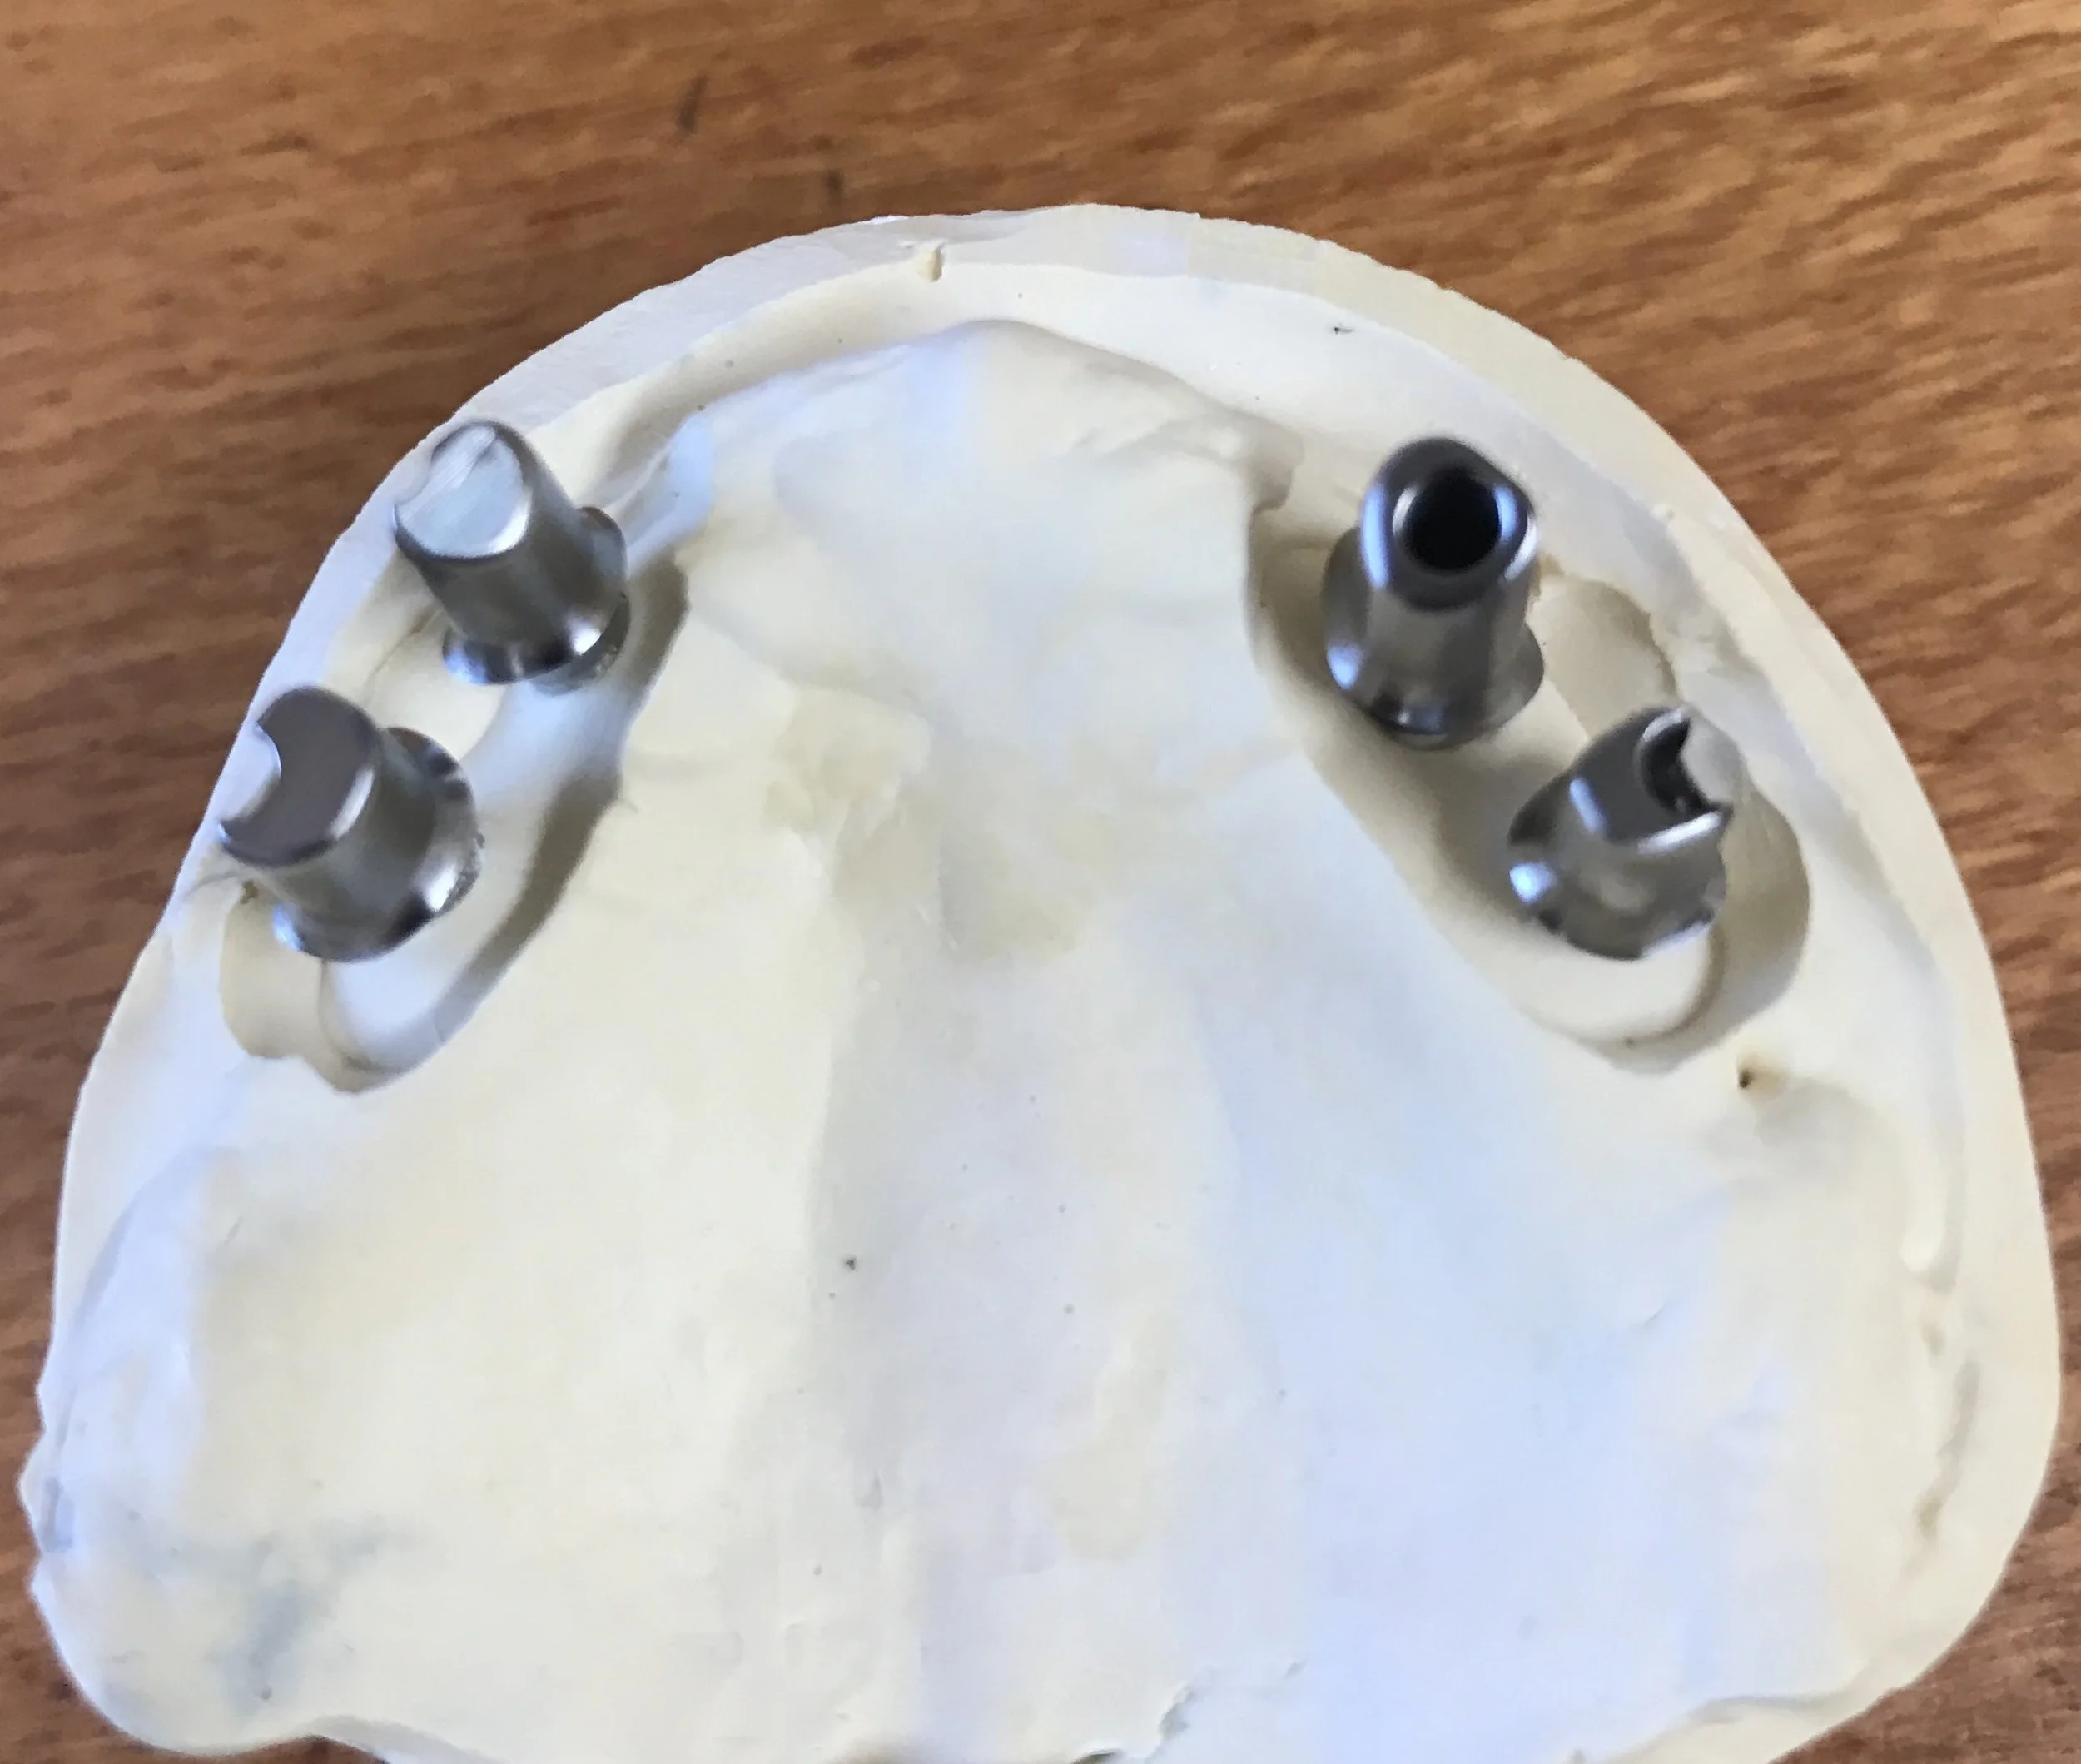
The underlying surface of the implant dentures with 4 nylon frictional sleeves in each denture.
-
![]()
This illustrates the lower zirconia implant denture with nylon friction sleeves along side a plaster model with titanium parallel abutments for a telescopic fitting Fixed-Removeable implant denture
-
![]()
This illustrates the upper zirconia implant denture with nylon friction sleeves alongside a plaster model with titanium parallel abutments for a telescopic fitting Fixed-Removeable implant denture.
-
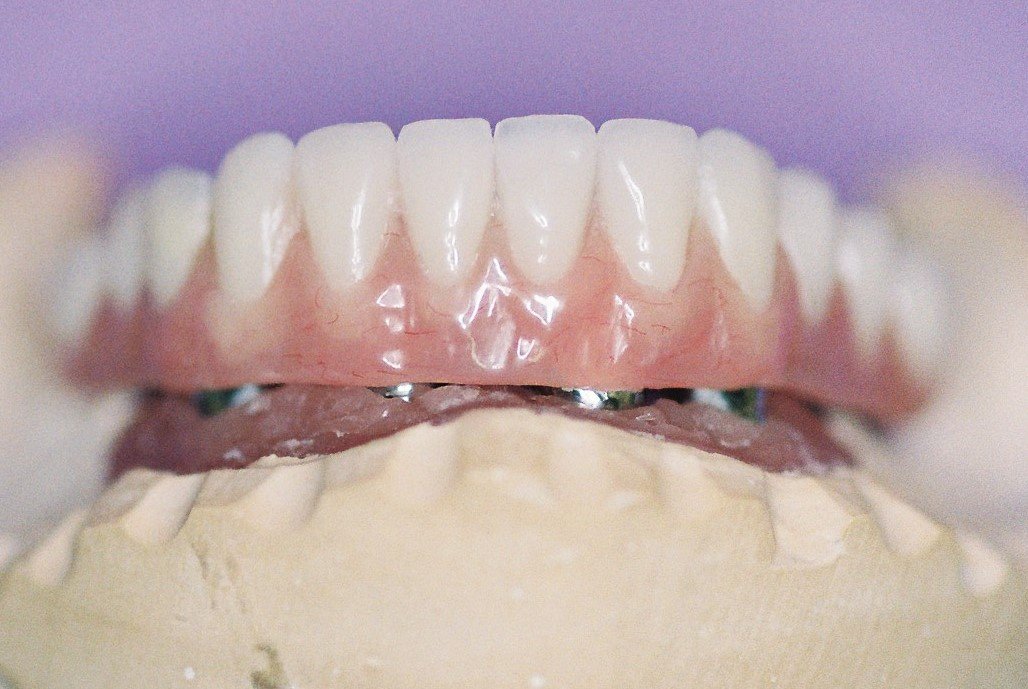
![]()
The implant dentures seated in the mouth biting in hinge bite.
-
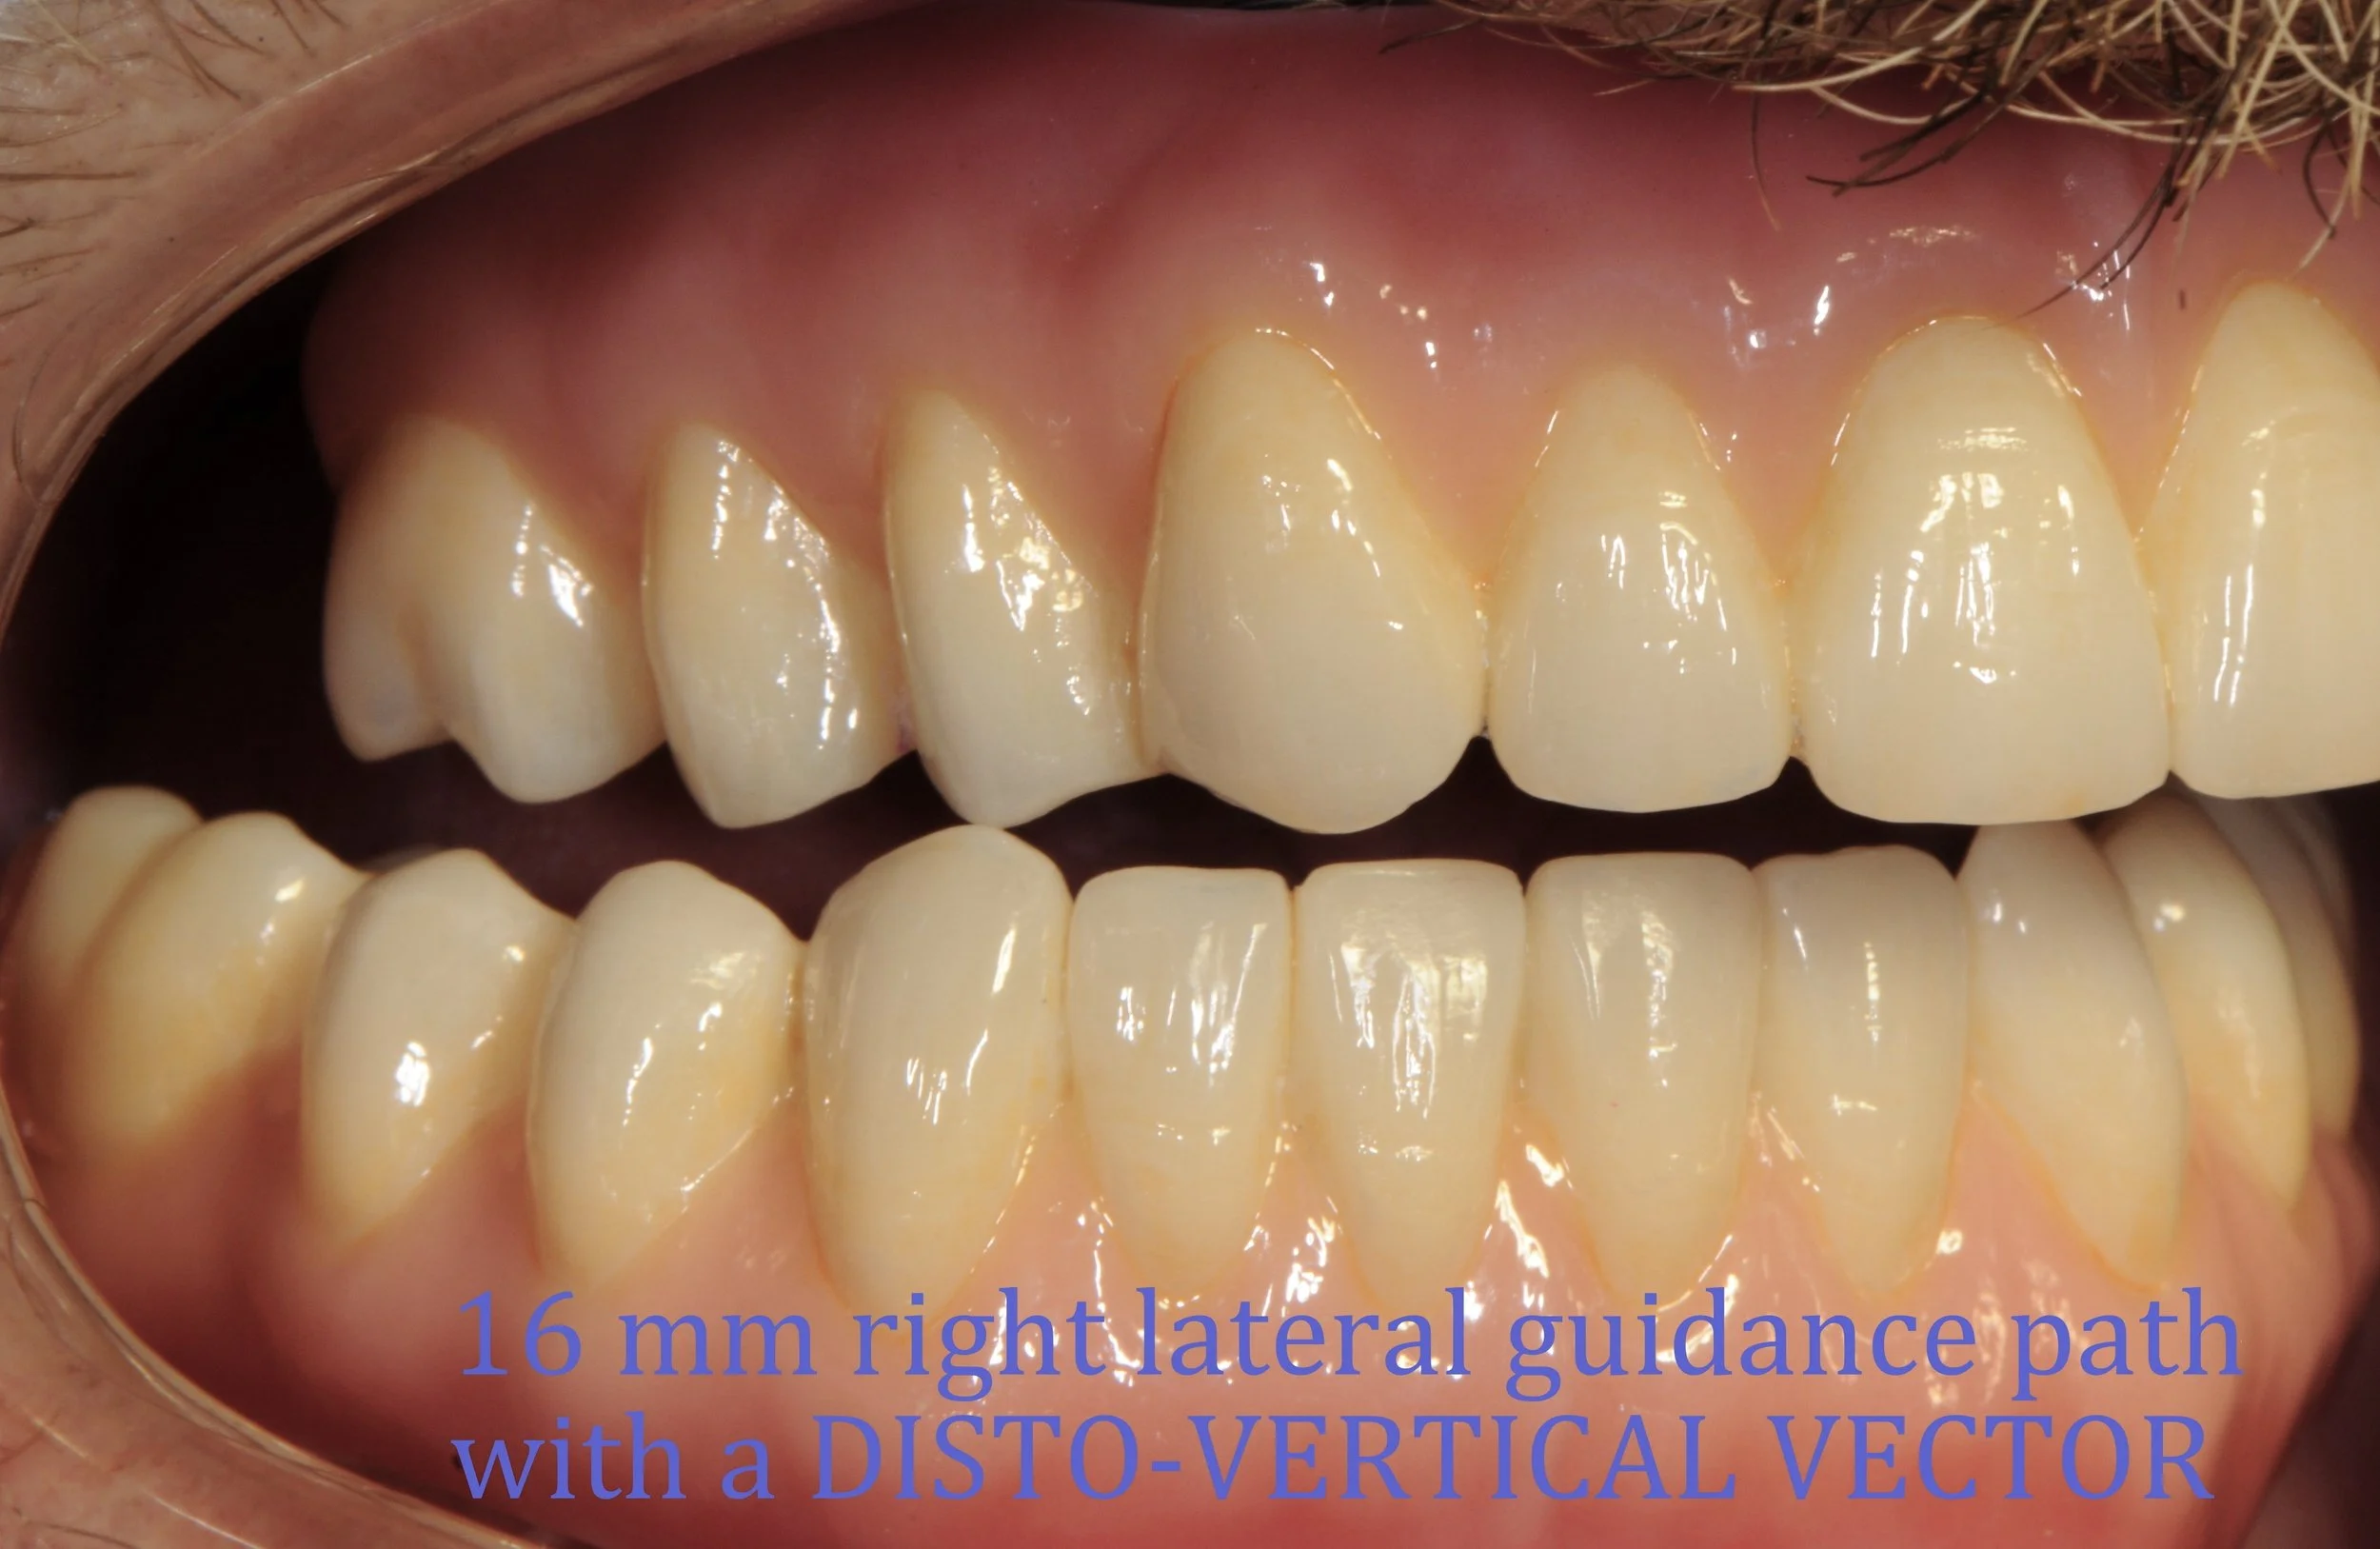
![]()
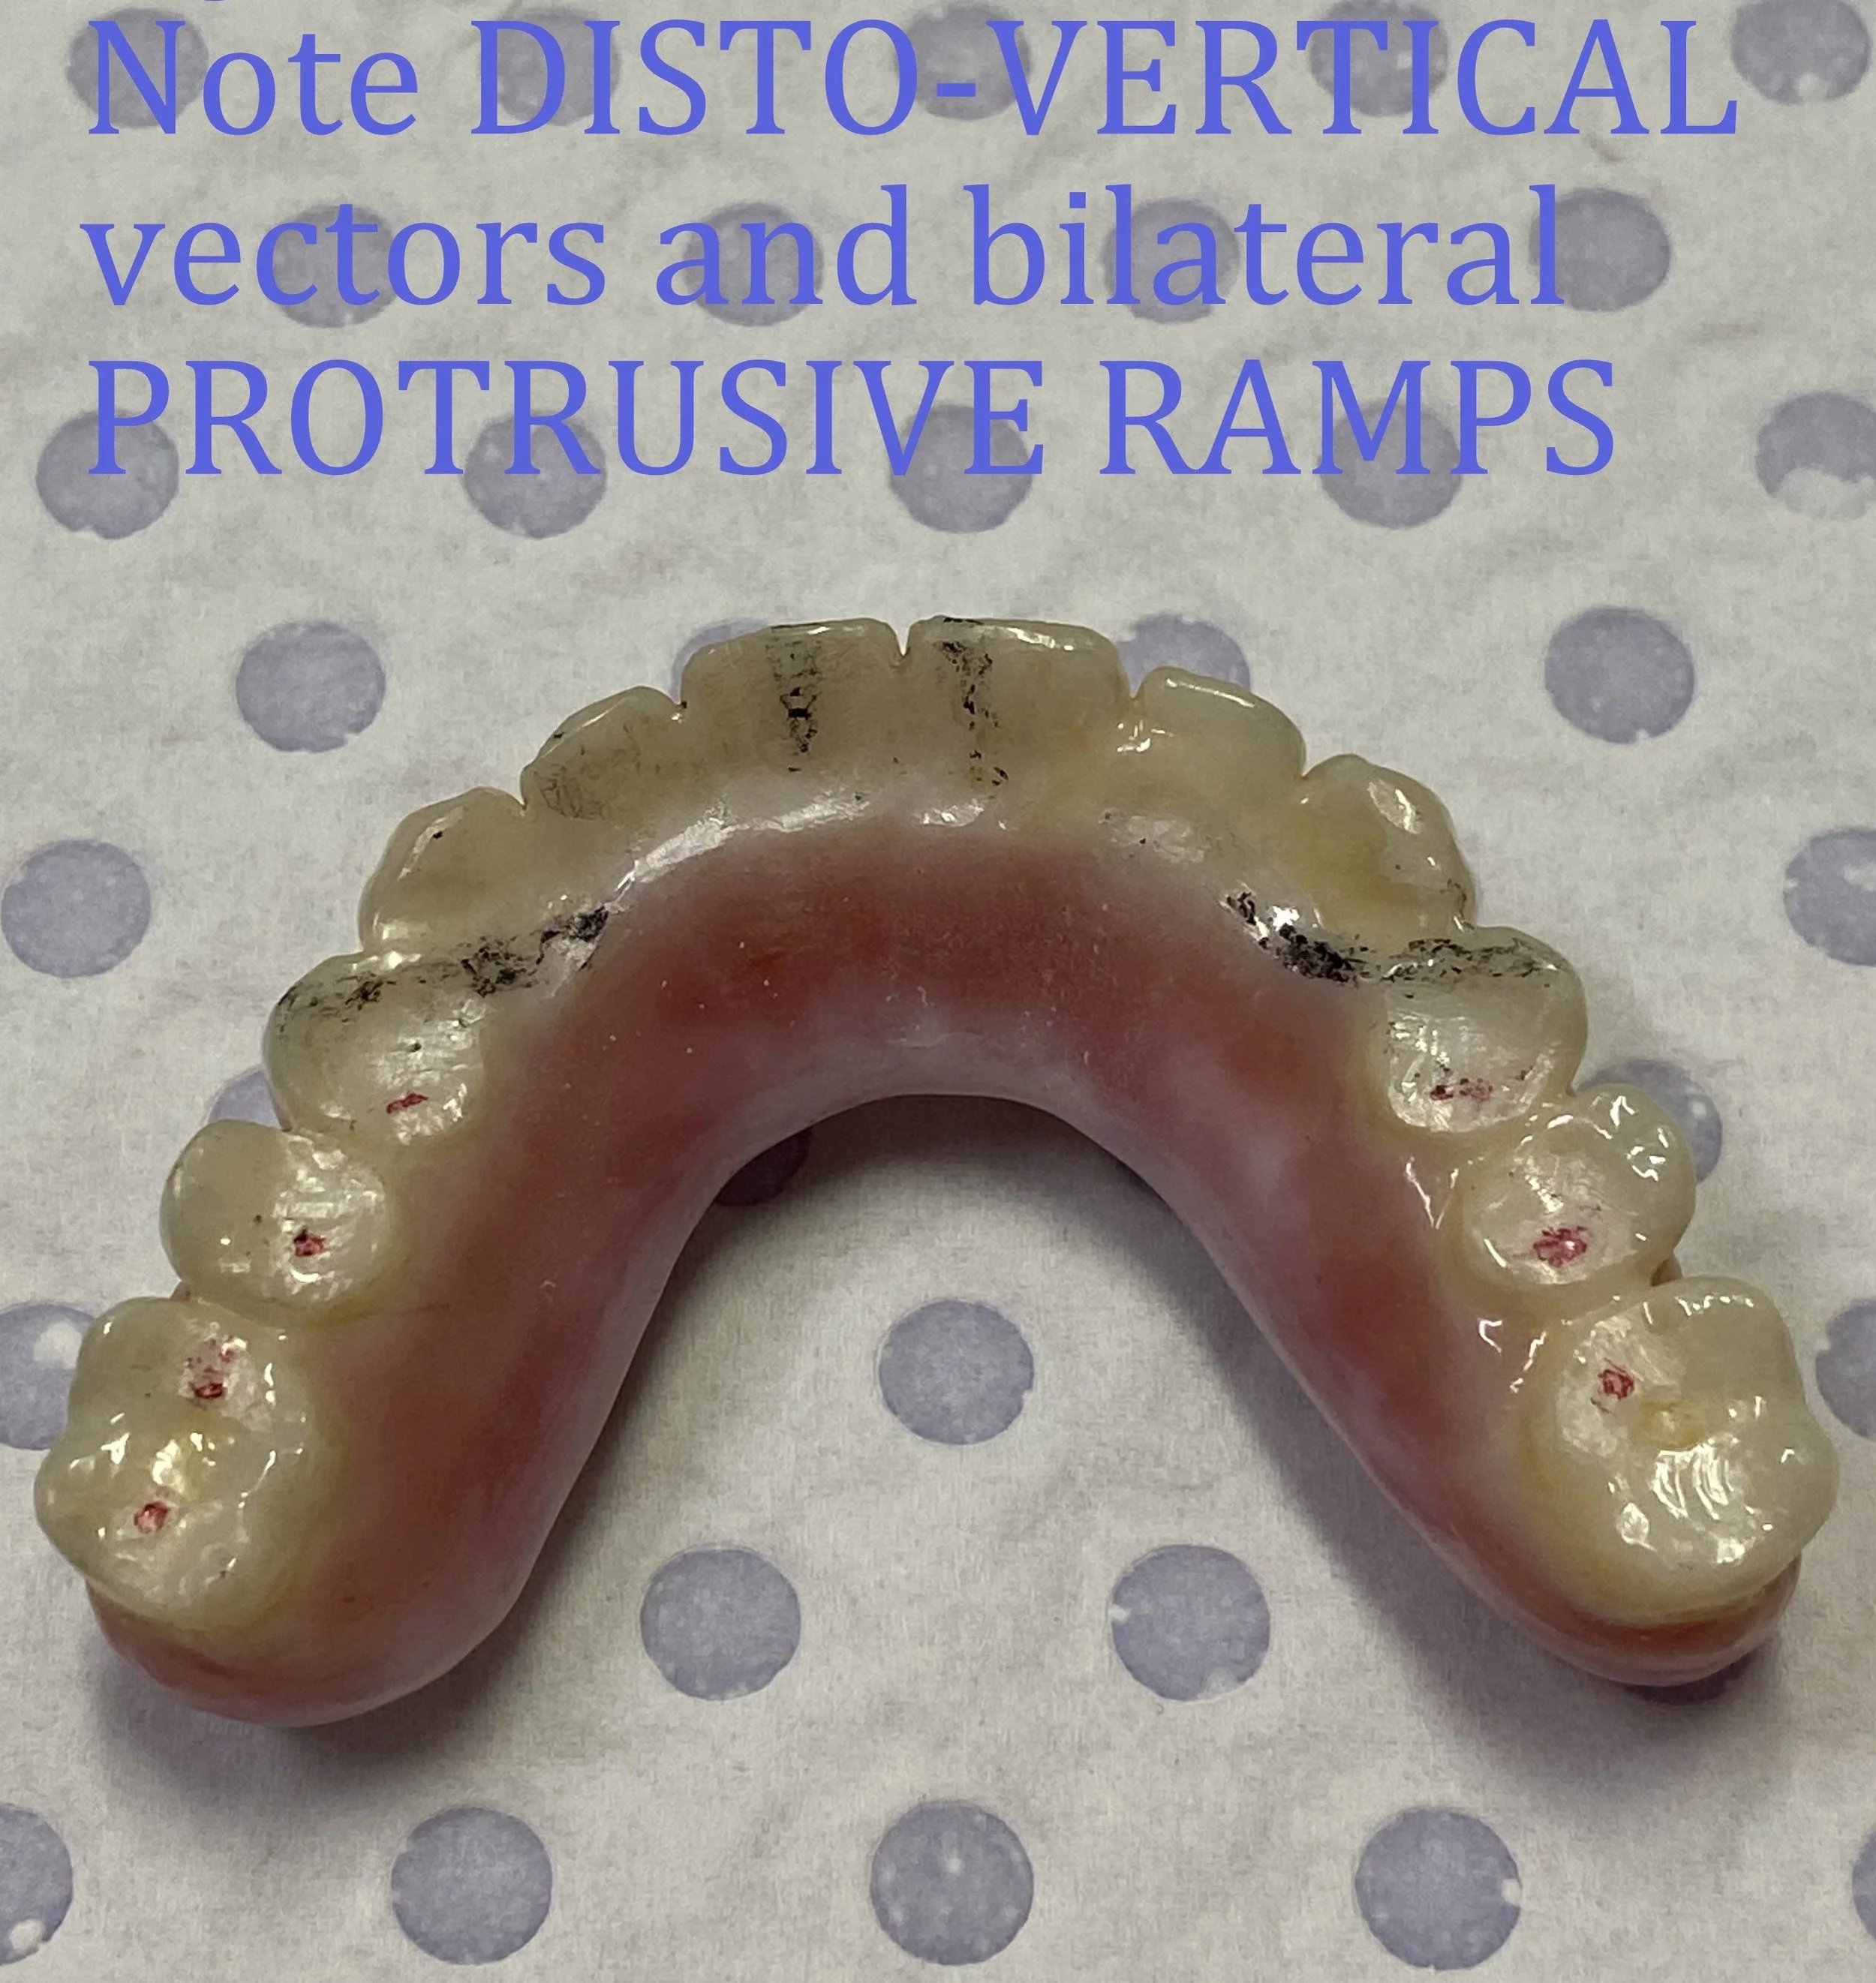
Implant dentures biting in protective right bite initially guided by the canines and the final extreme lateral guidance path located on the 14 buccal cusp landing pad.
-
![]()
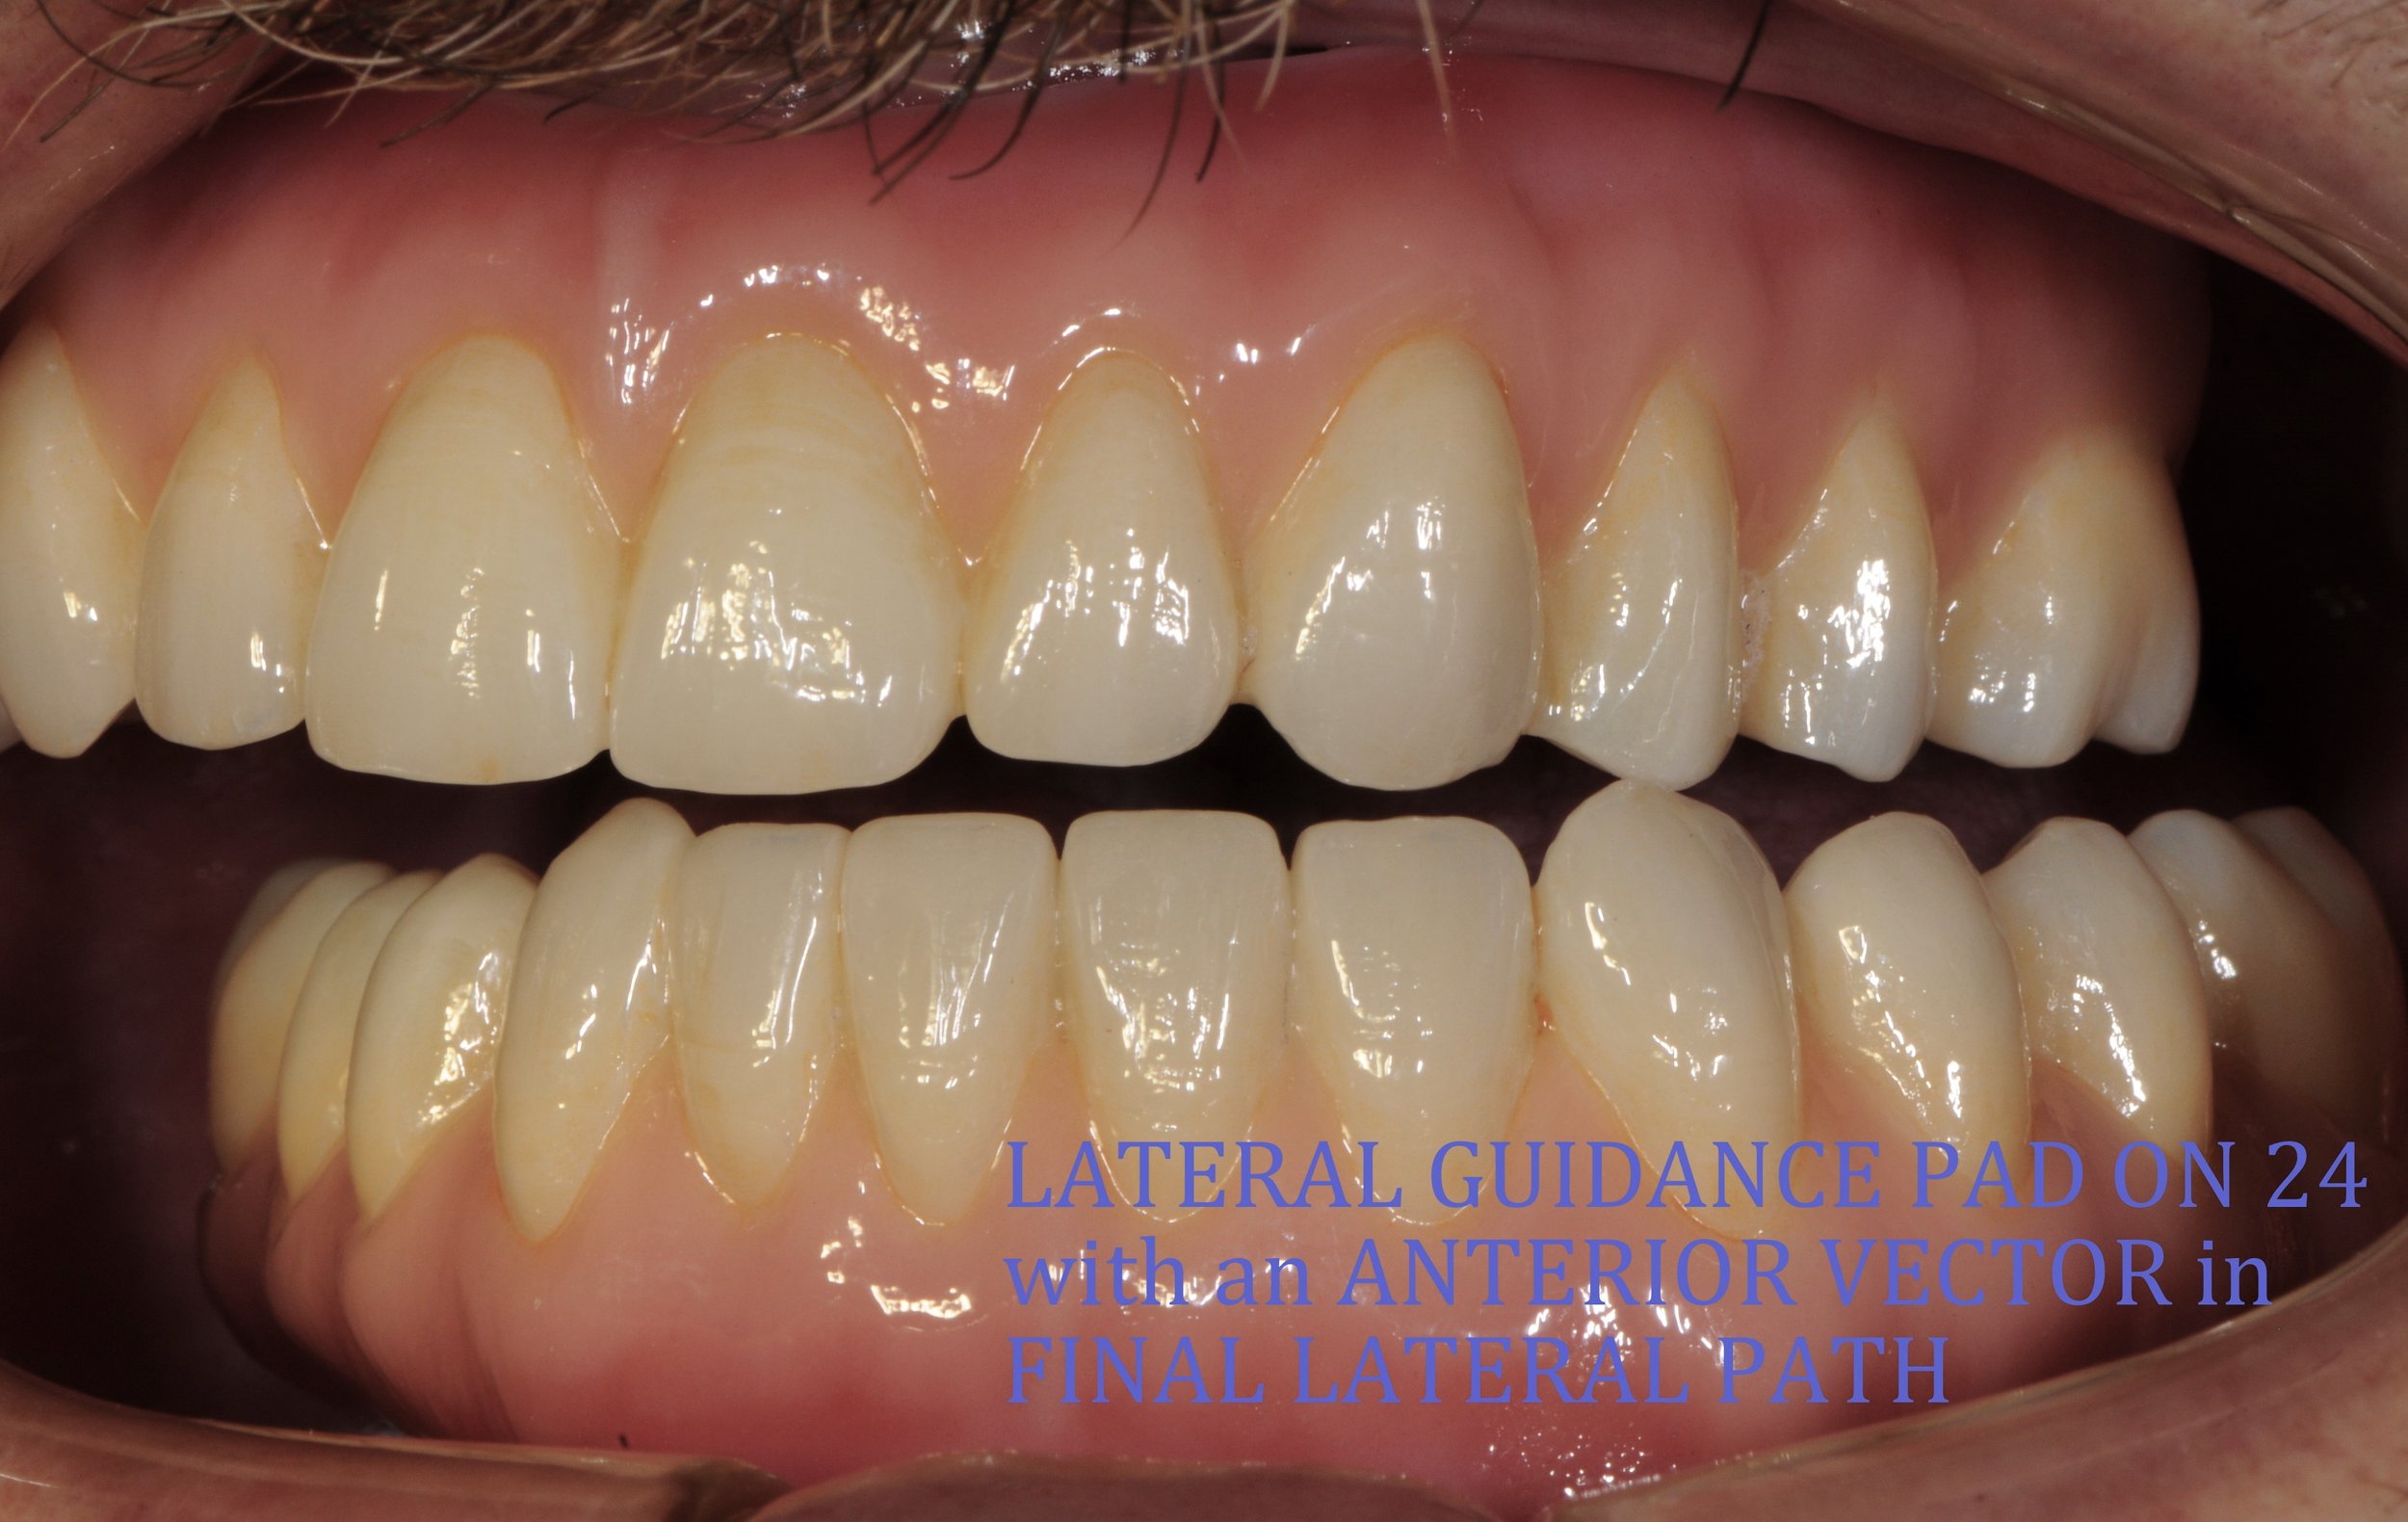
Implant dentures biting in protective leftt bite initially guided by the canines and the final extreme lateral guidance path located on the 24 buccal cusp landing pad.
-
![]()
A protective forward bite of the implant dentures.
-
![]()
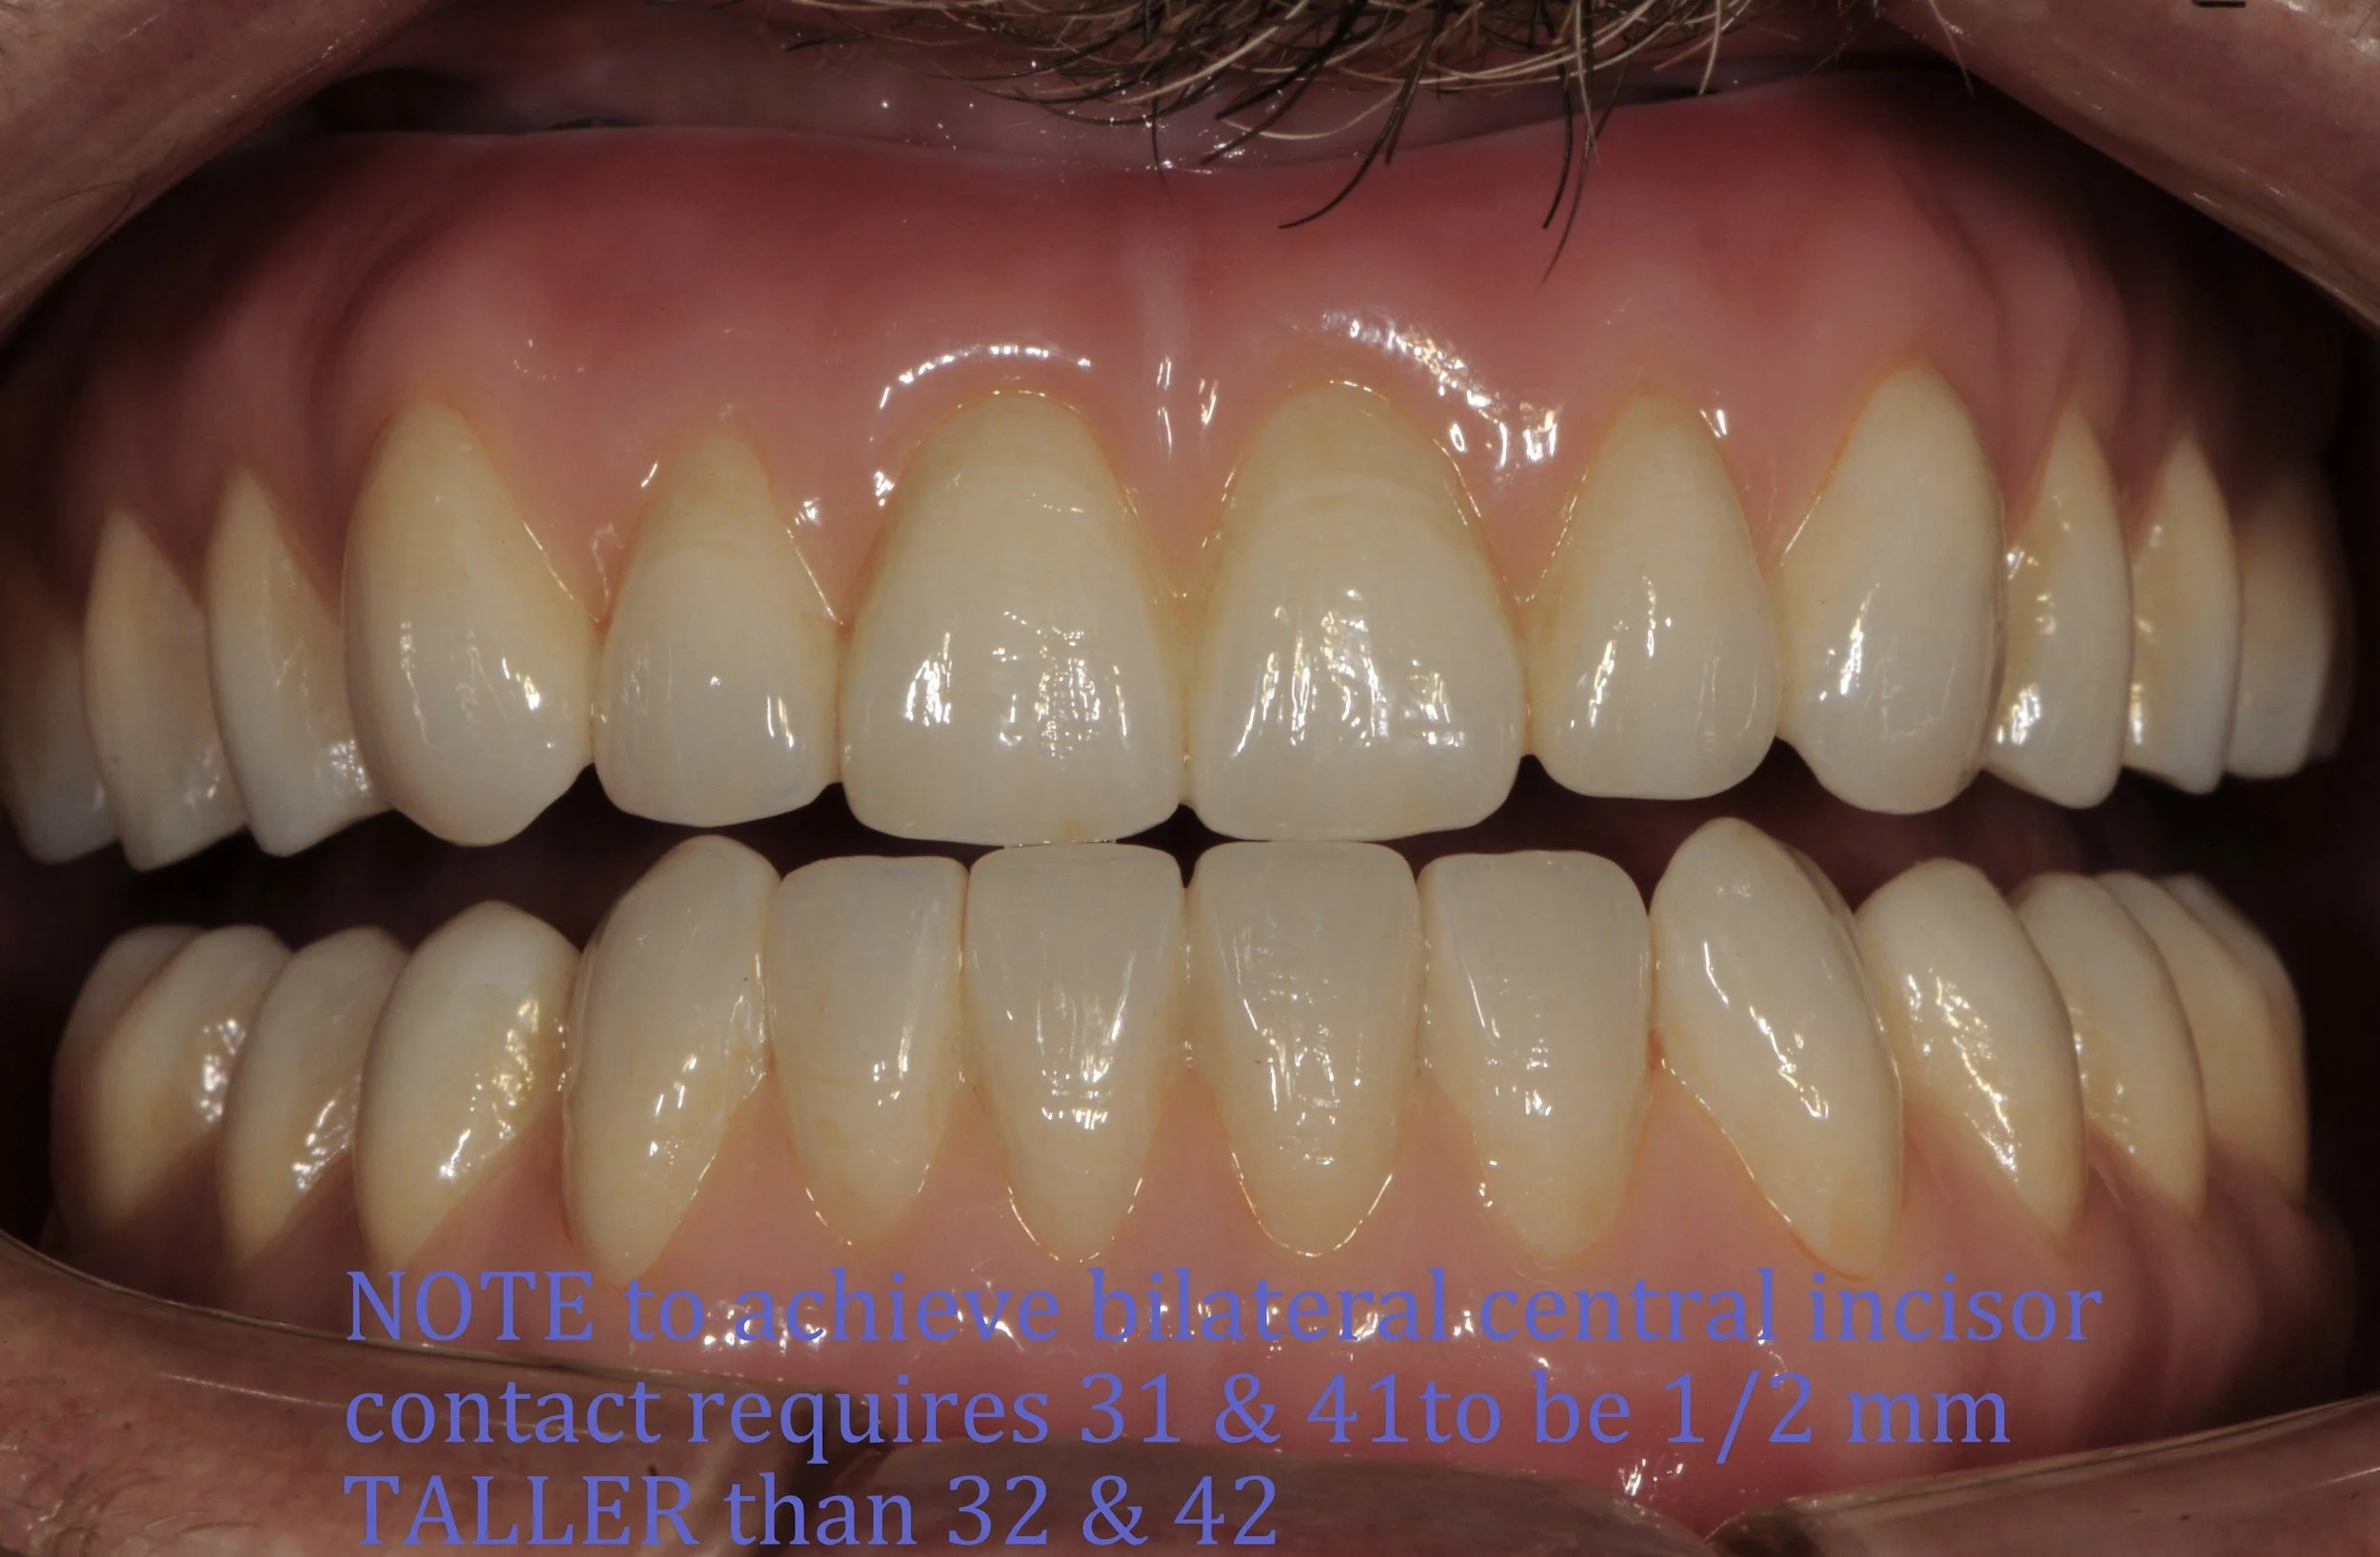
The red marks left from red carbon paper illustrating protective hinge bite.
-
![]()
The black marks left from black carbon paper illustrate protective right, left and forward bites
-
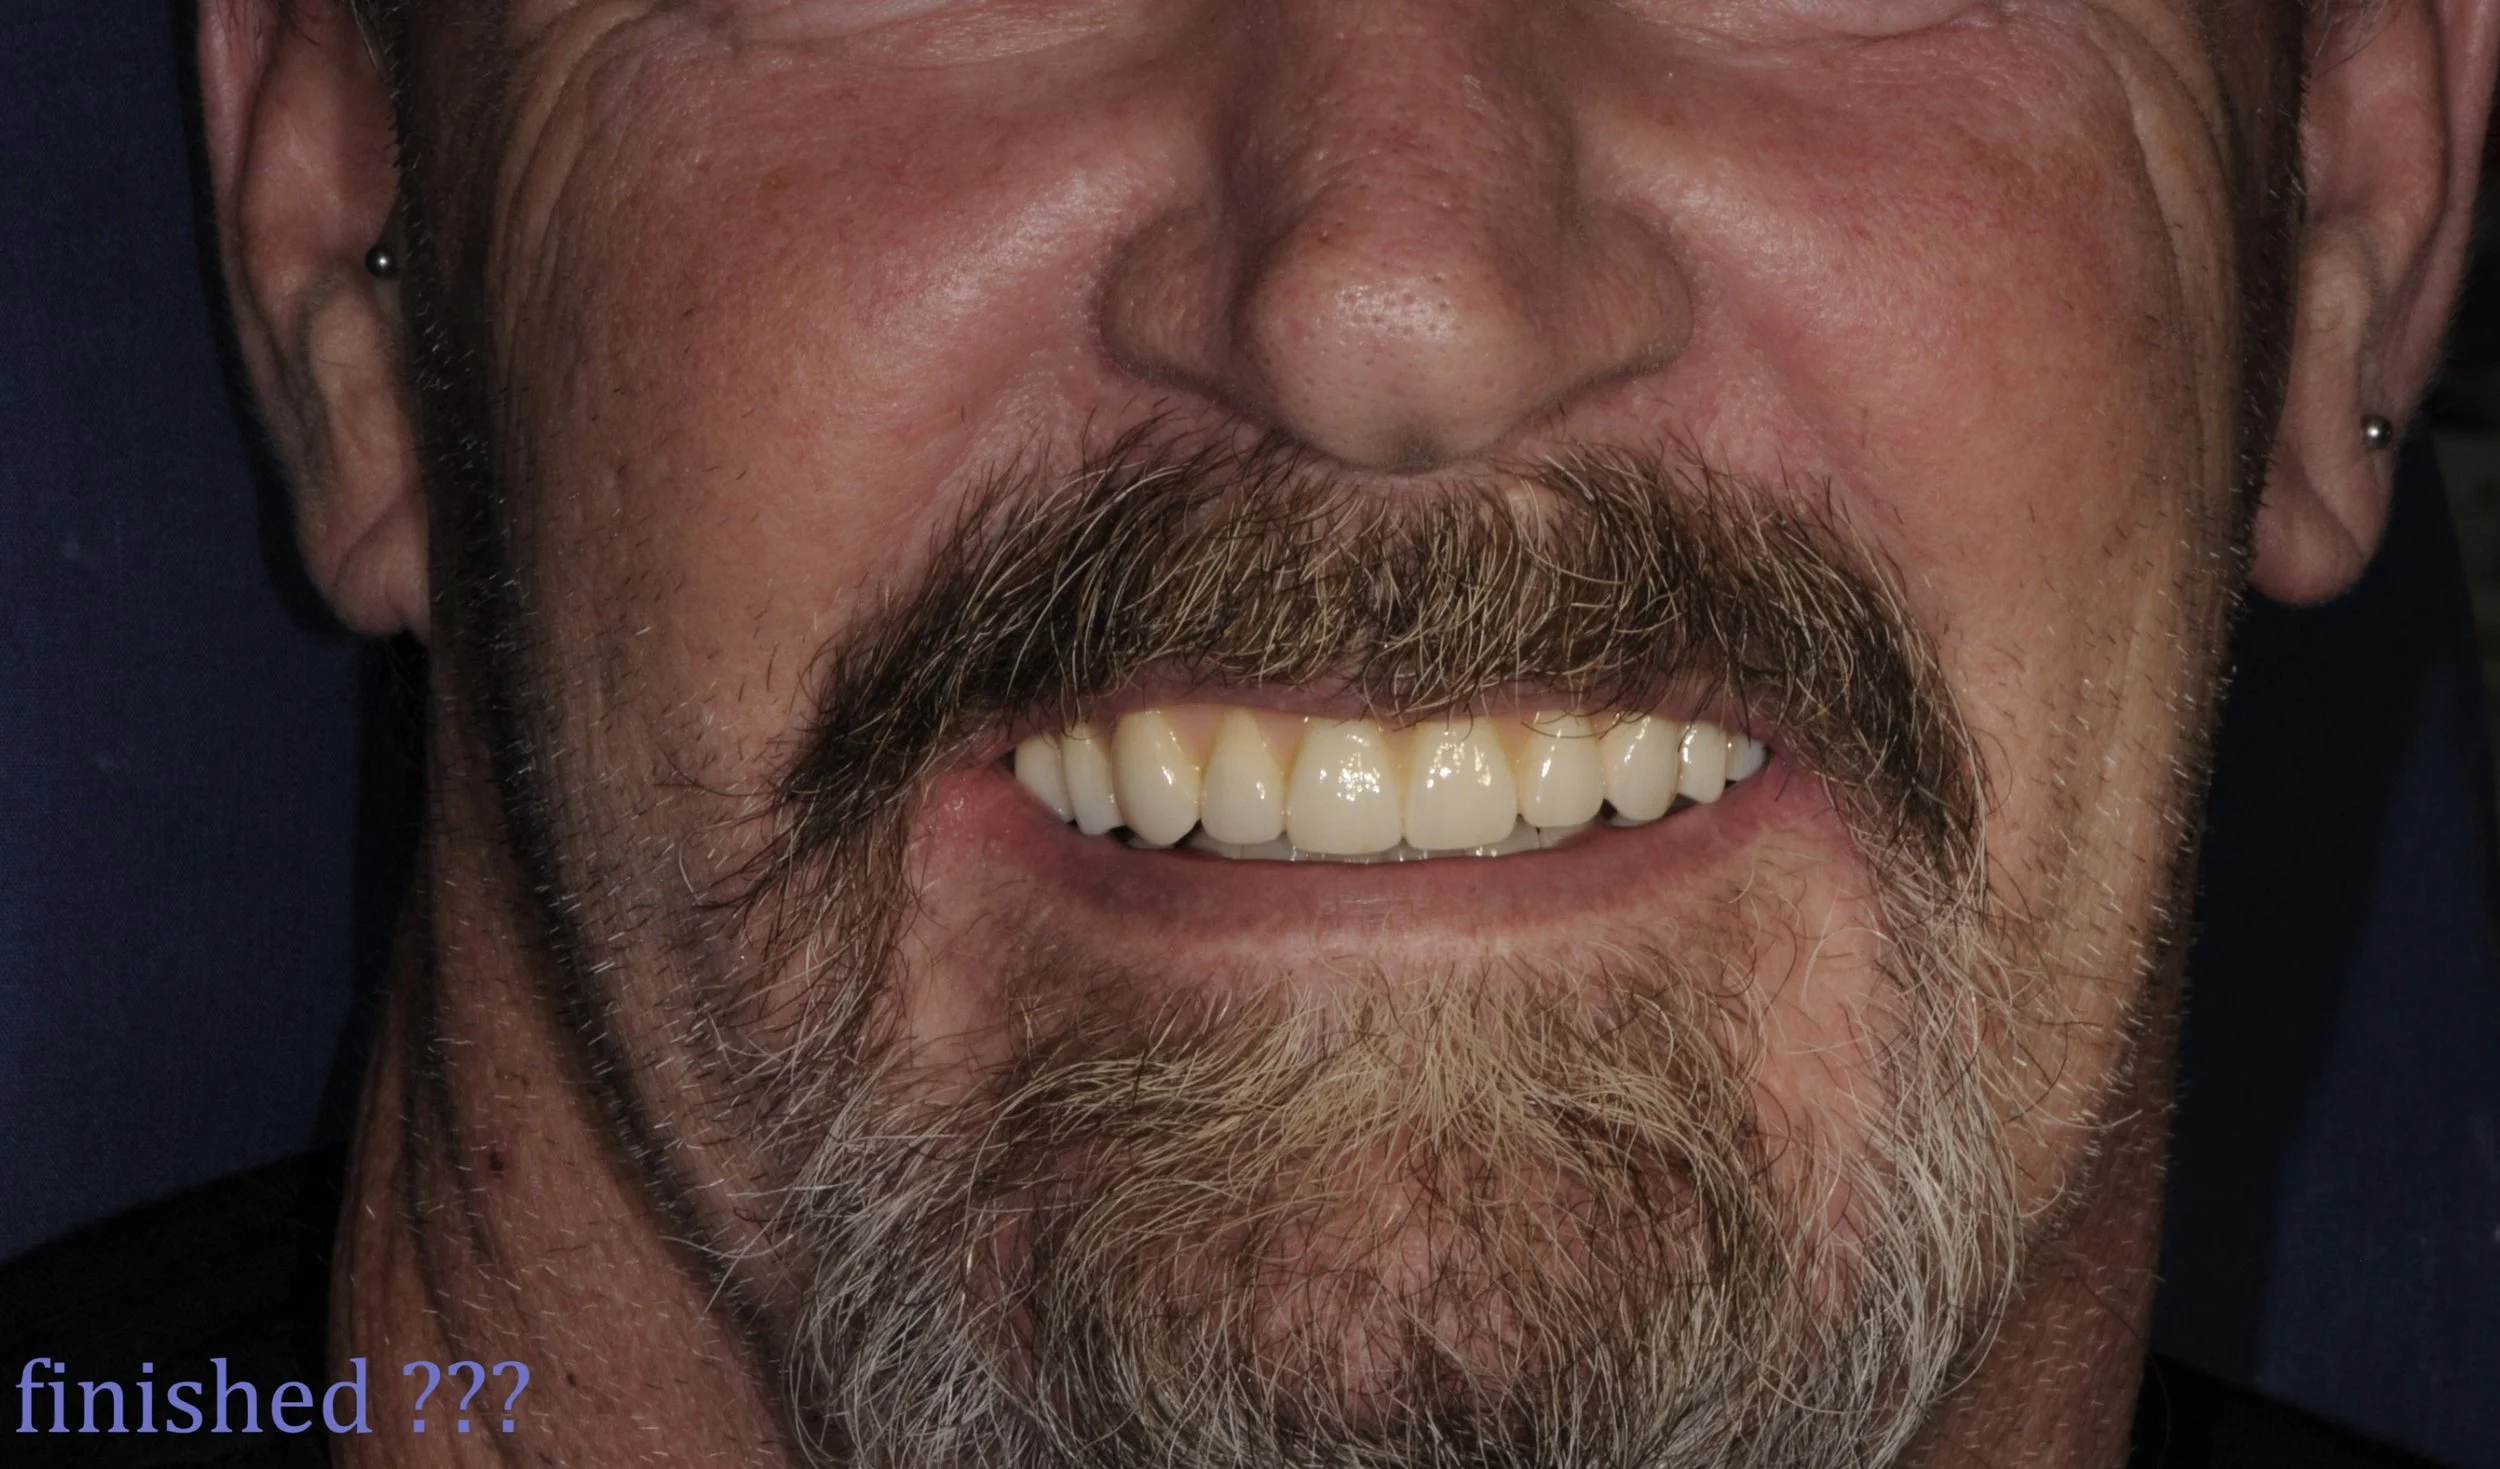
![]()
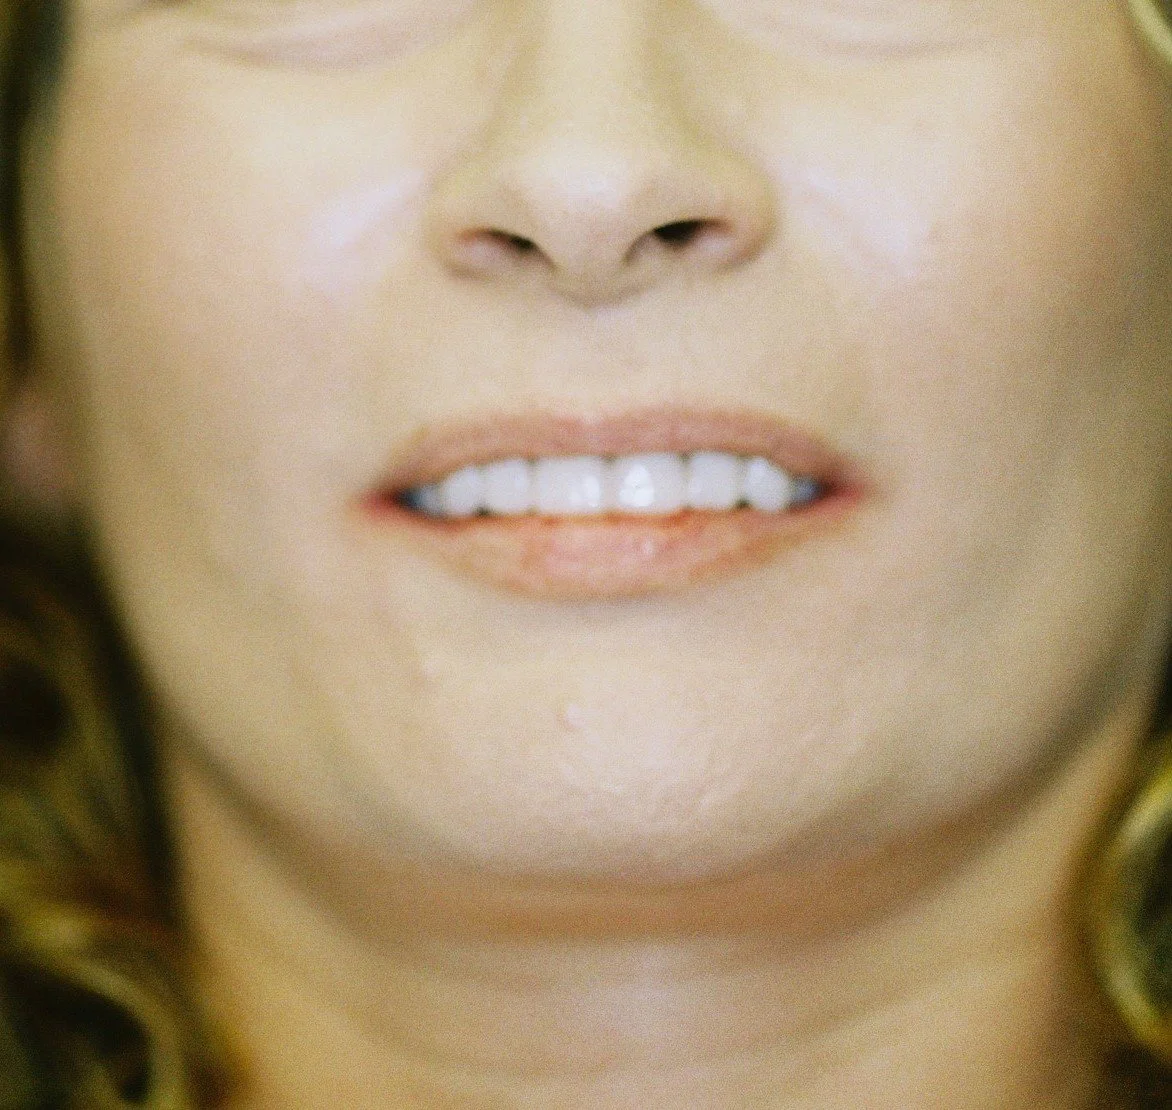
The completed aesthetic implant dentures
-
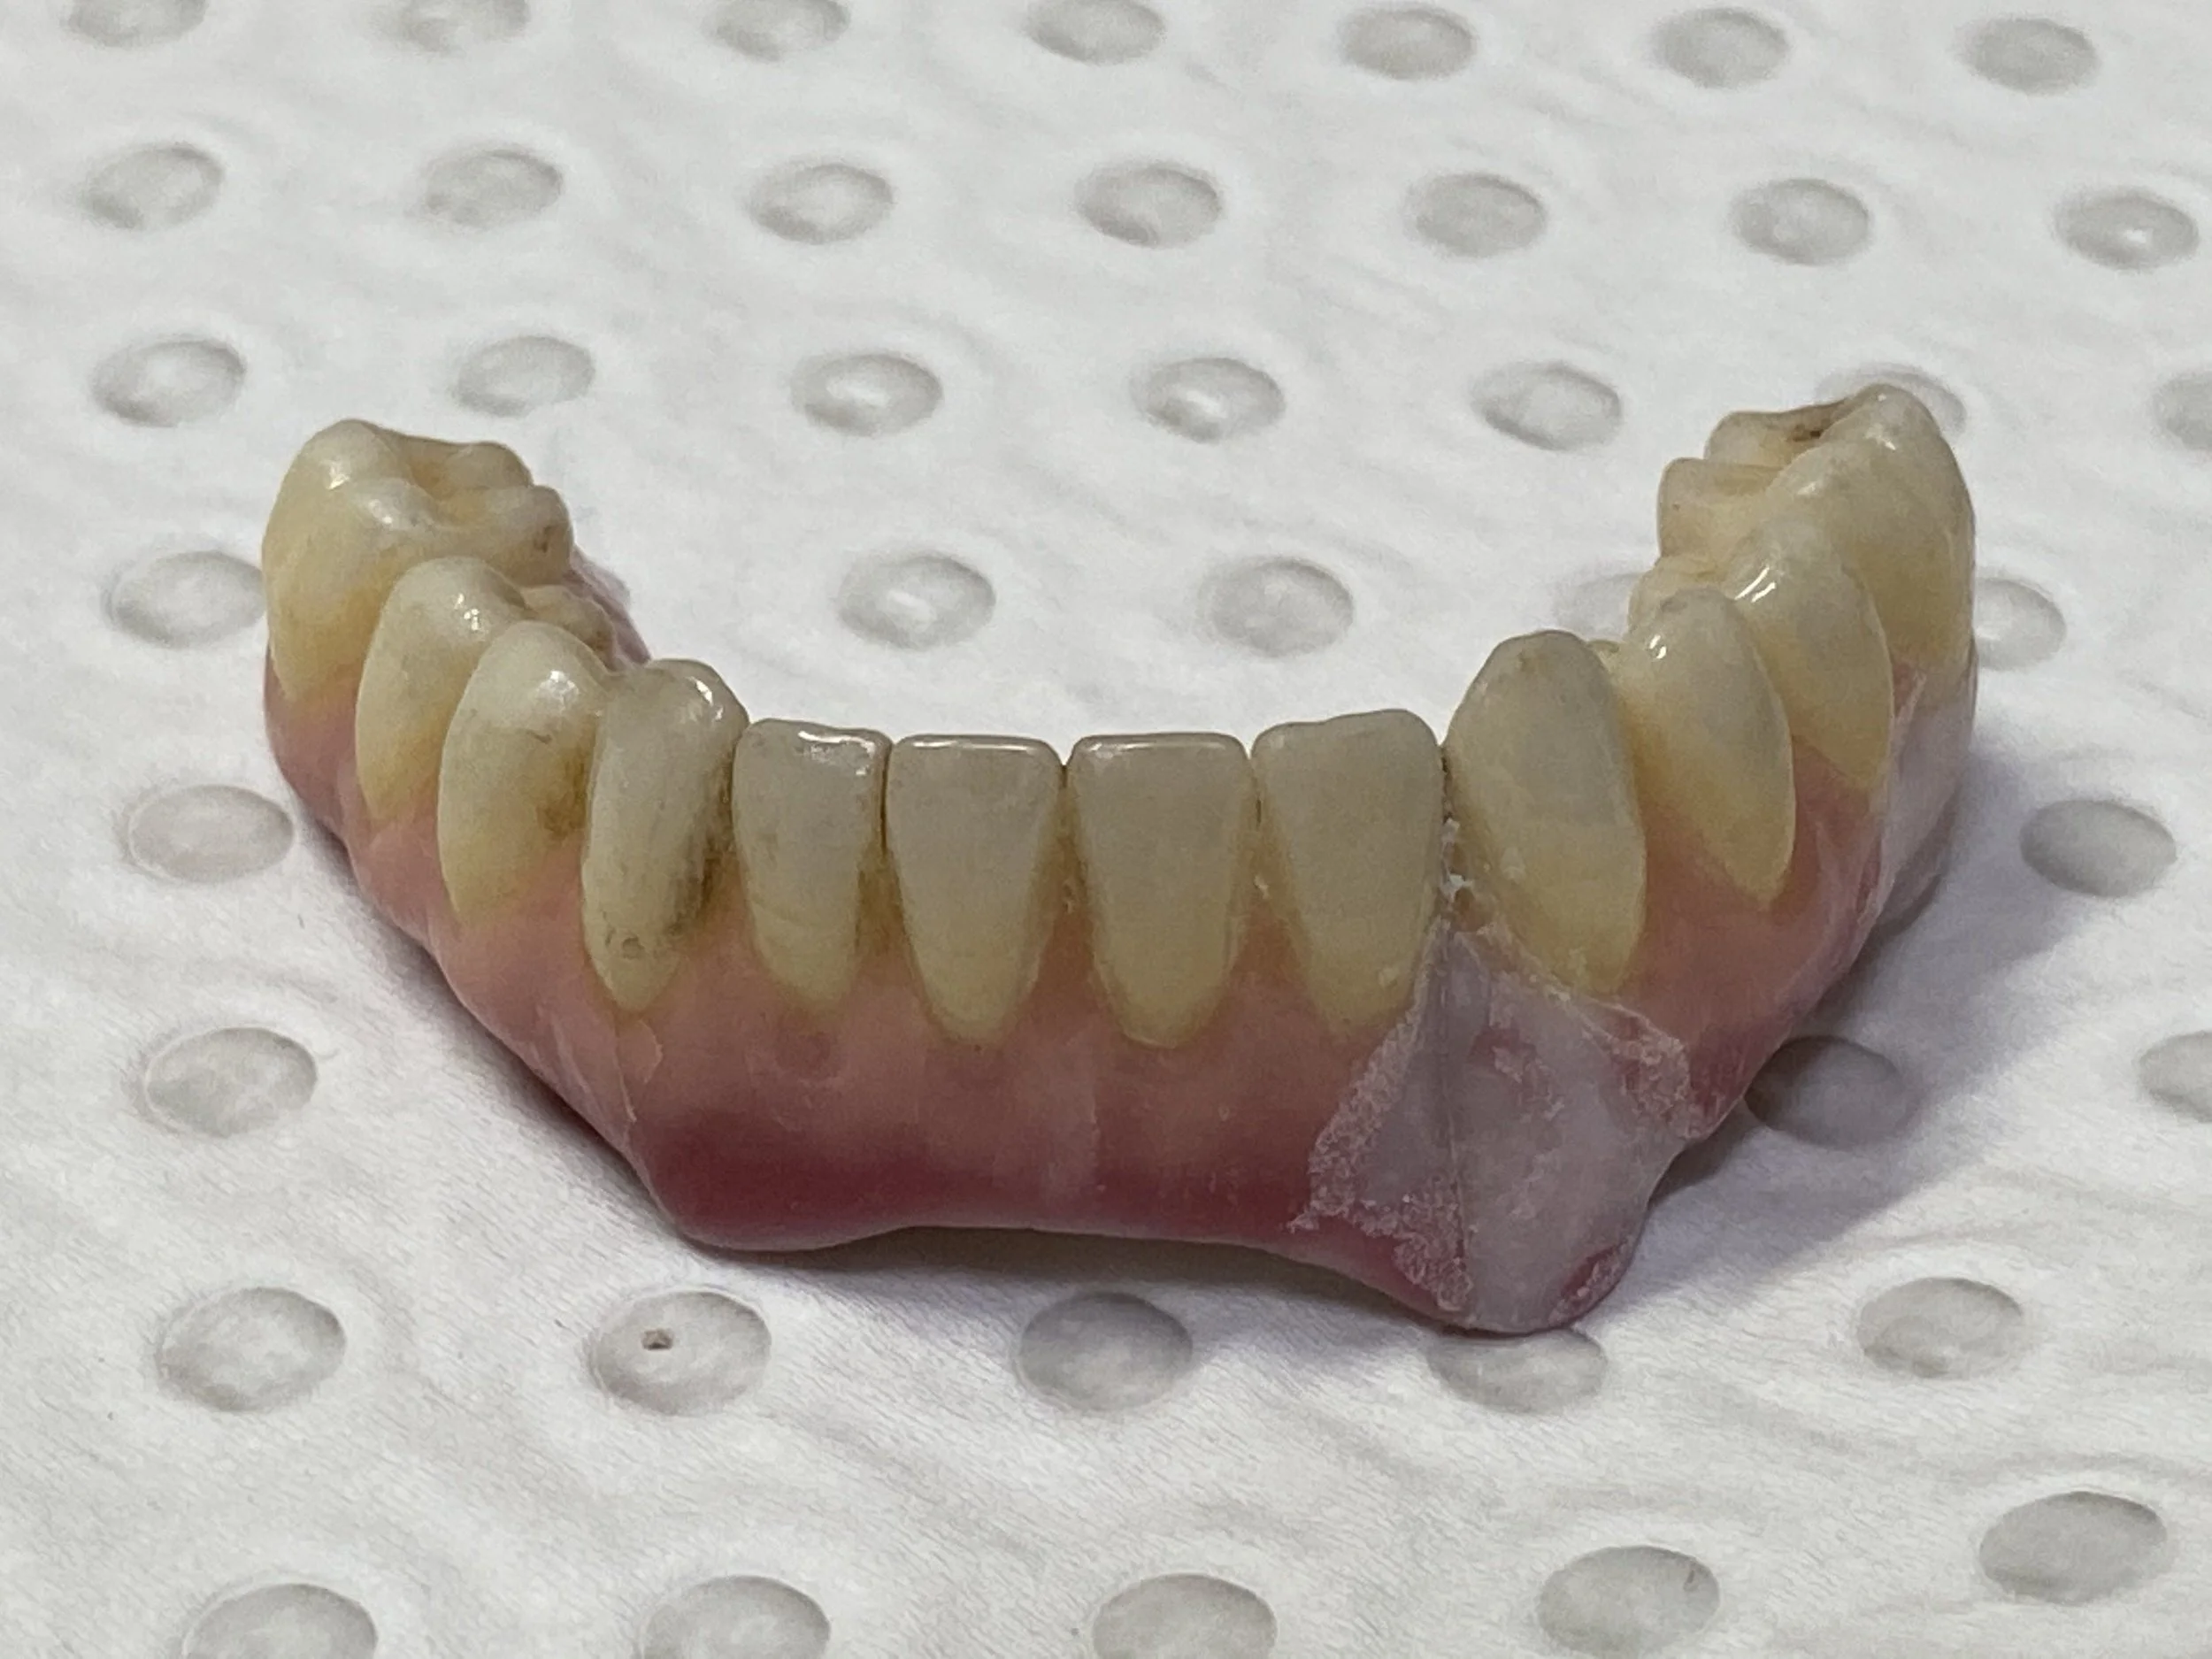
![]()
Unfortunately several years later the patient had a head on motorbike/ vehicle crash and knocked out all of his upper implants and cracked his lower implant denture
-
![]()
The lower implant denture was replaced by Dr. Darveniza with a more robust titanium reinforced Zirconia telescopic Fixed-Removeable denture fabricated by Master Technician Werner Sauer. The metal was electrolytically coated with Rhodium for optimal hygiene.
-
![]()

Fixed–Removeable Hygienic Implant Denture – Telescopic Denture Design - with titanium Atlantis abutments and Syncone gold caps and acrylic resin denture base and teeth.
-
![]()
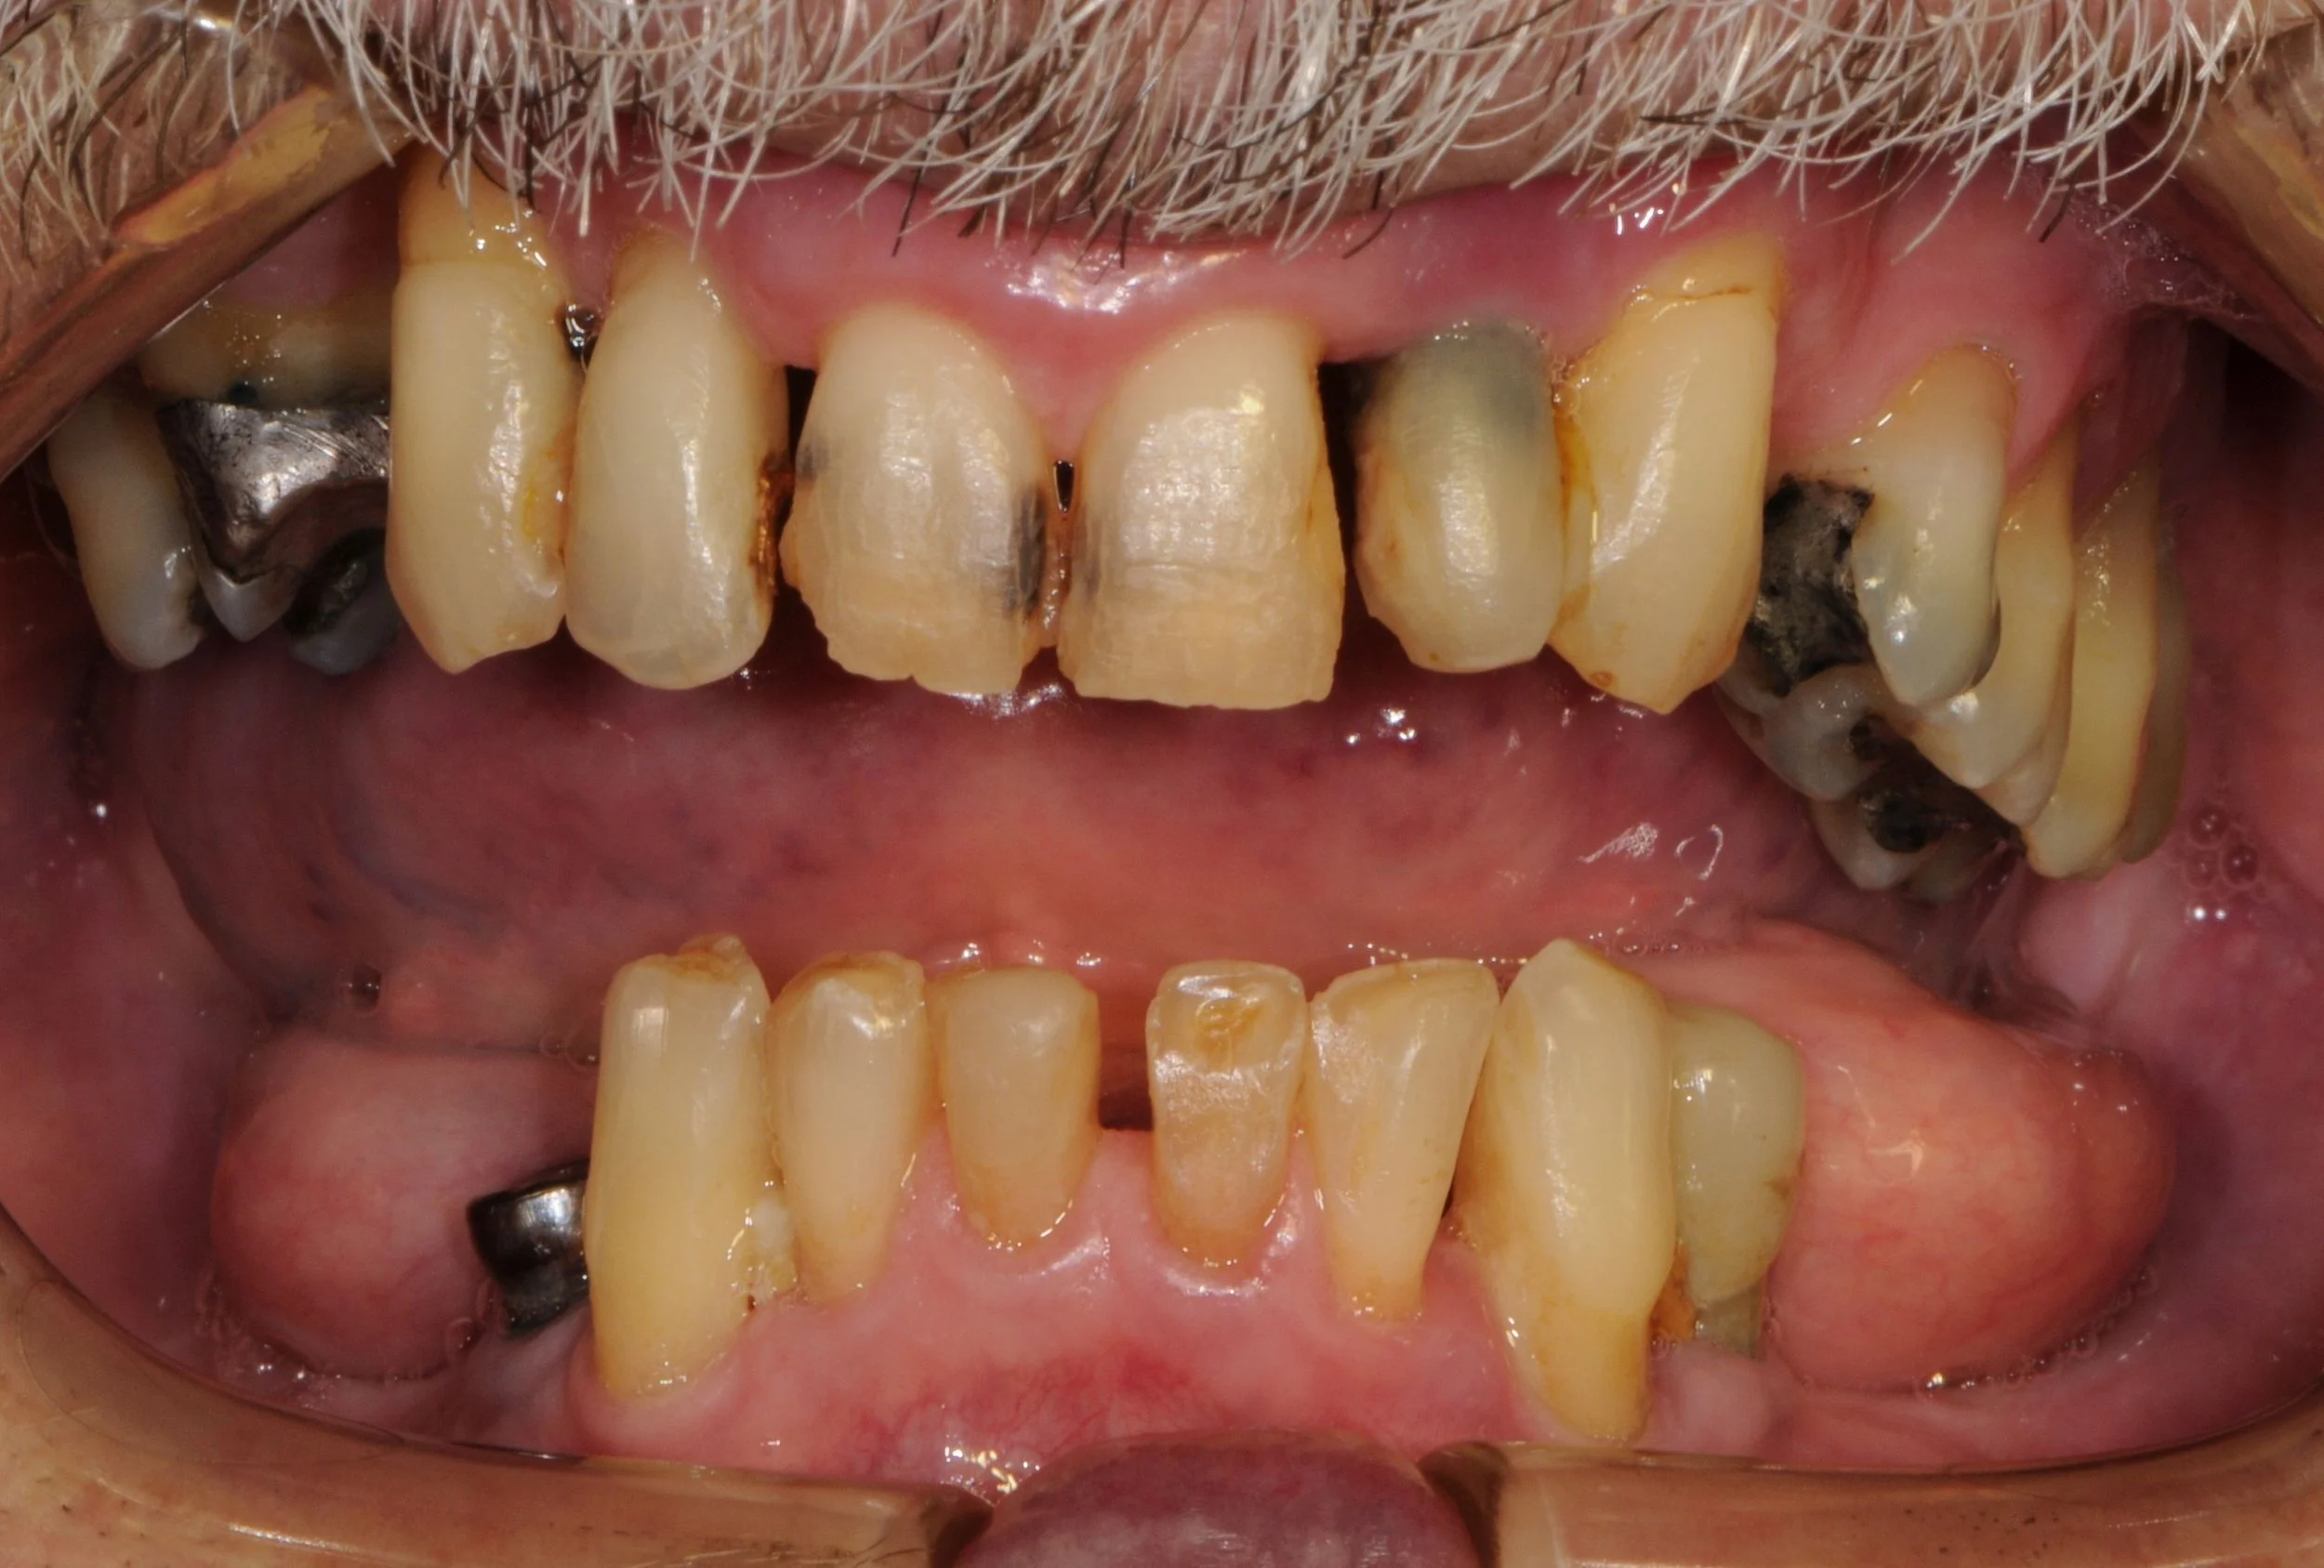
This 65 year old patient had numerous dental problems including decay, periodontal gum disease involving moderate to concerning future bone loss, missing teeth, heavily filled teeth and an extremely difficult very deep overbite.
-
![]()
An OPG radiograph illustrating a variety of dental concerns and the presence of 2 implants in the lower jaw in the first premolar regions, namely, 34 and 44.
-
![]()
Part of the deep overbite and a heavily discoloured top left number 2 lateral incisor previously extracted, root sectioned and amalgam filled prior to reattaching as a bonded bridge tooth to the adjacent top left number 3 canine tooth.
-
![]()
The remaining lower 6 front teeth that were deemed to have insufficient bone for longevity and unsuitable for a bite reconstruction, these teeth were extracted.
-
![]()
-
![]()
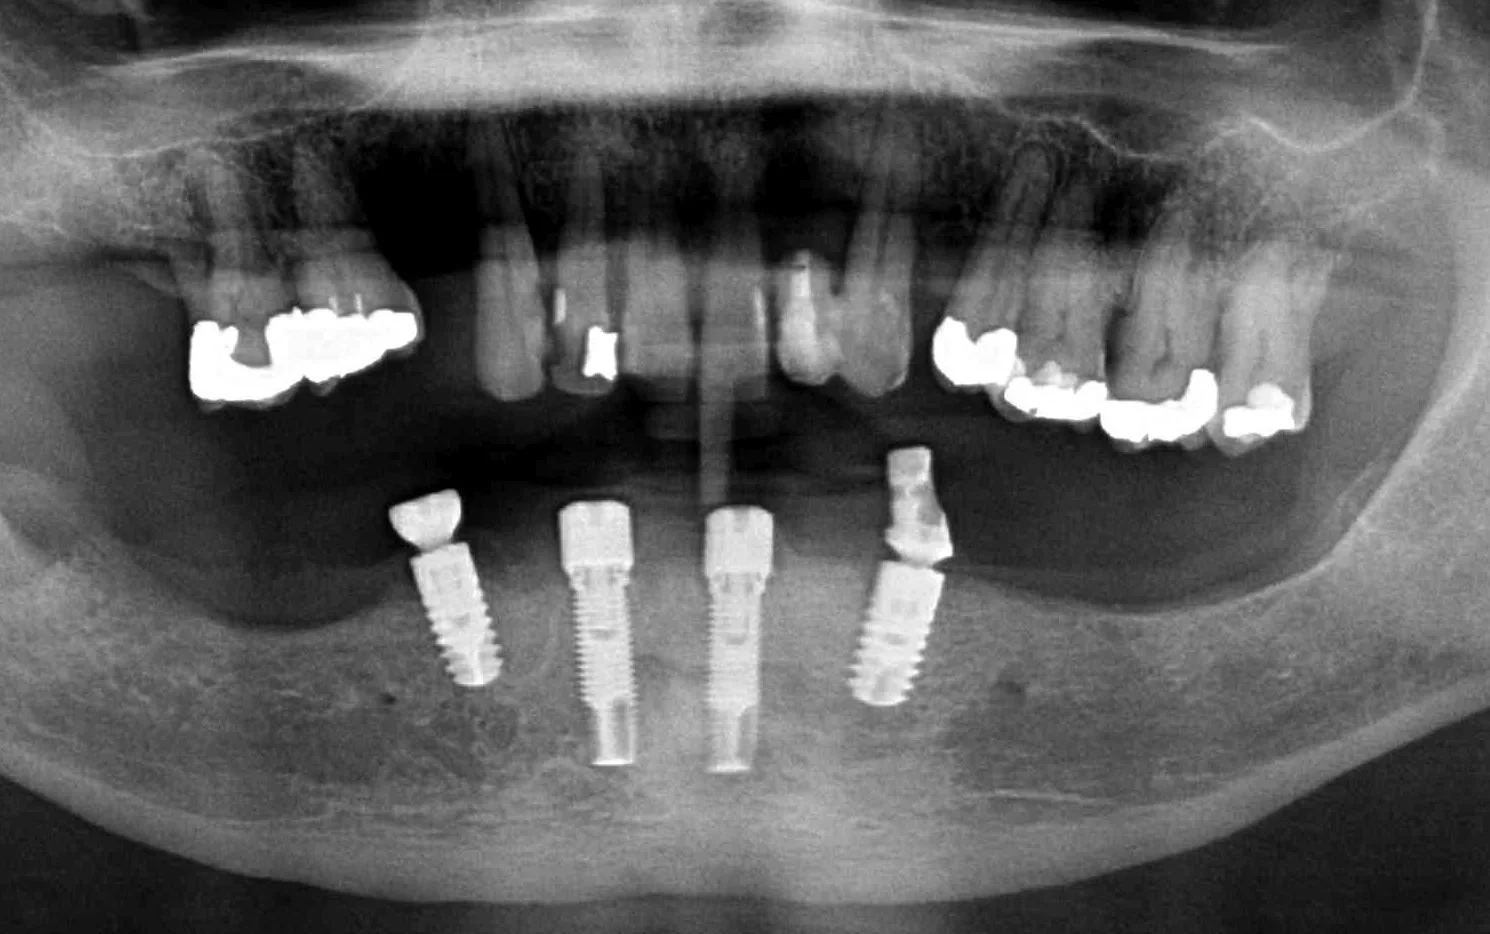
An OPG radiograph after the 6 extractions and Dr. Darveniza in 2014 surgically placed 2 Branemark implant fixtures between the existing 2 Ankylosis implant fixtures along with some artificial powdered RTR bone. Bone grafting adjacent to these Ankylosis implants was required following the extraction of the lower canines which had bone loss adjacent the 34 and 44 implant fixtures.
-
![]()
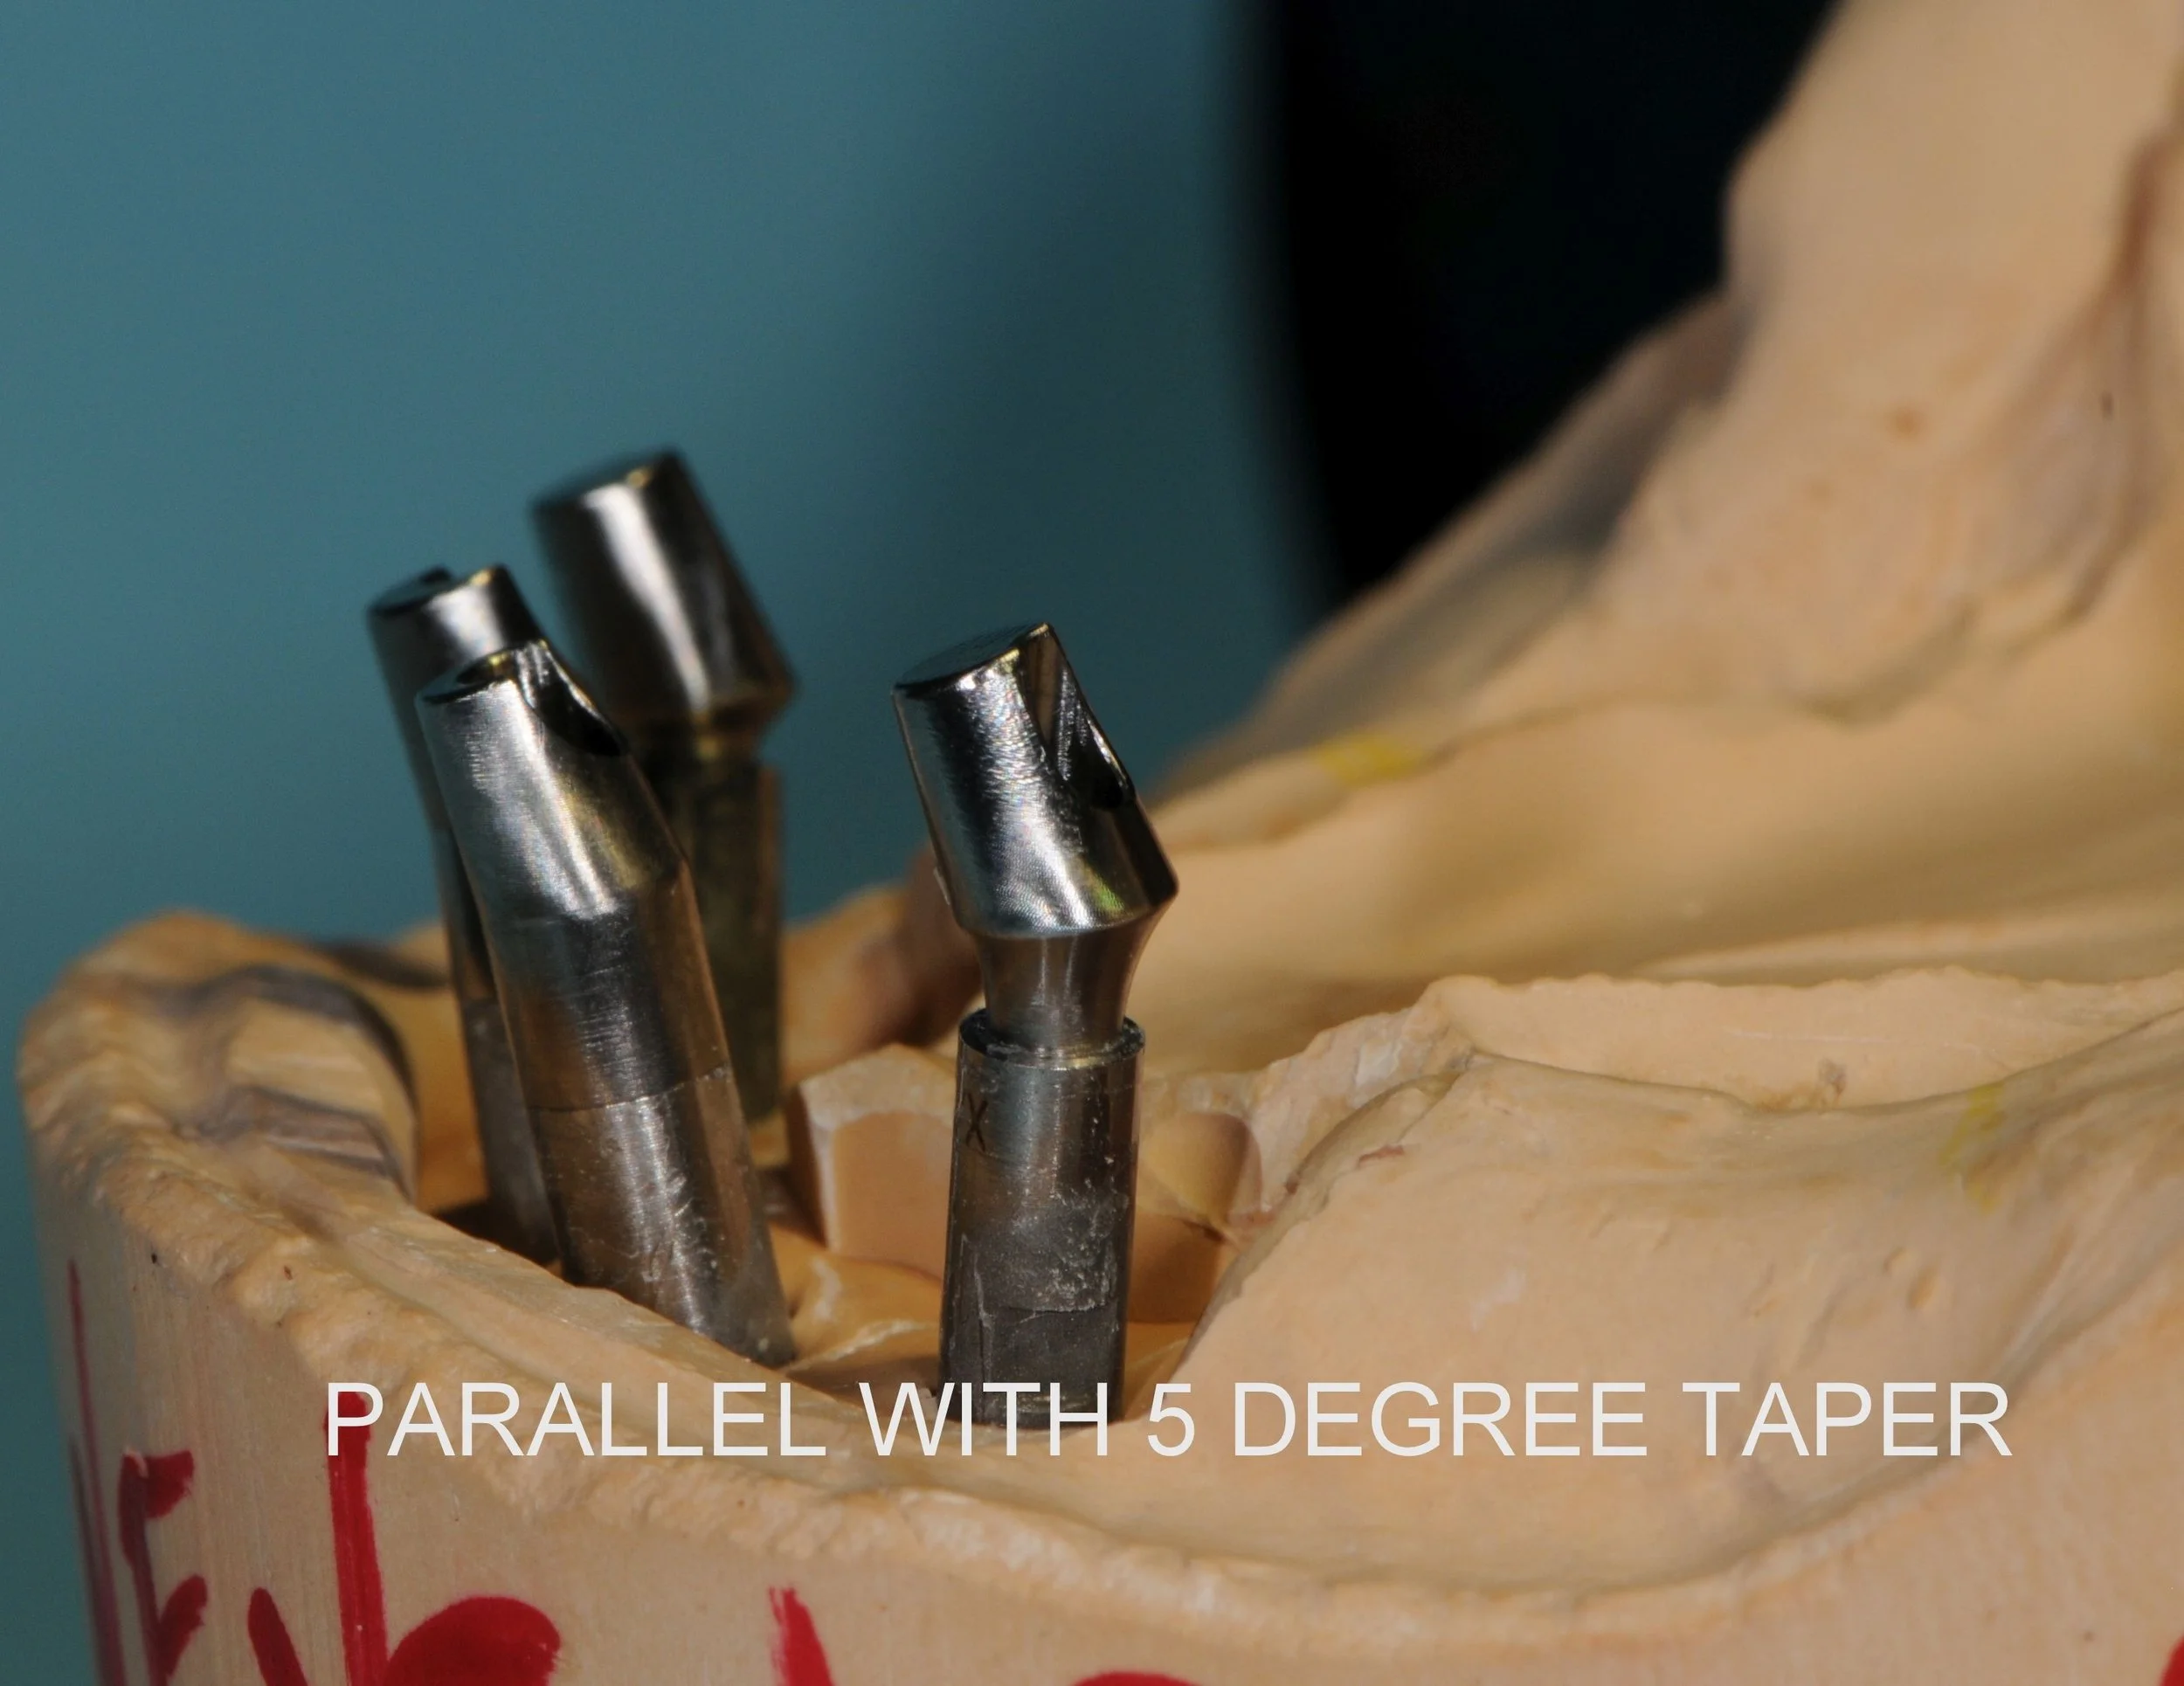
The titanium Atlantis abutments designed and milled in Sweden to be parallel to each other with a 5 degree taper.
-
![]()
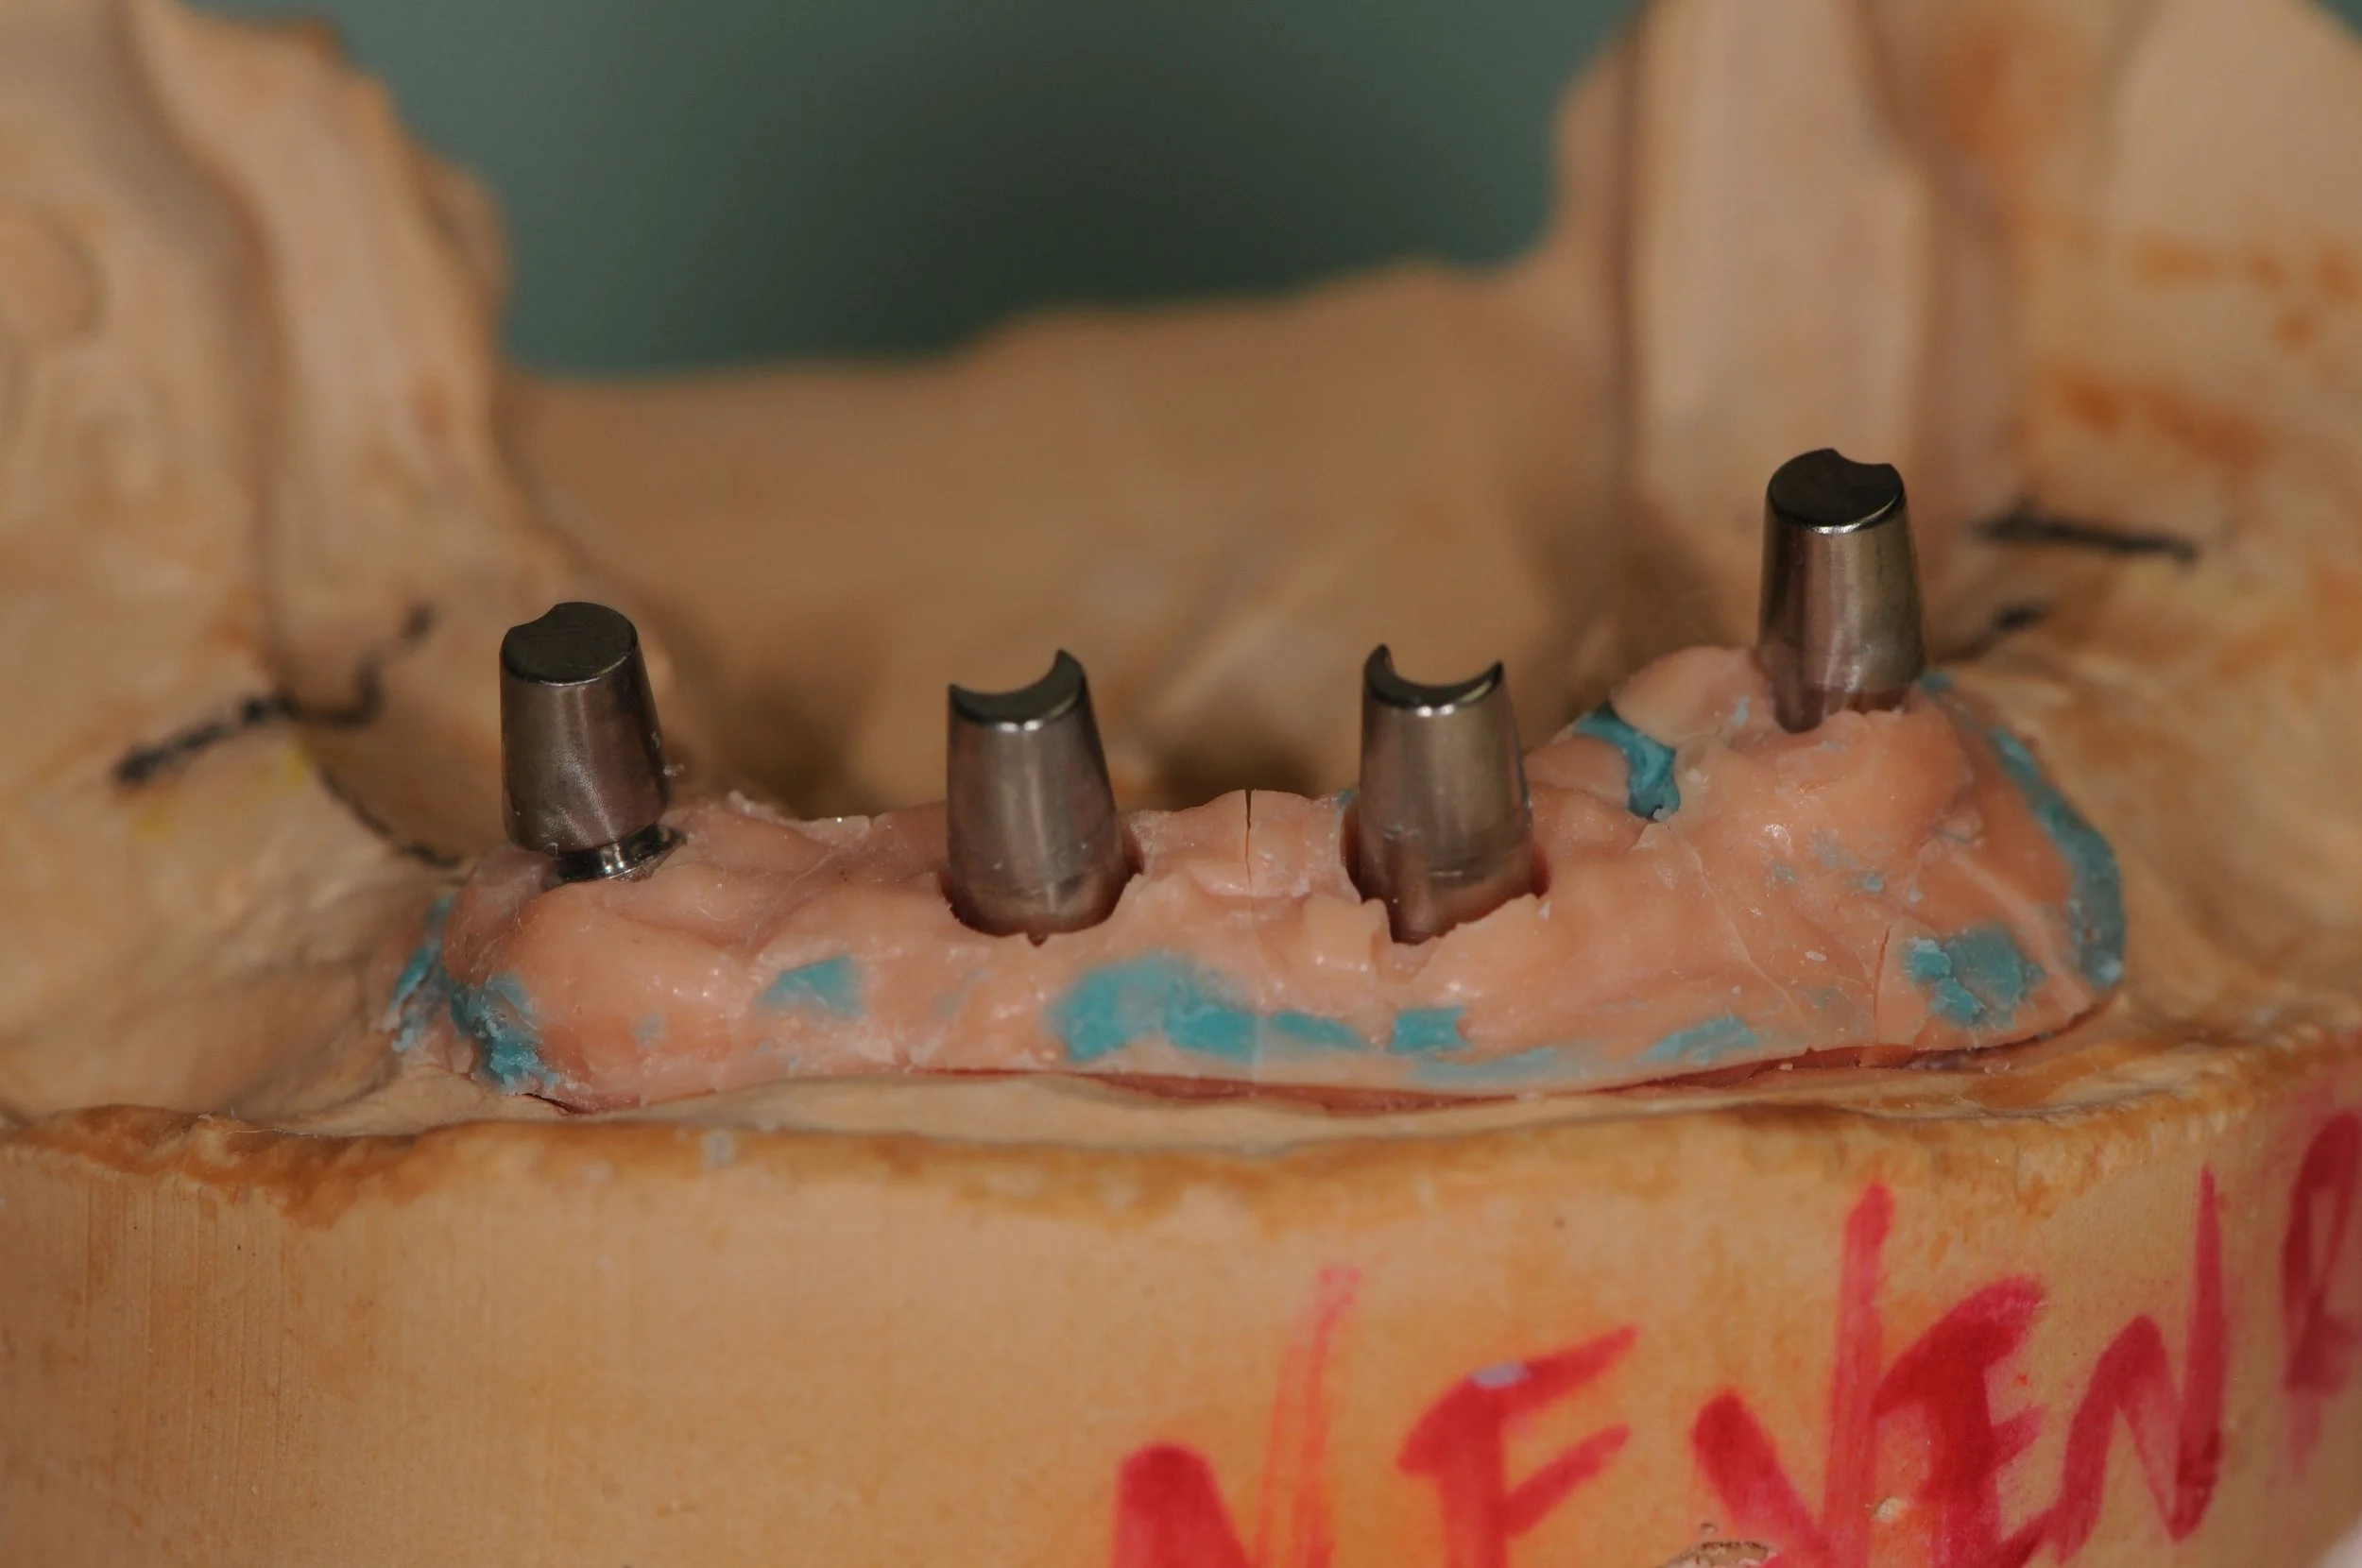
The abutments relative to a replica gum line in a plaster model.
-
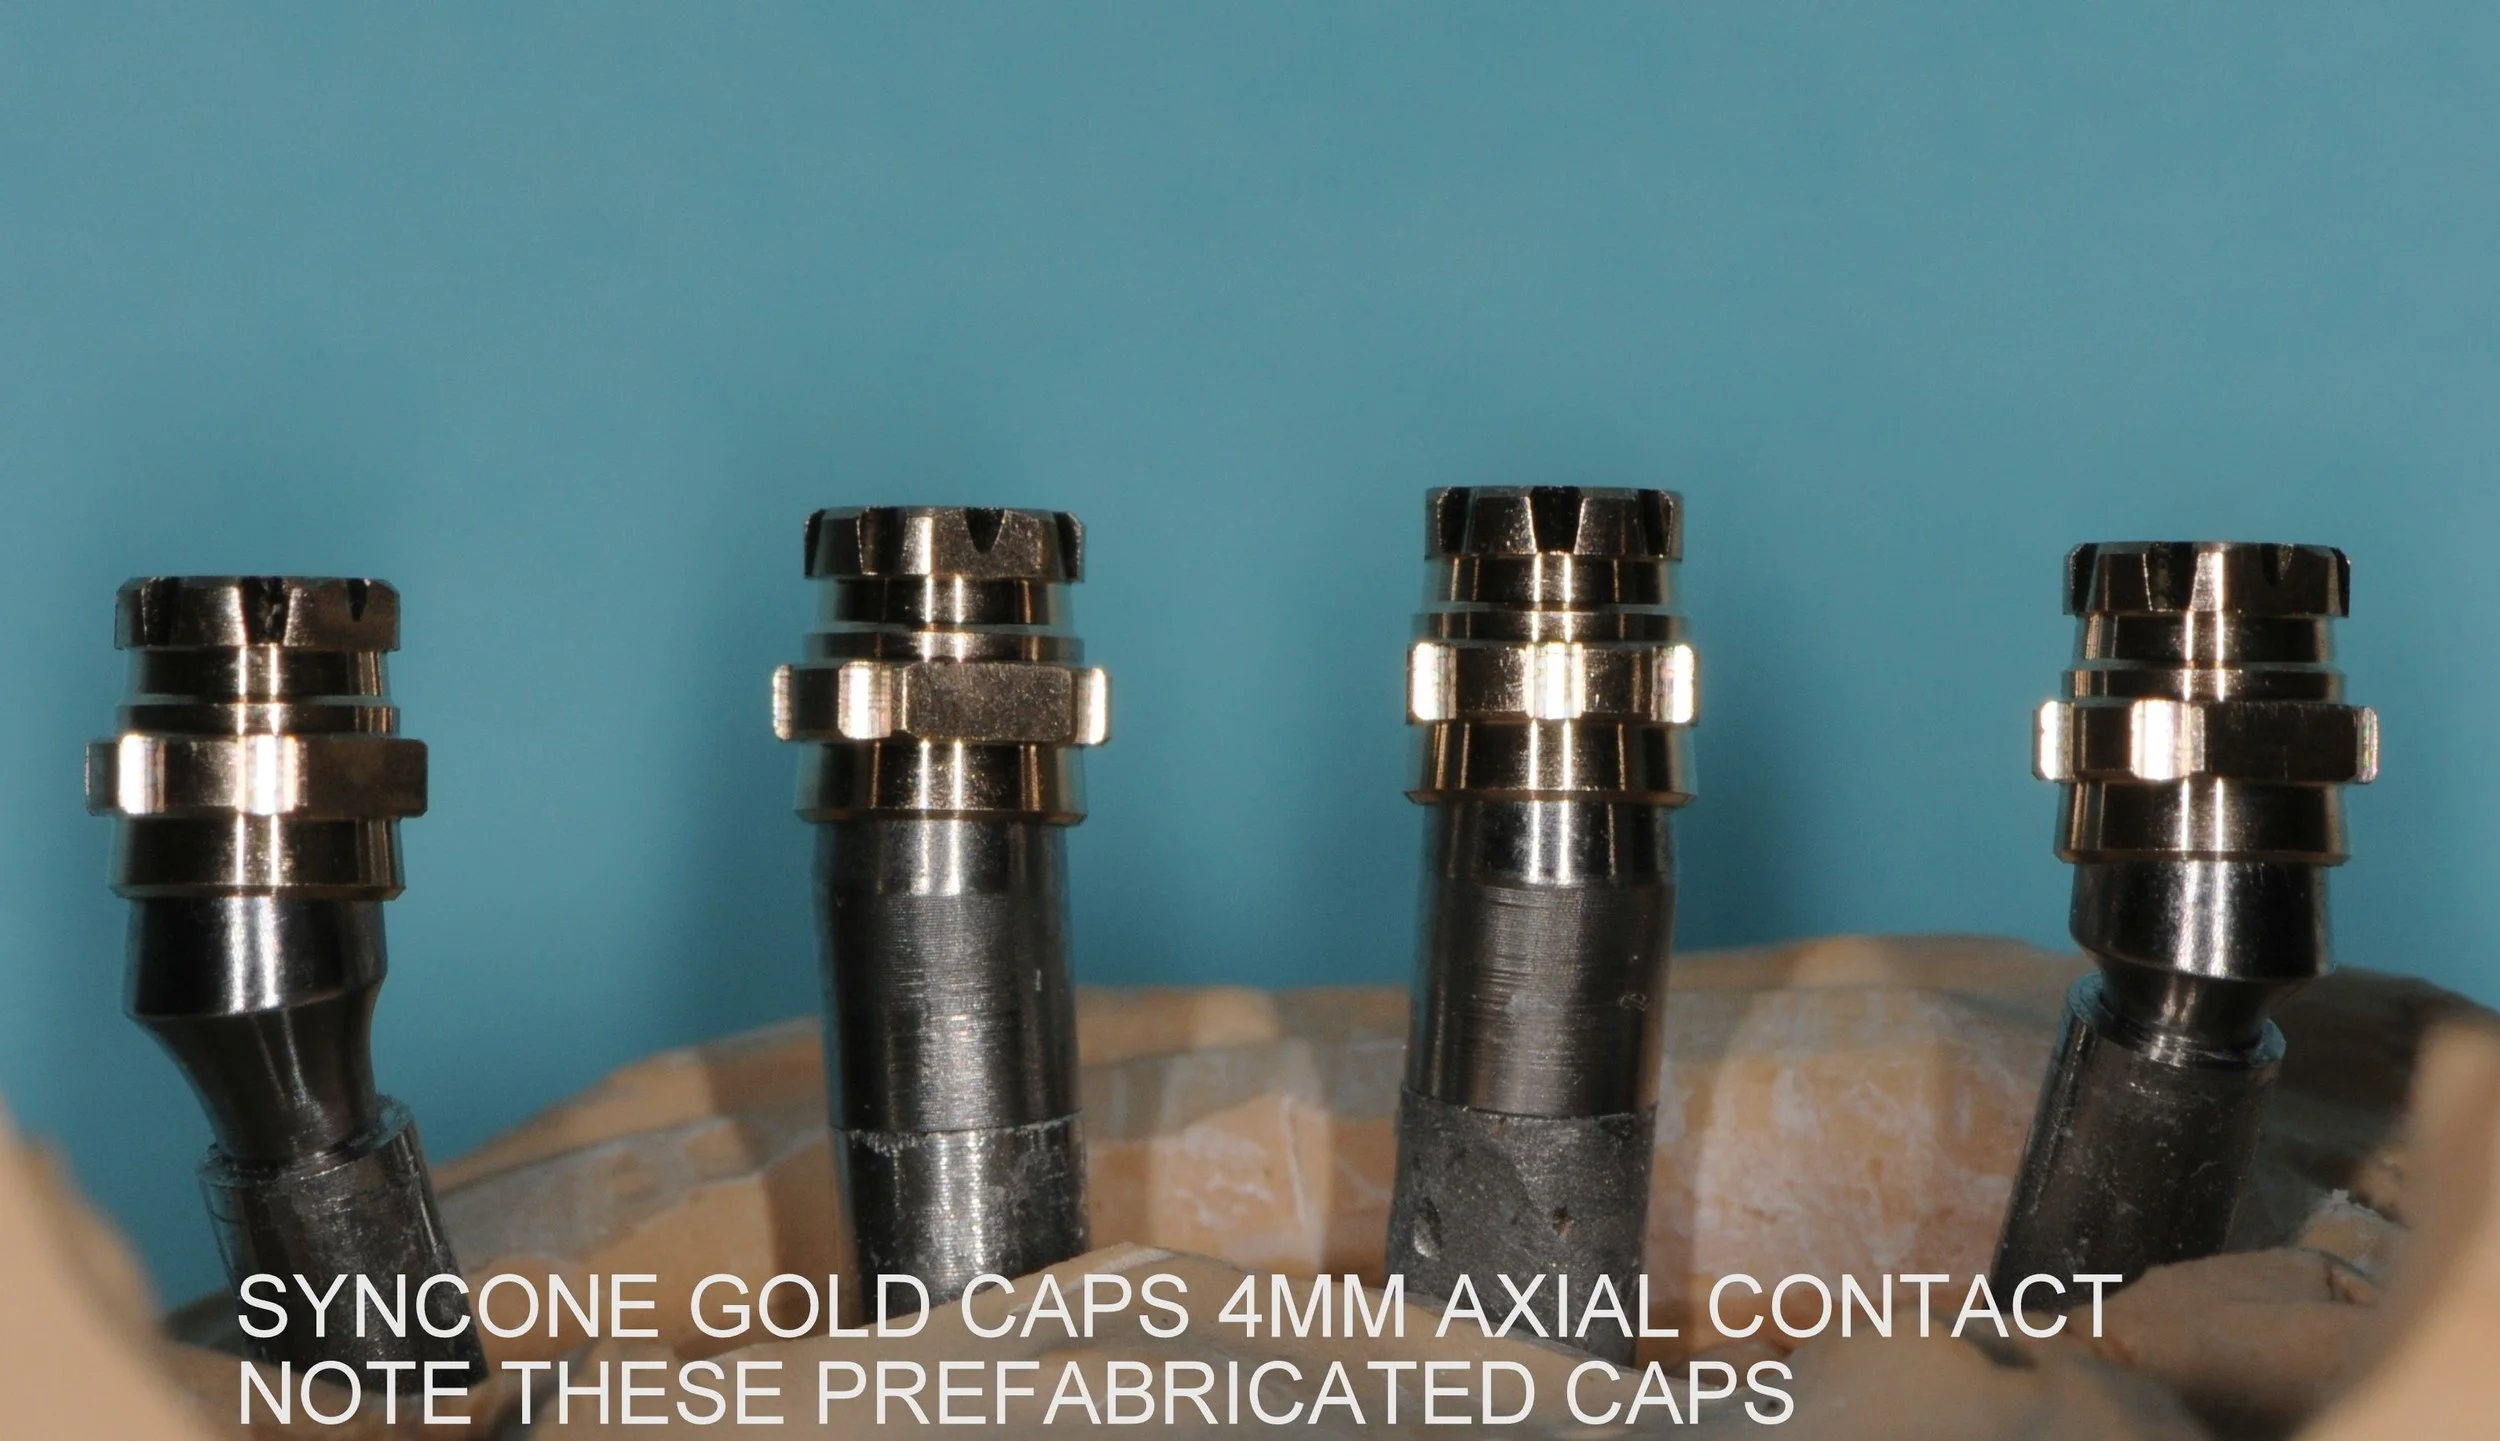
![]()
4 gold prefabricated Syncone caps 4 mm in height and grooved to retain pink denture acrylic resin. These caps have a frictional sliding fit onto the tapered abutments, which will retain the denture during chewing.
-
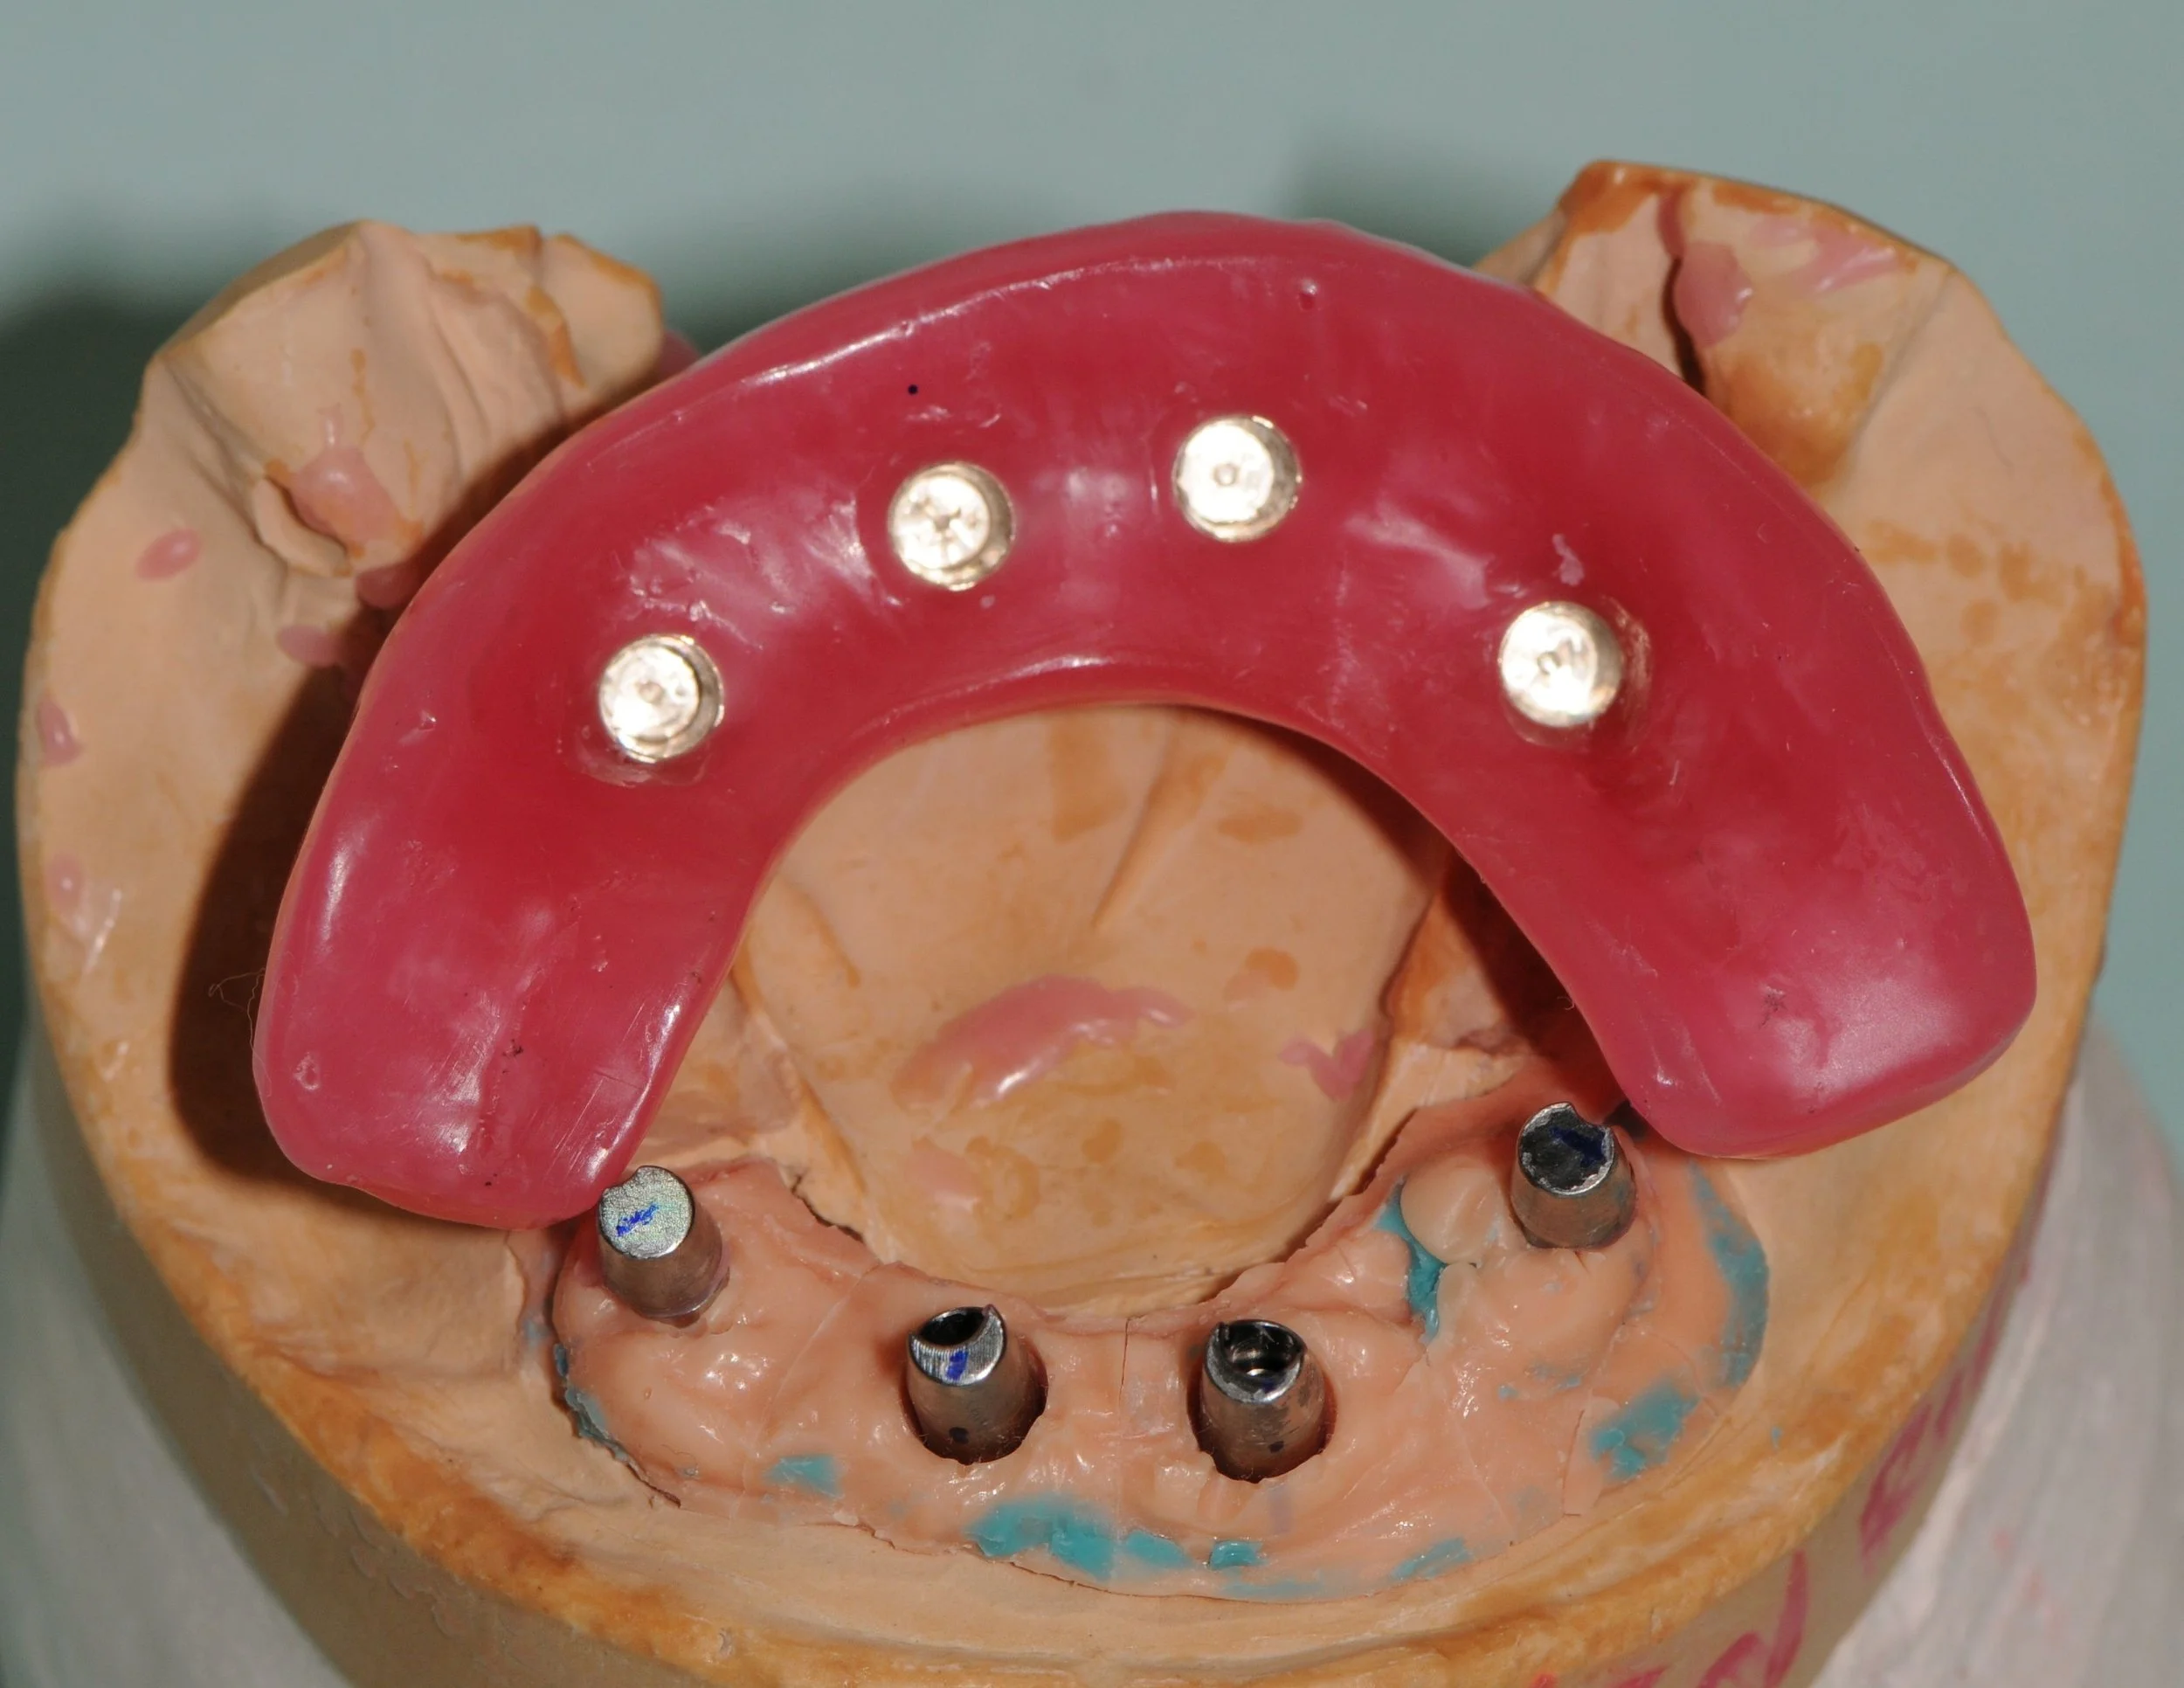
![]()
A plaster model with 4 abutments and 4 gold caps inside a waxed implant denture ready for processing.
-
![]()
The removeable implant denture in place with a normal overbite and the decay removed and fillings placed.
-
![]()
The red carbon paper biting marks on the teeth illustrate a protective balanced hinge bite which is responsible for keeping the lower implant denture stable when chewing.
-
![]()
These abutments are easy to clean following removing the denture.
-
![]()
The final photograph of the implant denture supporting the lower lip and an improvement to the aesthetics of the upper teeth. The patient is currently treatment planned to completely replace the stained top left number 2 lateral incisor with a white bridge and other front teeth with aesthetic Zirconia/Porcelain crowns to colour match the whiter implant denture. The patient has returned twice yearly for a Continuous Care Appointment CCA for examination, fine tune bite adjustment and airbrush cleaning with chalk, air and water around the implant gumline followed by a fluoride application. The telescopic implant denture is now on its 10th year of longevity.

Mission Statement
“As a dedicated experienced clinician my goal is to listen intently to patient’s concerns, issues and their dental requirements. My examination involves a tactile appreciation of their symptoms and a visual inspection of their immediate dental concerns. Dental problems that confront me I find a challenge to solve. My approach involves addressing patient’s emotional requirements followed by my knowledge in engineering, design, material science and aesthetic dental science to problem solve in a holistic manner. The fundamental requirements of conservative management are mandatory to conserve tooth structure, wherever possible, and to find the easiest and least expensive solution while not compromising longevity of dental restorations and prostheses. In every instance creating a dental environment to minimise pain during dental procedures is paramount. I look forward to helping you with your dental treatment to get the very best results performed in a light and cheerful manner.”
Yours sincerely,
Michael Darveniza


SURF ABU DHABI
March 2025